
There has been a lot of progress lately in the Factory...I will warn you that every detail of the FWF will not be posted. As I've transitioned to FWF work, I've been doing a lot of reading/education and I've also been relying heavily on Jason Beaver's great site for guidance. His build is very similar to mine and his site is more detail oriented. I just don't have the time...I'd rather build. He's got some good ideas that I am borrowing. I recommend you check it out.
He, like me, are the last of the "Checkoway disciples"...a lot of the inspiration for my site came from my chats with Dan Checkoway before I started and I know Jason actually knows him personally. His site reflects the Checkoway lineage as well....very well done. Its interesting to me that new builders aren't even aware of who Dan Checkoway is, but if you were building 4 or 5 years ago...his was the 'de facto' build site...he set the standard.
Ok, enough about that...as I said, I've been very busy...lots of things coming together lately, this stage of the build is very exciting. I am hyper-motivated right now.

Cutting my panel inserts, drilling the mounting holes...installing nut plates, etc.

My CAD side panels showed up for fitting. With the JDAir latch that I installed, CAD likes the owner to do his own fitting...cut out around the latch. So they send just the thermoformed plastic with approximate areas for trimming. You cut it to fit and then send it back for covering. Its a little aggravating to spend $45 on shipping to send it back...I think they should cover costs for this, but its not going to keep me up at night.

There were no instructions, so first order of business was how to cut this stuff? Its pretty thin and lightweight, I first tried heavy duty scissors without much luck. Then I said how about my snips? Worked pretty good...tight inside corners were tough but I just did a rough trim with these. Anytime you are cutting something where its crucial not to cut too much (you cant put it back on)...trim a little at a time, as I say...sneak up on it.

Fine trimming was done with my dremel tool...worked perfectly.


No trimming around the Aerosport panel needed...the side panel tucks perfectly behind it.

Starting to look like a finished airplane eh? Well, maybe not quite yet...but its taking shape!

Be aware, you have to do a fair amount of "surgery" on the panel to get it to fit with the side rails and canopy frame. Here is the start...more to come later.

With the SJ cowl, you will need to cut your oil door. I used the circle (shows where the dip stick intersects the cowl) as my target and settled on a 6.5" x 6.5" door. I then cut it out with a jigsaw so I could use the cut out piece as my door. Came out real nice...I have more work to do on this, but this is a good start.


Plenty of builders complain about the cowl fitting...I gotta say I am really enjoying it. The SJ cowl fits real nice and the fiberglass work is far superior to the Van's cowl. I'm very pleased I went this route (talk to me later if I have cooling problems). The fitting does take some time--not done yet, but it is kind of fun to me.

Of course, pics like this help make it fun...with the canopy down and the cowl in place, Wablosa is looking very sleek...sexy even.

Drilling the upper cowl hinge...

Side hinges...I debated how to do my side cowl pins...remove them through the cockpit via a hole in the firewall or do a nice cowl pin cover? I chose the latter...Aerosport Products does a nice set of these...I will either buy theirs or build my own.

Attaching the hinges...standard rivets coupled with "flox rivets". The 1/4" dia holes will get a dab of flox to help with the standard rivets vibrating loose over time.

Flox applied...this bugger isn't going anywhere.

Notice the added piece of alum I used to cover this air gap between the upper cowl hinge and the bottom cowl. Certainly don't need it but I also don't want a gap where I can see into the engine compartment....just a cosmetic thing.

Match drilling the side hinges to the cowl. I did the side hinges last...the last amount of fine tuning can be done leading up to this step, once you lock down the sides it isn't going anywhere. So...tweak it (fine tune it) to exactly where you want it and nail it down with side hinges. I left a 0.040" gap between the two cowl halves for paint...dont forget to allow for paint thickness.

Notice the rivets across the top...I just used my rivet squeezer on these, worked perfectly...don't try to use your rivet gun...not sure why you would though? I will cover these with filler and you'll never know they are there.

I wanted to install my EGT sensors in the exhaust, first though, I thought I would put the lower spark plugs in to make sure I wasn't interfering with them for maintenance. Don't forget your spacers if using auto plugs like me...anti-seize added to the threads.

Dynon EGT thermocouple...this just inserts into a 1/8" hole drilled into the exhaust and strapped down...choose a location 2"-8" from the flange...whatever you choose, be consistent on all four. I went with 2".
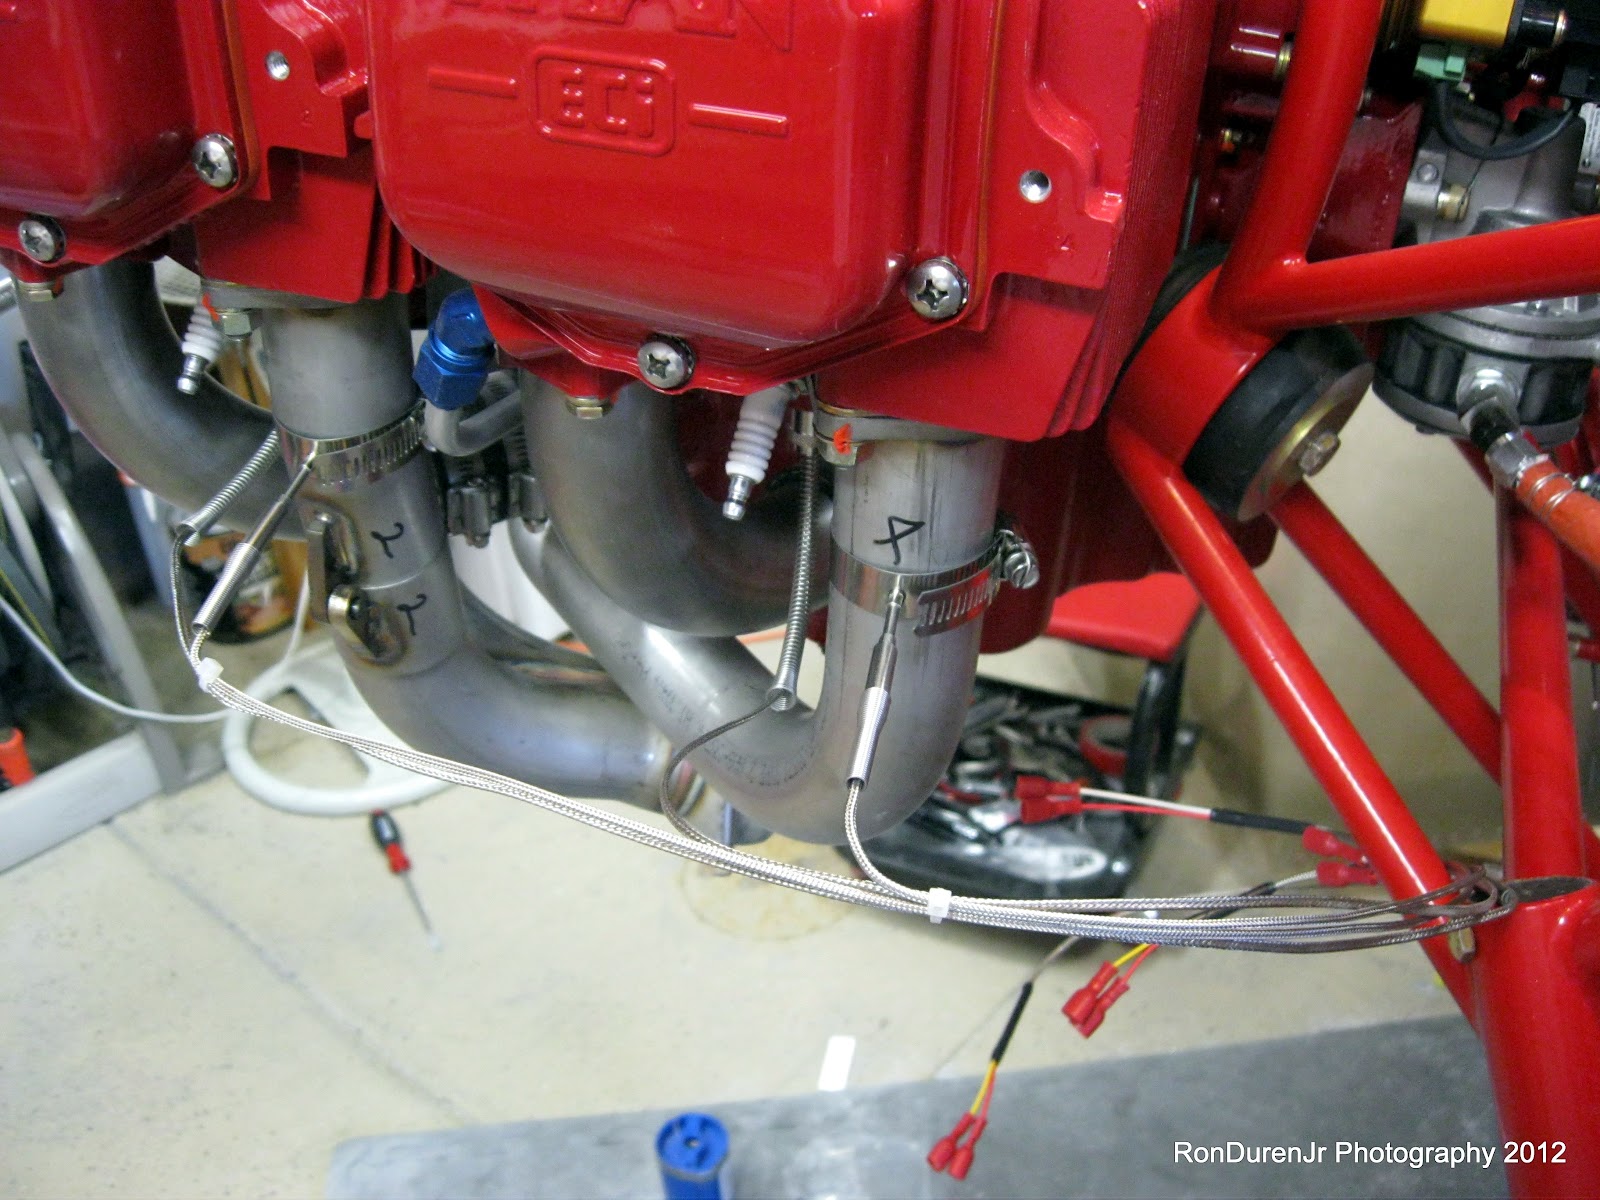
I thought about angling them toward the rear but was worried they may get in the way of the spark plug wires and cause maintenance issues. I knew there was clearance around the cowl so I just stuck them straight out. The cable ties are temporary...I will replace them with high temp versions later. I also safety wired the hose clamps...not a safety of flight issue if these came loose but it could cause a CO problem from an exhaust leak. Also, you dont want these buggers coming loose and flopping around your engine compartment in flight. I say, if in doubt, just safety wire it...you'll sleep better.

Not sure I ever posted this...I was confused where to put my oil temp sensor. I asked the guys at Aerosport Power while I was at OSH...with the 90 deg oil adapter, where does that puppy go? Here you can see where it goes, which is different than the standard filter housing...its the brass fitting under the filter.
No comments:
Post a Comment