Ron's RV7 Aircraft Factory


Welcome to my personal blog. This site was created as an informal description of my build progress in the construction of a Van's RV7 aircraft. A place where family/friends/builders/curiosity seekers can follow along. It is not intended to be a detailed description of every step in the building process as that would be much too time consuming. There are plenty of sites that do a great job in that arena, that is not my intention with this site. My intention is for this to be a philisophical/motivational/inspirational account of the emotional ups and downs of the life changing journey...and it will change your life. I hope this will give you an idea, through my eyes, of what its like to make this transformation. A note to other builders, I am not an expert so do not put your safety at risk by attempting anything you see on this site until you have done your own research, or send me an email so we can discuss it. Any deviations from the plans are not approved, nor endorsed by Van's Aircraft or myself. Thanks for visiting.


Showing posts with label Smoke System. Show all posts

Tuesday, September 2, 2014

Smokin' in Colorado!


Finally got around to getting my last hose on the smoke system hooked up. It was the hose from the tank to the feed line. Not too big a deal, but I had to navigate around some side panels on my interior. I've been messing with higher priority items, so this had taken a back burner, until now. 

Anyway, if you aren't aware, I was one of the first 'beta' customers for Smoke System Helper's new behind-the-seat tank. I painted it black and it really is hardly noticeable behind my seat. If you don't want to remove your tank...this is the way to go. More information on this system can be found on the right side of my page under the label "smoke system".

Here is a snipit video of me doing the first test of the system, no leaks. It took a little while for the system to prime...maybe 20 seconds...but then it was off and running. The smoke flow you see is about halfway open, for comparison. Not sure how this will look in the air, but its a good starting point.

In other news, I just did my second oil change at 85 hrs on the HOBBS. The first one was at 32.8, so I went a little over my 50 hrs threshold. But, other than making a little bit of a mess, nothing to it. Did a quick test flight to make sure all was good. 

This was in preparation for flying down to Denton (DTO) this weekend to watch the Red Bull Air Races with some friends from the Colorado Pilots Association. This will be my second RBAR, the first being over San Diego Bay before they went on haitus a few years ago. Before  heading to Denton, we are going to drop into BAZ, south of Dallas, in New Braunfels, TX for a quick visit to my parents new home.

Loving this flying life! KPR...its all worth it.


http://www.teamchambliss.com/

Thursday, January 16, 2014

Oil Accumulator HOBBS 2514.0 hrs

 
How is this for a view outside my hangar bright and early on a cold, crisp sunny Saturday morning? Summer seems like a long ways off...that's for sure.
 
 
When I decided to postpone the wing mounting for a few weeks, I took advantage of the extra time to research and then decide on adding an oil accumulator to my setup. With the half raven system and now this 1 Qt oil accumulator, I should be able to get 7 seconds of full inverted flight. That will be sufficient for my mission for this plane. Without a counterweighted prop, this is as far as I feel comfortable going with inverted systems. It will allow me to fly sportsman aerobatic competitions without any "cheats". Because this mounts to the firewall, it was good to get this mounted before the wings went on.
 
An oil accumulator controls engine oil pressure during surges or loss of pressure. The way it works is, its a pressurized canister holding a pre-charge of air on one side of a piston and oil on the other. As the engine oil pressure comes up after start, this will compress the air and fill the canister with oil. If the engine loses oil pressure, the air will force the oil back into the system protecting your engine. Once the pressure comes back up (roll upright), it reverses the process and fills back up with oil until the next time you need it. I followed Ron Schreck's of Team Aerodynamix VAF post regarding installation. I am still working out the details of the plumbing however....pics of this later.
 
I ordered mine from Summit Racing (great service and selection). They also have hard to find Aeroquip fittings if you ever cant find what you need at ACS.

 
If you plan to add one, keep in mind, this isn't small...it holds a quart of oil so its gotta be somewhat large. Trying to find a place to mount it wasn't easy.

 
This is the only place I could do it with my setup. Its not ideal since I cant see the air gauge without removing the cowl. I could remote mount it, but I'm hoping its a "set it and forget it" kind of a deal. It should hold pressure pretty well.


Some measurements to give you an idea...its posted on the site also. Again, this is all I have for install pics right now...the hose routing wasn't easy, I have some hoses on order and we'll see how it all goes together.

 
On to other things. I got my prop cable finalized with some creativity. The cables I am using don't have a threaded nut, so I had to capture it with a homemade bracket as shown here. Its 4130 steel so its not going anywhere.

 
As I was getting the prop cable fine tuned...I, of course had to install my center console again. Got it dialed in nicely with almost a full throw on the prop (within about 1/16" for now).

 
A gratuitous FAA shot of me bundling wiring under the panel prior to wing mounting.

 
A couple weeks ago I was using some duck bill pliers to pull on some tie wraps when the tie wrap broke and I proceeded to jam the end of the pliers into my face about a half inch below my eye socket! It hurt like hell! After I cleaned up the blood, I realized my flying career might have ended right then and there. Not many one eyed pilots passing an FAA medical that I know of. Be careful! I went out and bought some nice safety glasses and planned to wear them all the time...which I broke during the wing mounting.

 
Working on wing details...the fuel tank attach brackets need a little bend added to them. Not much to it...add a nut plate on the tank and drill a hole and you're done.

 
Unfortunately I had to remove my tanks to get to a fitting that was buried behind a wing rib on my auxiliary fuel tanks. This was kind of a pain to get to the bolts on the z-brackets. I timed myself, it took me exactly one hour to remove one tank.

 
Lastly, I was finishing up the plumbing for the smoke system. This hose will from the pump to the firewall. Notice the needle valve for fine tuning the smoke oil flow rate.

Friday, September 20, 2013

Smoke Tank Installation HOBBS 2216.0 hrs

 
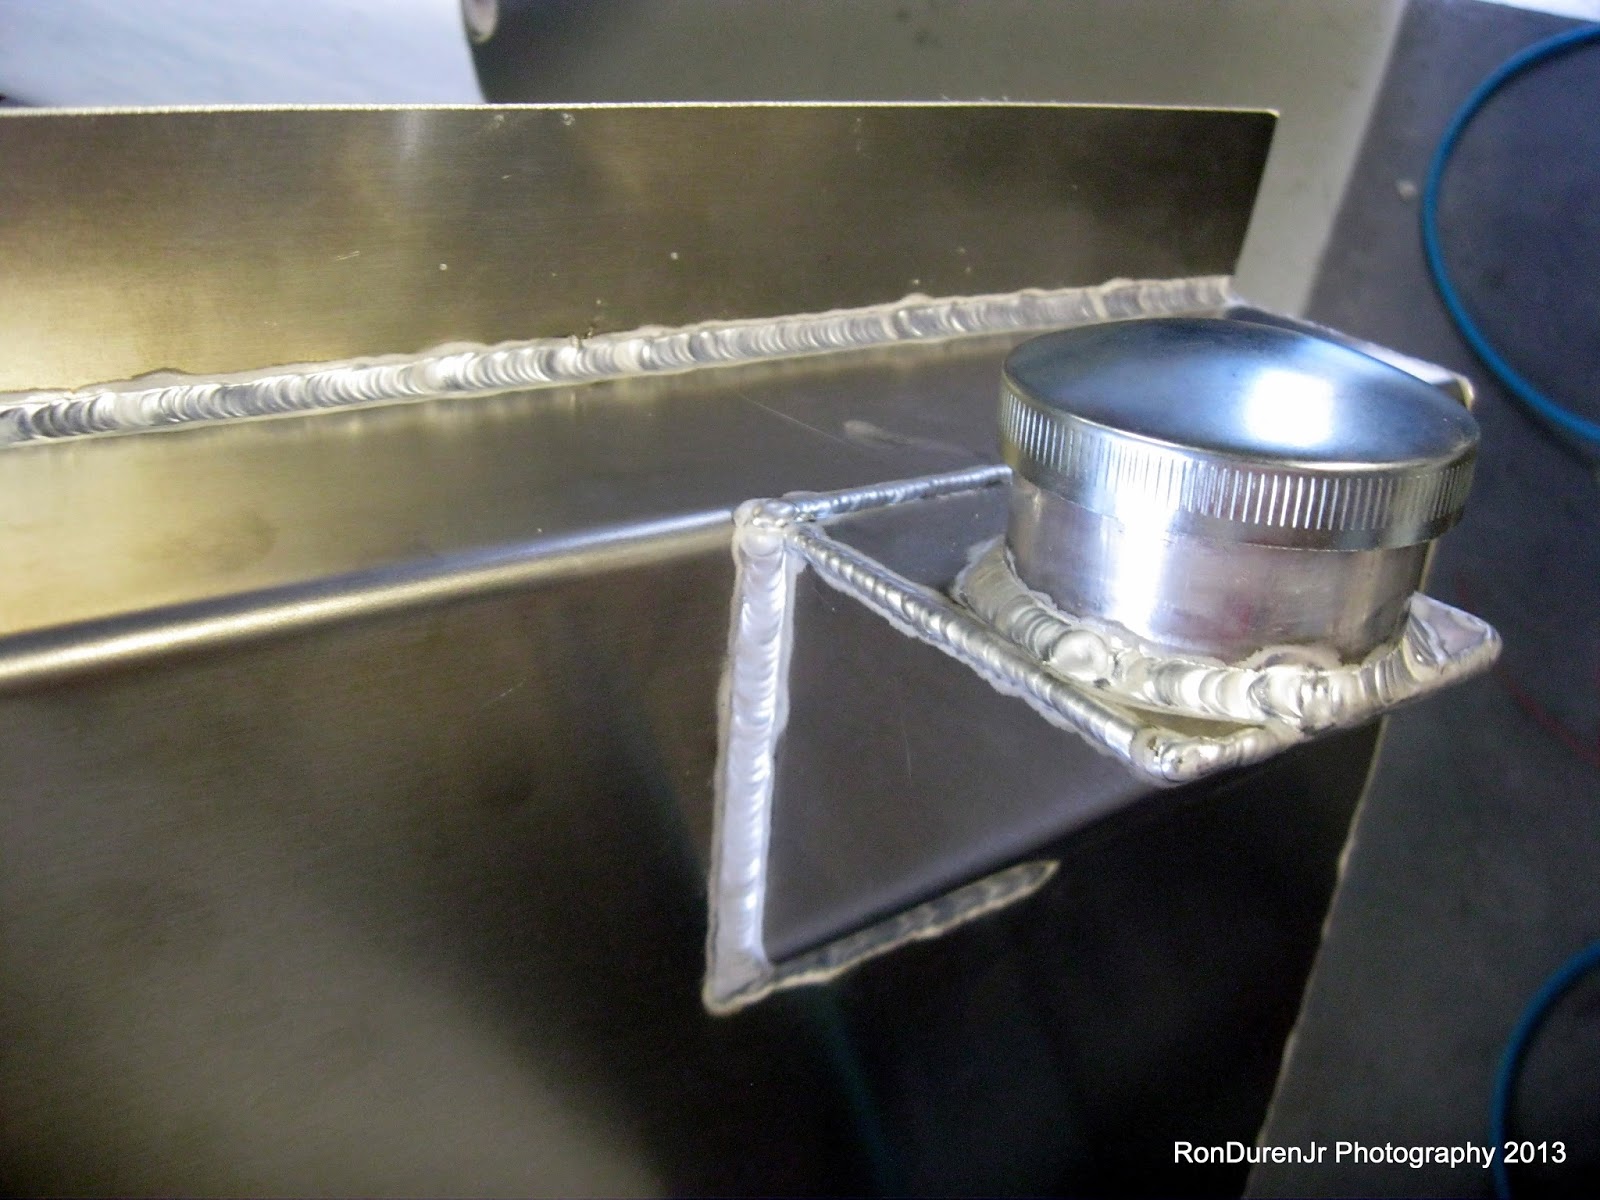
I've been working with Marvin Homsley at Smoke System Helper to install his smoke oil tank. He's been great to work with and always available for questions. This is an aluminum, welded, wedge shaped tank that fits in the unused space right behind the seat in a side-by-side. As soon as I saw this product, I jumped on it as it was exactly what I was looking for. In fact, I am installing the first prototype that Marvin produced. It has a vented cap and a flop tube as part of the tank. I will guide you through my installation with a few posts. Click on the heading "Smoke System" on the right side to see all of them.
 
This first picture shows how it came to me, out of the box. You can see a slight bend in the "leg", not really a big deal as its easily bent back in shape, but a little better packaging could solve this.

 
It comes with a bung hole welded into the tank and fitting already installed. As you can see, this is some nice aluminum welding work.

 
The vented filler cap. I'm not sure if this will create an unpleasant odor of smoke oil in the cockpit, but it is a consideration I will monitor after I am flying.

 
Test fitting the tank. I am putting mine behind the pilot side. Most will do the co-pilot side instead. My reasons are, I don't plan to remove the tank when not in use and I also want to be able to easily remove the co-pilot seat and stick for golf clubs or a snowboard on occasion. If the tank was on that side, I would have to remove it also, which would be a pain. The extra ~25 lbs of a full smoke oil tank on the same side as the pilot will have almost zero effect on weight and balance, the moment arm just isn't big enough to be of much consequence. You can see, this tank will mount to the cross bar and the seat belt bolts.
 
Marvin designed the tank to fit a slider. You can see, with the tip-up, you have the latch bar that gets in the way. You can fit it behind there, but it takes a little coaxing and the bar rubs on the tank. Not enough to cause the latch to bind, but it isn't ideal that it rubs. I plan to work with Marvin on an idea I have to eliminate this rub. 

 
For some reason the angle on the "legs" doesn't match the angle on the floor. Marvin intends for this to be cut to fit so not too much of a big deal.


Here is what it looks like with the seat in place. Plenty of room. Actually, Marvin could have easily made this tank a little bigger in my opinion.

 
Time to start trimming the legs. This was my first cut, to get it more in line with the floor angle.
 
 
I don't like sharp edges, so I added some nice radii and drilled my hole to match the seat belt mounting holes


Getting the tank positioned to drill into the cross support. Make sure you have room for your hose fitting coming out the side before committing. Check...and double check...goes without saying at this stage of the build.


I used some nice large fender washers and AN3 bolts to distribute the load in case of a frontal impact in a crash situation. Also notice, I added radii to the mounting flange also. This flange is a little big, if you are lightweight proponent, you could trim this down a little.
 
So, that is pretty much it for the tank install...it was pretty straightforward. I plan to paint my tank black to match the rest of the interior, and when I do, you will hardly even notice the tank is there. I was happy with how this came together.


Moving on to the smoke oil injectors. Marvin will sell you the wider clamps with the holes already drilled, which is nice if you've ever drilled stainless steel, you'll know its a pain. I have two injectors, one for each pipe. Really simple to install...


Drill your 1/4 diameter hole, insert the injector and fasten with the strap clamp. Be careful not to tighten these straps too much as they easily will deform your pipe...ask me how I know? :) Next post will focus on the hose routing and final details to make it all come together.

Wednesday, August 7, 2013

More Center Console Work HOBBS 2137.0 hrs

Google blogger has been giving me fits lately. You know you can't complain too much for something that is almost free, but the editing on this site is pretty bad. I just updated my Internet Explorer to 10 and that has seemed to fix my issues, but I am definitely behind in my posts because of this snafu. 
 
Anyway, airplane stuff...busy, busy, busy in the Factory...and no, I'm not done yet. Thanks for asking. :)
 

So, because I am just about sick of messing with wiring, I have been on an extended break from it while I tend to some other items on my list that don't involve flowing electrons. Namely, the last details of the center console...which includes work on the control cables, throttle quadrant and now...the smoke oil pump.
 
I recently decided to buck the trend and not use Smoking Airplanes for my smoke system. I realize just about everyone uses that company, partly because they are the only game in town....or so I thought? Although I have heard good things about Smoking Airplanes and am not here to bash them in any way...comments like, "their kit is all inclusive", "they have great support" and "the instructions are good."
 
My problem with them is, #1...their price is expensive in my opinion at almost $1000 for a system and #2, I think their "kit" is a little bit of overkill to some degree which I guess drives up the cost. At this point in the project, I am just about sick of spending obscene amounts of cash...I am crying uncle!
 
I had intended to build a triangular shaped fiberglass tank that would fit behind my seat, and then buy the Smoking Airplanes kit without the tank (still $689). I thought this tank was a great idea (sure, I realize I might be biased), and also thought it was original  as I hadn't seen anyone else do it? Well, turns out I was not the first to come up with this clever idea. Marvin Homsley of Smoke System by Homsley Aircraft created a 4 gallon welded aluminum tank with flop tube and vented cap that is exactly the concept I was thinking. Even buying this tank at $300, I will be well under the Smoking Airplanes cost of a system. It was a no-brainer for me after exchanging some emails with Marvin. I will be his first customer for this tank and I will do a full writeup later on my experience.
 
Ok, so, getting started...although I don't have the tank yet, I did buy the pump and injectors from Marvin. The problem was...where to mount the pump? Marvin was planning to mount it on the other side...behind the seat that doesn't have the tank. This would be fine, but I want to put a Bison RV flight bag there...so I needed to come up with an alternative.
 
As you probably know...space is pretty tight in these buggers so my options were limited. I considered mounting it FWF...mounting it behind the baggage bulkhead...but in the end, I decided to use up the relatively unused space in front of my center console and boost pump as you can see from the picture above.

 
A shot of the throttle quadrant in place...I need to come up with a mounting scheme for my control cables which I'll show later. As you can see, my center console is designed to come out in pieces for ease of maintenance.

 
Its nice that I can work on this sub-assembly on my workbench.

 
As a Mechanical Engineer...I am a stickler about "strain relief" with my wiring...don't forget this. These two pics show my adel clamps to secure the wires coming out of the pumps. Again, both pumps can be unplugged and the entire sub-assembly removed for maintenance.


The problem with this arrangement is the smoke oil pump is a little wider than the center console. I suppose you could just leave the pump and its hoses exposed to your feet...I didn't want to do that. First, it looks unfinished...and second, its a catch point for your feet. Even though its not a flight critical system, I didn't like that. So I built a couple "wings" to clean it up a bit.

 
Yes, it does cut down on your foot space but it is easily clear of my feet while on the rudders. It will be fine, I knew putting in a center console would limit my foot space a little anyhow and I'm ok with that as a tradeoff. I sat in the cockpit for quite awhile like this (had a beer actually) and it feels very comfy to me.


Here I am fit checking and tweaking the whole shooting match...seats, console, quadrant. This kind of gives you an idea what the finished product will look like. The red leather on the armrest is a piece of sample that Luke at CAD sent me when I was selecting my seats. I am quite pleased with how this is coming out. Notice the automotive console plastic spring latch that I picked up through Auto Zone...seems to work fine for my application. 


These last shots show my access panel for the throttle quadrant.