Ron's RV7 Aircraft Factory


Welcome to my personal blog. This site was created as an informal description of my build progress in the construction of a Van's RV7 aircraft. A place where family/friends/builders/curiosity seekers can follow along. It is not intended to be a detailed description of every step in the building process as that would be much too time consuming. There are plenty of sites that do a great job in that arena, that is not my intention with this site. My intention is for this to be a philisophical/motivational/inspirational account of the emotional ups and downs of the life changing journey...and it will change your life. I hope this will give you an idea, through my eyes, of what its like to make this transformation. A note to other builders, I am not an expert so do not put your safety at risk by attempting anything you see on this site until you have done your own research, or send me an email so we can discuss it. Any deviations from the plans are not approved, nor endorsed by Van's Aircraft or myself. Thanks for visiting.


Showing posts with label Engine. Show all posts

Friday, July 13, 2012

Engine Details HOBBS 1385.0 hrs

The engine is hung, as you've already read...going back in time, here are some pics of the stuff that came with it. I had one reader (Bob C.) ask what was in the box? Well, here is the answer.

First, a couple specs on the engine. It is an IO-375 from Aerosport Power in Kamloops, BC, Canada. It is rated at 195hp. The documentation that came with the engine did not show a dyno hp rating from testing. I called and asked about this, they stated that it had dyno-ed 198-202hp...which they said was "healthy" for this engine....I agree, a 200hp +/- 2hp engine sounds kinda nice doesn't it? I'm not entirely sure why this kind of data wasn't included with the engine...but I have my ideas why they wouldn't send it by default.


Lycoming engine manual...my engine is essentially the same as an IO-360-B1B. There isn't much information in here about installation or good pictures so don't get your hopes up...it covers mostly maintenance issues.


A packet containing several documents and informational brochures, including an engine log.


My Precision Silver Hawk fuel injection servo...nice looking piece of machinery.


Firesleeved hoses...although, not entirely sure what these are for yet...?


Oil sump heater installed by Aerosport...this should be plenty sufficient for Colorado winters (this isn't Minnesota or Wisconsin), a block heater is the other alternative, but would be overkill for me.

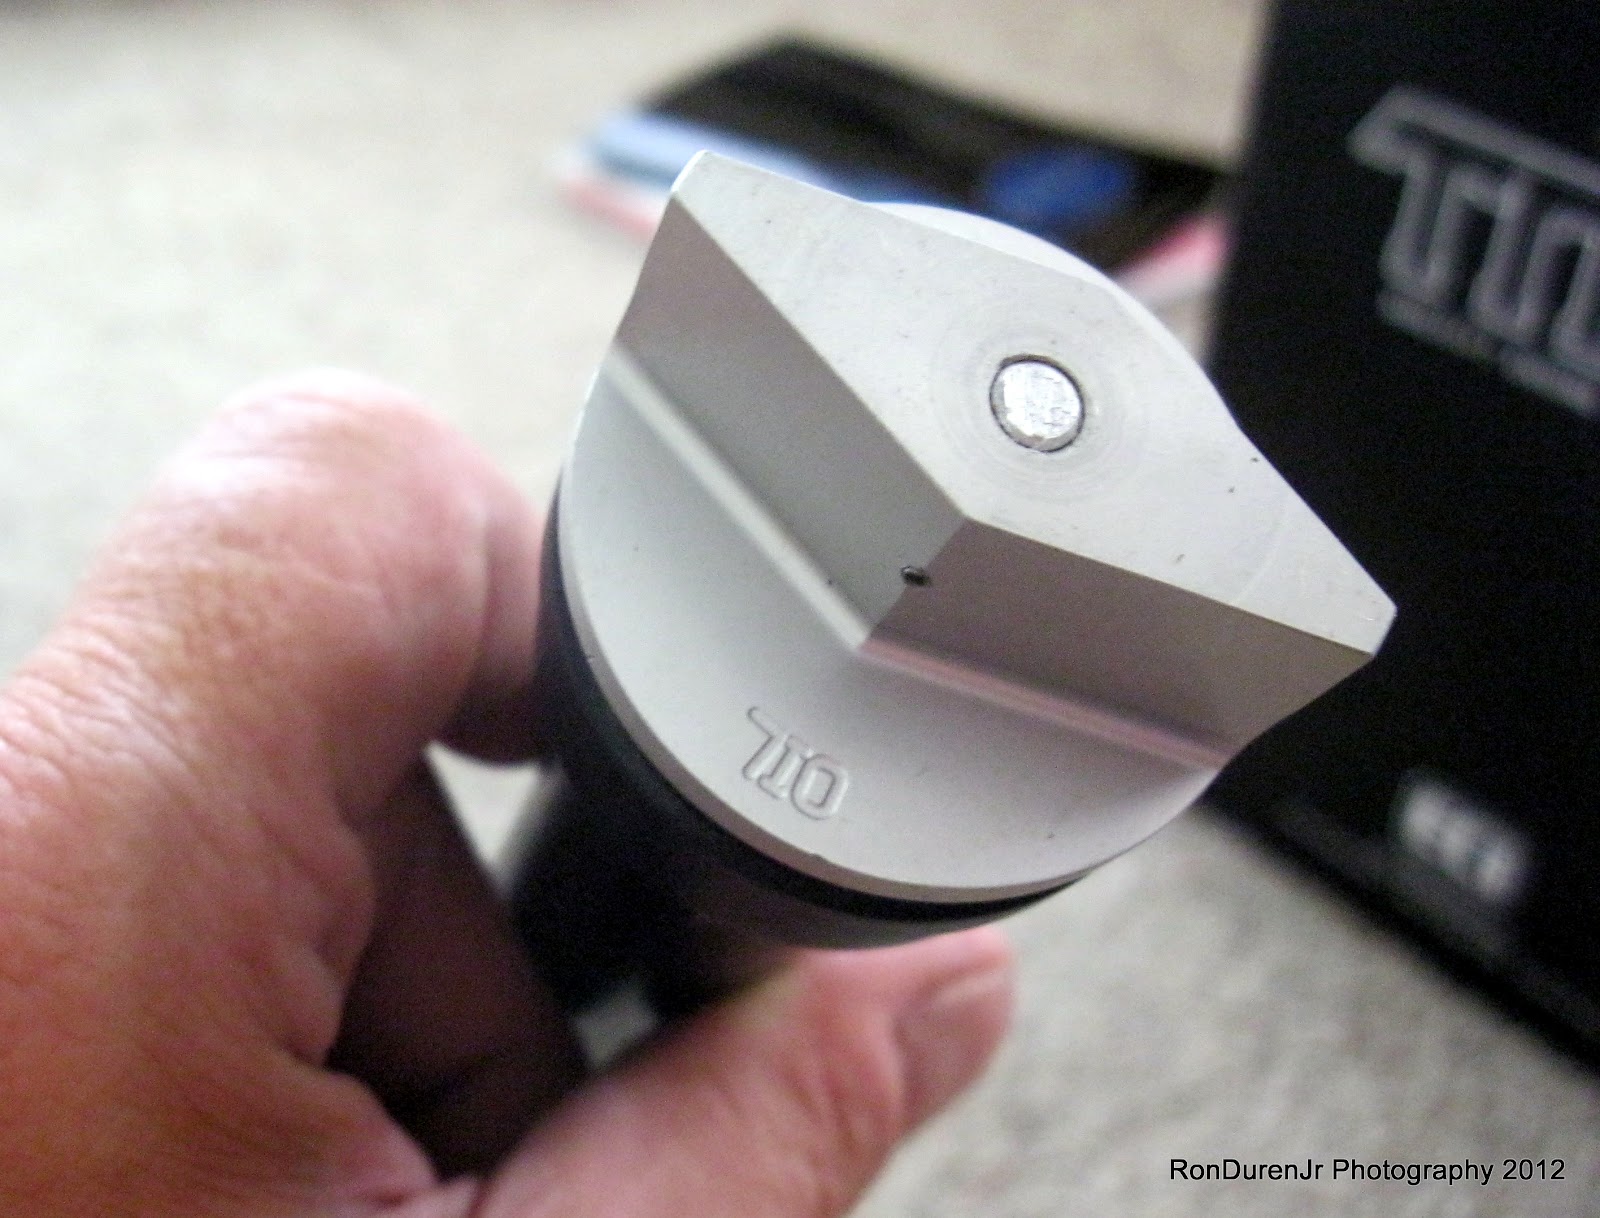

Oil filler/dipstick...this was protruding out of the top of the box when I got it, which seemed like a strange way to ship it...but hey, it worked.


A couple complimentary t-shirts...nice gesture by Aerosport Power


Auto plug wires for the dual P-mag system...this will save cost on buying aviation grade spark plugs and these supposedly work just as good.


Some hoses and decals came with the P-mag's...


A gasket and install kit for the prop governor...


Not sure yet what this cable harness is for?


Spark plug spacers to accommodate the auto plugs...spin these onto the spark plugs finger tight and then install the sub-assembly on the engine


8 plugs...two for each cylinder


Red touch up paint...which I have already used...it looks and applies like fingernail polish


60A Plane Power alternator


Lightweight SkyTech starter


Fuel distribution spider on top of the engine for the fuel injection system


90 deg spin on oil filter option...


The engine driven fuel pump on the left and mounting pad for the governor on the right


Wires hanging down for the oil sump heater...I taped these up so I don't accidentally damage them


A pic of one of the P-mag's...I went dual P-mag's...I debated one P-mag and one slick mag right up until the end. I just thought, if I am going to embrace this new technology, lets jump in with both feet. It remains to be seen if I regret this choice down the road...I do think they have stabilized the P-mag design quite a bit since the early models. For education...the difference between an E-mag and a P-mag is that the P-mag has its own backup power source in case of system electrical failure. You can read more about it on Emag Air's website.

Tuesday, July 10, 2012

She's Hung! HOBBS 1385.0 hrs

Well, the BBQ/hanging party was a big success! We actually got the engine hung...had some good food, cold beverages and great company. I cant thank everyone enough for all the help...I felt a little guilty, I really didn't do much except man the hoist. Hanging an engine, is at a maximum a 3 person job, any more than that and you are just in the way. The excitement and enthusiasm of my crew kind of pushed me to the side believe it or not. :) Which was fine, it was kind of fun to sit back and watch it all go down.

A couple things before I launch into this post. As you can see, its been awhile since my last blog entry. Not for lack of activity, that's for sure...I was just entertaining my family for 8 days so computer time was not on my agenda. In about a week and a half, Dad (for 8 days) and I racked up 52 man-hours on the plane! I've said it before and I'll say it again...having another person who has knowledge of aircraft construction helping is HUGE! If ol' Pop lived here in the Denver area, this plane would surely be flying by now. Even a week with him around was a very welcome surge in progress. Thanks Dad.

Because of my lapse in posting...I have a lot to catch you up on, so expect quite a few pics/posts coming up in the next few days....


One last pic of me (notice my "SOS Bros Beer Venture" t-shirt from last year...already getting in the mood for OSH!) and the engine on the hoist before we lift it into position to hang it on Wablosa.


Bob, my Dad and Bryan take a peek while Scott looks on...


My Dad and Bryan working on those pesky four bolts...yes, only four bolts...


The ladies lend moral support to the hanging crew...


Scott and Chuck share some conversation...later they got sucked into the vortex of helping, but for now they are fine with just watching.


Gary also stayed out of the mix early on...chatting with the ladies. Gary probably had the most experience hanging engines, but he kept saying, "we needed to learn", so we struggled...and learned. :)


Now, Scott gets involved...with a bottle jack and some 2x4's for spacing...


My nephew Gabriel and Dad look on as Scott wrestles with the engine and the bottle jack...the top two bolts are in, but the bottom two are giving us trouble at this point.


It was an interesting scene as 3 or 4 of us feverishly worked on hanging the engine while everyone else casually visited...with each group in their own world, oblivious to what the other was doing.


Finally after over an hour of jacking/prying/wiggling the engine, Gary gets involved. "Hand me that 1x2 Ron"...what!? "Gary, do you know how much that engine costs??" ;) After he explained what he was going to do...and it was wood (not metal) so it wouldn't damage the case, I gave him the go ahead to pry on my engine...gently please!


It worked...we finally got the last bolt in! It took about an hour and a half for the entire process...but she is hanging! I've been told you can do this in 15 mins...but I have to see that to believe it--I had a lot of experienced guys helping and it still took us that long to get it done. It just takes a while to get the engine in just the right position to get those bolts in.


Scotty holds Gabriel for a pic with the engine...one day I hope to teach Gabriel how to fly in this airplane so this will be a cool pic to look back on for him.


Bob and Bryan look on at a job well done...time for a cold one!


So...what did we learn tonight boys?? Bob, Sean, Gary and Chuck discuss....


Later, after everyone had gone home and the family went to bed I just sat out in the shop looking at my newly hung engine for about 45 mins savoring a celebratory Stranahan's whiskey...and snapped a self portrait. What a huge milestone this is...it all kind of hit me in that moment, that this all might become a reality...me flying this thing one day. It was a long day and I was exhausted, but what a great day it was!


The next day, I finally got Pop to pose with the hardware...


I was honored to have Scotty sign the avionics bay (8/13/12 edit)...


After the engine was hung...we had BBQ-ed Carne Asada tacos, Sangria, beer, chips/salsa, jalapeno pigs in a blanket, jalapeno's filled with cream cheese and wrapped in bacon, pie, rice crispy treats...you name it...it was quite a Mexican style feast!

Then, of course, we had to discuss important 'pilot' topics...GPS "Track up or North up?"...boy was that an interesting and sometimes heated conversation--with the pilots being divided about 50/50. I fall into the "Track up" camp...


I turned my Holy Cowl into a chip dish for the party...with internal lighting! ;)


The next day, I went back and torqued and cotter pinned the bolts. A few days later, I was reading the Van's instructions carefully and checking off items we had done, and it mentioned..."don't forget the extra washer on the bottom mounts". I scratched my head for a second, extra washers??...and then remembered I had two large washers left over from the mounting hardware which seemed strange to me. Hmm, a couple seconds later I put two and two together...Doh! ...we forgot two washers!! This photo shows how we had it...one large washer against the case and one small washer on the back side.


This photo shows the correct arrangement...notice the added large washer on the back side now. So, two large (1 on each side) on the top mounts..but four large (2 on each side) on the bottom mounts for a total of six large washers. The drawings show this, but somehow we missed it....maybe it was the alcohol?? It was pretty easy to slide these bolts out one at a time and swap the washers though so no harm. Getting the cotter pins off was the hardest part. Just pay attention to your bolt/washer arrangement...its important to get this right, its not trivial for these washers.

Friday, June 29, 2012

Almost Time HOBBS 1333.0 hrs


I just wanted to post a real quick update on my progress, or lack thereof. If you've been watching my HOBBS meter in the last month...you will notice I have been kind of stuck in quicksand lately. The reason being, I was getting the house ready for a visit from my parents...out from Ephrata, Washington. But, thats behind me...they have now arrived, and the engine hanging party is all setup for tomorrow afternoon...from the RSVP's I've recieved, its going to be a good turnout. As you might guess, I'm pretty excited for the ceremonial event and some good company.

Oh, and from my last post...both my Dad and Bryan Raley suggested I put something under my engine while it is in the hoist to help support it. Good advice and good insurance...consequently I put some 2x6's under the mounting brackets to remedy this. Not sure it would go anywhere hanging from the hoist, but better safe than sorry.

For any of you that are coming to the engine hanging...I look forward to seeing you tomorrow...if not, I will be posting pics from the event here on the blog. If you are in the U.S., enjoy your Independence Day holiday...happy birthday America!

Friday, June 22, 2012

Engine Arrives!! HOBBS 1330.0 hrs


Yesterday, June 21st, I got a call from the freight company saying my engine was ready for pickup! Of course, I wasn't expecting it just yet (they said 7-10 days and its been about 5 days I think?) so it caught me a bit off guard...but definitely great news. After making some arrangements to get an engine hoist, I asked them what time they would be open today...they said 6am til 6pm. Well, guess what time I showed up to pick up my shiny new red engine?? Yup...6am of course!

Just wanted to post some quick pics to mark the day. I will write more later. As you can see from the pics, the crate was atrocious...totally destroyed, as good as Aerosport Power's engine reputation is, they could learn a lesson or two from Van's on how to properly crate something for shipping. I actually hand lifted the top of the crate off the pallet because it had been so badly damaged and wasn't even attached to the pallet anymore.

But...the good news is...nothing inside was damaged and the engine looked immaculate! So, as bad as the crate looked...I guess ultimately it did its job to protect the contents. I certainly did cringe when I first seen it however.

Special thanks to Mr. Gary Zilik for letting me borrow his engine hoist to unload it. He told me it has lifted many Lycoming's over the years. I owe him a beer...or two...which I will gladly give him at my engine hanging party.


How it looks when you lift the top crate off...engine and "goodies" box...that rod sticking out the top is my dipstick.


Very securely bolted to the pallet with 1/4" angle iron...that is surely what kept it undamaged.


Isn't she purdy?? A chrome package would've been nice...but for $500, I figured I could live without it.


Ready to be hoisted out of the truck...of course, I was a nervous wreck having my new baby suspended 5' off the ground.


And because I wasn't thinking ahead...I didn't add an extension of chain before picking it up so it wont lower far enough to set it down on the shop floor. It'll be fine as is, on the hoist, until we hang it next weekend.