
Tuesday, January 31, 2012
RV7 Video HOBBS 1109.5 hrs
I saw this very good RV7 video posted on VAF...nicely done by these gentlemen...and a nice looking RV7 as well--even being a 'slider.' Enjoy...just in case, you still need inspiration to build one of these 'sports cars' of the sky. ;) Looks like a lot of fun doesnt it?
Monday, January 30, 2012
The 'Big Cut' HOBBS 1109.5 hrs
 Although this week's hour total was down (10 hrs), it was a grand week nonetheless. Saturday morning I successfully made the 'big cut'! To you new builders, the big cut is the cut that splits the canopy in two. It is one of the more common areas to inadvertently crack your canopy so its stressful to most builders. In addition to the added stress of doing it...it is considered one of the bigger build milestones. I started out Saturday morning with the intention of doing it Sunday...spending Saturday getting the canopy trimmed up and everything ready to go for a fresh start Sunday. But...everything went so well that I was ready before I knew it and thought..."why not today?" So, after a little bit of deliberation I jumped into it! The anticipation was off the charts...excited but nervous.
First things first...I needed to prepare the "operating table" for this delicate procedure on the patient. Plexi likes warm temps and gets cranky when its cold. My shop temp on Saturday morning was 60 degs. Some guys wont cut their canopy until they have it 80 degs in the shop...as you'll see, I think that's overkill...with a caveat. No doubt, warmth is good for the plexi...I used what I would term "local anesthesia" rather than "general anesthesia". No need to heat the entire shop...just the plexi. I drilled a clearance hole in the center of the operating table for my small space heater cord. This ended up being plenty sufficient as the plywood directed the heat directly onto the plexi...just to give you an idea, it was toasty to the touch during the cut.

Get the canopy cut close to the size you want...doesn't have to be perfect, in fact Van's says it will shift slightly after the big cut so don't final cut it to size yet. Just close enough to get a representative fit. Here is my rough cut line on the front.


Once it is trimmed up well...position it correctly fore and aft and on centerline. Double check everything...mistakes cant happen during this process.

I strapped it in place once I had my positioning correct. I marked the cut line down the center of the roll bar. Once this was done I then installed the rear canopy skin over the canopy to trace the line where the skin overlaps the canopy.

Mark this as a "no cut" line for reference....just to be safe, I also put it in red. Cutting that line by mistake would render the canopy junk!

With everything marked for cutting...carefully move the patient back to the operating table. The idea is that NOTHING moves during the cutting process. The table will take care of most of this, but other precautions should be taken. Van's instructions are very good and I followed them almost exactly. In this photo you can see I added a piece of duct tape across the bottom span of the canopy to keep it from springing out during the cut.

Duct tape is added on either side of the cut line to keep it protected from a slip. Position the canopy so that you can make the entire cut without having to reposition the canopy during the cut...this is very important to think ahead, before starting the cut, so you can achieve this.

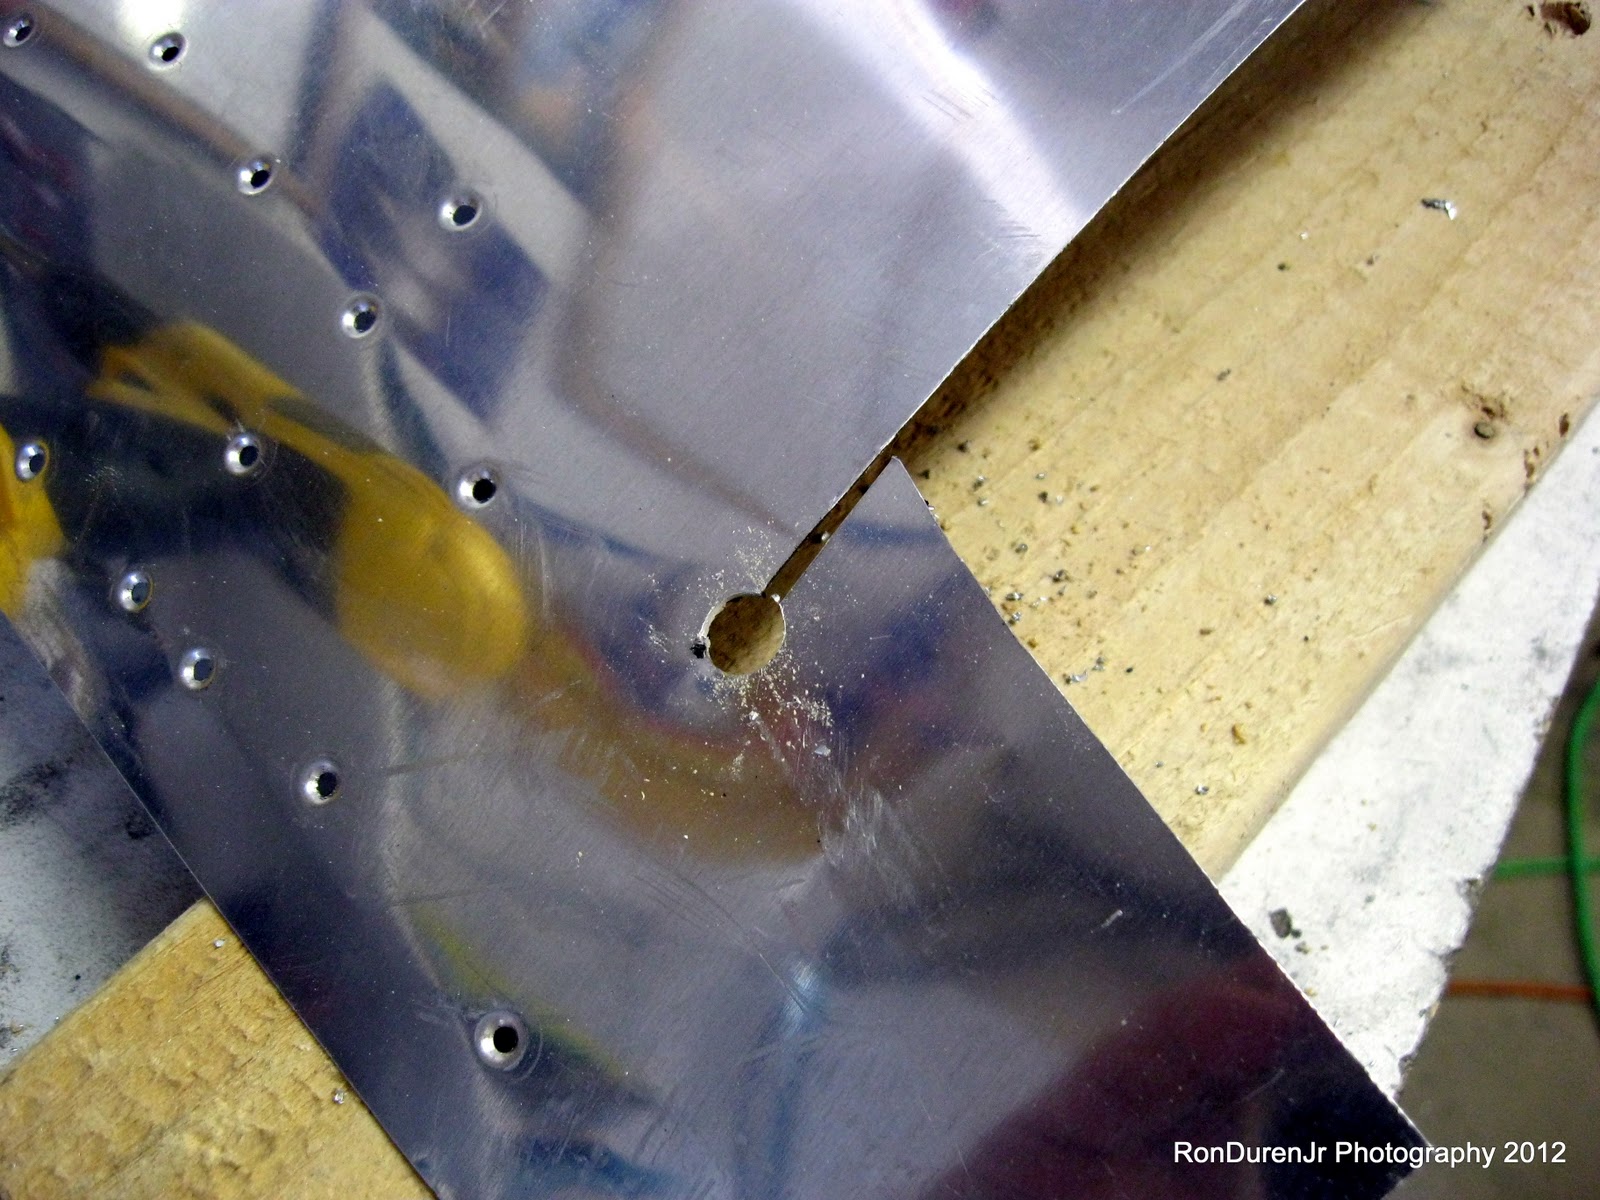
I deviated from Van's instructions slightly here. They say you can start your cut where you want...but not in the center. I did just the opposite...I actually started at the center. The most stress in the canopy will be at the center as the sides try to spread. My thought is cut the high stress area first. But with this process, as shown, it is probably fine either way....your call. It is very important to add additional tape as you progress with your cut...this keeps the canopy in place with absolutely no stress (on the canopy...plenty of stress on you!) or movement during the cut.

Try and keep your cut line as smooth as possible...if your initial cut is rough with jagged steps, it will add stress concentrations that are undesirable...think smooth with all cuts even though you will dress the edges later. I say, dont even introduce them in the first place. Once I finished the big cut, I did the aft trim while it was still taped together...easier to work with it in this state.

Once I had the aft trimwork done, I just took a razor knife and cut my tape (which was the only thing holding the two pieces together at this point) and pow...we now have a split canopy. Let me add that all of the support tape made it so that nothing moved even when the cut was completed...that is your goal...the canopy doesn't even know it is now cut in two! :)
I finally took care of these sharp ears that overlap the canopy. These are a pain and scratch the canopy during fitting if you're not careful...I may cut these off later, but for now they stay. I opened up the hole at the end of the slit so that it could spread around the plexi better and also (although not shown in this pic) took a file to that sharp point and rounded it.

And back on the fuse (see how the "ears" fit over the canopy)...dang, this is looking good. I was pretty ecstatic at this point...I actually can't remember a time in the project that had me this excited! I was stoked!

Posing for a self portrait to mark the occasion....


For guys/gals that are considering the tinted canopy (#2514), here are some contrasted photos to show how dark the tint actually is. It really is pretty subtle...I held it up to my eyes out in the sun and it wasn't much tint, but enough. I don't think it will be any problem for VFR night flight.

Later in the night I had my traditional cigar and a couple beers and a shot of Stranahan's Colorado Whiskey to celebrate this big day (don't forget to celebrate your milestones along the way!). All in all, this cut really turned out to be a piece of cake. Be careful, work slow and follow the instructions...but really if done properly, its not a big deal. (Disclaimer: I can say that because of all the guys that went before me and passed on their experience...that is valuable for a successful outcome). So, in the end, the "Big Cut" turned out to be the "Big Easy" for me...KPR!
Thursday, January 26, 2012
Cutting has Commenced! HOBBS 1103.0 hrs


And here it is...some builders are pretty fond of this moment in the build--so I was also very excited to see it on the fuse for the first time. It was kind of anti-climactic for me personally. First, it was pretty difficult to get it lifted in place by myself (highly recommend you get help for this if you have it readily available...I kept waiting for that chilling 'pop' that signifies a cracked canopy!). So all along, I was kind of getting that dreaded feeling I sometimes get when I am flying...of "do I know what the heck am I doing?' And then once it was in place, as you can see, it really doesn't fit all that well initially as there is a fair amount of trimming ahead to bring it into shape. So, yeah, kinda cool...but not really that great....have no fear though, it gets much better... :)


Ok, so now I had it in place on the fuse...marked my centerline and some initial rough trim lines. It now dawned on me that I had no place to put said canopy for trim work. I pulled out the top cover of the finishing kit crate that I still had laying around (Van's sure does use good plywood for shipping crates!). I also used the same 2x2's from the crating that were wrapped in cardboard...I placed these 43" apart to hold the spread of the canopy. I think it is very important to have a good stable fixture like this to secure your canopy during cutting. This setup worked perfectly...cheap and easy too.

Again, I wrestled the canopy off the fuse and onto my newly made cutting table...and again, sweating bullets that it was going to 'crack' as I awkwardly moved it into place! As I worked more with it throughout the night, I relaxed a little...in this state, it appears to be pretty stable. Just don't add a stress riser and then move it...or all bets are off.
On that note, I recommend all builders approaching this phase to read fellow builder Bruce Swayze's account of cracking his canopy...and how easily it can happen. Kudo's to Bruce for being man enough to post this for all the world to see so we can all learn from it. There was a time during my cutting that I was tempted to reposition my canopy during a cut...and I thought of Bruce's experience and said to myself, "don't you dare"! So, thanks Bruce...if I get through this without cracking it, I owe you a beer! :)

Before I get into the cutting portion...let me add, again, this is about a $1200 part so I was a little apprehensive during this entire work session for obvious reasons. Mess this up and its a very expensive mistake.
Ok, deep breath and away we go...this was my first cut...along the front edge. As you work along, don't let the cut portion of plexi dangle behind you...use clamps to keep it in place...you guessed it, no stress risers. Let me add, the shop was only about 65 degs and I did nothing special to heat the canopy before cutting. I used Van's cutting disc supplied in the kit...cut it like butter and I would recommend it. These first cuts were really not a big deal, quite easy really...just keep the stress off the canopy as you work, your fixture should do this for you...cant emphasize that enough. After my first cuts I'm thinking this is no big deal...another 'overblown' part of the build by some builders. I'm going to try and make sure I don't get over-confident, but so far so good. We'll see if I'm still singing that tune at the end of the process...?

My centerline...if you look close, you can see some index lines about 1" apart (front and back) that I figured were indicating the center of the canopy...it came this way from the factory. Taking measurements to verify, they looked like they were indeed center. It is very difficult to know for sure though since the canopy edges are not symmetrical coming out of the mold so you have nothing consistent to measure from side to side. This will do for now...hopefully I can adjust this later if needed?

My rear trim line hand sketched...I left a strong 2" from the edge. Make sure you have the canopy is positioned very closely to where it will reside (front to back) if you are going to cut it this close. In hindsight...I maybe should have left a little more leeway to be safer?


NOW, things are starting to look fricken cool! After trimming the front and back it already it starting to take on that cool sleek look that I like so much with the tip-up canopy. Note: make sure you smooth all edges...i.e., remove all sharp edges before moving this bad boy out of your fixture. Its a little bit of a pain because in the back of your mind you know you are going to be doing more cutting later so its kind of wasted work...but you gotta do it to be safe, spend the time.

After carefully dressing the edges...I lifted it back onto the fuse...its already a little lighter, smaller and easier to move, which is helpful if you are doing this solo. Here is where I had my glorious moment...big 'RV grin' here as I stood back and looked at it! That's looking pretty sweet don't ya think??


An obligatory pose with my night's handiwork...this was an exciting work session and stage in the build.
Tuesday, January 24, 2012
Canopy Frame HOBBS 1099.5 hrs

Logged another solid 22.0 hr week. Notice I am now just tickling 1100 hrs...wow, that was a fast 100 hrs since clocking 1000 about 6 weeks ago. This is a screenshot of my time tracking spreadsheet...I know, I'm sometimes quite anal. :) The blue line shows my weekly hour output and the red line shows my running average. As you probably know, I started this tracking 16 weeks ago when I made the prediction I would have this thing flying a year and a half from then (or by April of 2013). To do that, I plan to average 15 hrs per week until completion....this pace will yield 750 man-hrs a year....no small feat, but should get me to where I want to be. This is harder than it sounds...15 hrs is admittedly a little grueling for me...luckily I'm enjoying the work. :) But as you can see, the good news is I am right on target so far with my average.

Alright, with the anodized side canopy rails riveted in place...it was now time to tackle the canopy frame. First order of business is making some 1/8" and 7/8" spacers. I used some 1/8" alum scrap and used my old trick and cut some PVC for the larger ones.

I felt like this was kind of an important part in the project for me as I start into the canopy...so why not get a couple pics...of me! :)

Checking the curvature of the side rails...clamping the side skirt in place...the curvature looked pretty darn good right out of the box. I tweaked them ever so slightly...but not much.

Getting the roll bar/canopy piece in place...this took a little bit of doing to get it just right. This is where the 7/8" spacers reside (under the 4 clamps)

Van's says to adjust the flanges to 92.5 degs...here I am checking where I am...this was repetitive...check, remove, tweak, check, remove, adjust...etc

I got it pretty darn good...as you can see...its not easy, but important. Final adjustments will be made when the actual plexi canopy is in place but the closer you get the frame the better. Less adjustments or shims later...at least in theory. I have an aching feeling this canopy is going to be a bugger to get a nice fit. Oh well, the journey is gonna be fun...and rewarding!

I used some scrap angle and a piece of scrap 0.032 sheet to simulate the plexi and the side skirt. Oh...also, I realize I need more clamps!! I will have to make a hardware store run soon to stock up...the canopy is going to take a lot of them I'm thinking?

Getting everything lined up nicely before committing to drilling holes...lots of checking and double checking...

Alright, lets drill some metal! These are the first ones I did...through the splice plate on the other side.

After getting it drilled...you then remove the cleco-ed frame and do some more work to it to shore it up. First is to make these cheesy little wedge spacers. These are a pain. You can get an idea from this pic how mine turned out.

And this pic shows where it resides. I didn't push this baby all the way up...see the slight gap? It would have to be razor thin to get all the way in and I just didn't see the need to kill myself doing it...I almost lost a finger or two belt sanding/filing these to this point! ;)

This was one of my modifications to stiffen up the attach point for the side rail, much like I did on the canopy support roll bar....some 0.062" in this case. One of the complaints with the existing design is it tends to be floppy when lifting it from one side. I'm hoping this will help with that. It was a good idea, but my execution wasn't too stellar as you can see that the holes didn't come out centered. That is where it fit on the plane...when I had it all clamped in place and back-drilled the side rails they came out this way.

And now that I have it riveted back together...I put it back on the fuse. Next step is lowering the plexi into place for the first time...followed by my first trim cuts as I start down the long road of working the plexi into its final shape. I spent a long day Sunday getting the canopy frame done and was just too exhausted to put the plexi on yet even though I was excited to do so. I just didn't want to do it in my tired state and risk doing something stupid with that $1200 piece of plastic...so next session I will lift it into place and we'll be off and running.

This is a funny pic to me...my canopy has been sitting in my living room since I received it. This is the beauty of being a bachelor RV builder!! I can just hear a wife nagging me to move that damn thing.... ;) but its very, very faint...almost imperceptible. KPR!
Red Anodize HOBBS 1082.5 hrs
Friday afternoon, on my way home from work, I swung by the anodizing shop to pick up my parts. I was downright giddy to see how they all turned out. Upon first inspection, my excitement fell away with a thud. Let me explain...
I was quite disappointed in the job the shop did. There were several areas of dark color....it almost looked like when I do alodine and don't rinse the parts properly. And the color itself looked more like plum or maroon than bright red--although that may not be under their control. They claimed the dark spots were because of the Alclad...I'm not buying it, if that was the case, all of them would be consistent and they weren't. On top of the fact, I removed all of the Alclad on the cosmetic surfaces...to be honest, I don't think they really knew what Alclad was judging by their questions. I just think their QA was shoddy. My business is worth $100 to them...chump change in the grand scheme of things. And yes...I realize I could've thrown a fit...bitched and moaned about it until they fixed it, but thats really not my style for something so petty. I'd just rather be pleasant than a jackass, the world could use more pleasantness I think. :)
After the initial disappointment wore off...and I got them home, they started to grow on me...maybe they weren't 'THAT' bad?? Bottom line is, I really don't have much desire (time, effort) to have them redo them...I can live with them as they are...it will add to the character of my plane, it was never intended to perfect and its not like it looks horrible. Take a look for yourself, see what you think...is my disappointment overblown?


As you can see, from a distance and quick glance...they look pretty good...not so bad huh?

But when you look closer, you see the dark areas I mentioned...these parts were the worst of the bunch. On the bright side...and yes, there is always a bright side, its 'artistic'...kinda gives it a 'rustic' look eh? :) Ok, maybe I'm reaching...

You can see it here on the edges...click to enlarge

The good news is the rudder pedal parts came out almost perfect...was happy with these.


And after some careful riveting...I had four fully riveted rudder pedals ready for install...cool eh? I will probably be afraid to put my feet on them later for fear of messing them up, but whatever...onward.

I bought some black UHMW tape from Grainger for a few odds and ends on the plane. Does that look like a roll of 5 yds?? Its a little pricy, but you can get it in black if you desire...most places, including Van's sells it only in a translucent color...that turns yellow in the sun.

So, my first application was to add it to the angle attach brackets for the canopy side latch. Just stick it in place and then trim to fit with an exacto knife.

I cut out these holes for the washers...but later removed the washers as I didn't like the size of the rather large gap and how it felt when I rotated the lever--grinding metal to metal. Sliding on just the UHMW tape was much better so I think I will leave the washers (spacers) out.

And the sub-assembly ready for riveting...well, pretty much (I need to work out details on how the spring attaches to the bolt which wasn't clear in the instructions)...I will say the action of the mechanism is very good as it snaps in place convincingly. I really felt like I got my money's worth with this after market product...much, much nicer than the spartan stock version IMHO.


And now, the moment I've been waiting for...riveting these bad boys in place...again, carefully as to not mar the surface with the rivet gun. I used rivet tape and it worked fine...not a big deal. Again I sealed these for water leakage before riveting them in place...although I didnt use ProSeal this time as I wasn't in the mood to mix up a batch, I used the same paint-able silicone I used on the static ports (and later for the antenna's), should do the same task...much easier.
If you look closely at this pic, you can see that I had to drill out all of the pop rivets holding the side spar caps on. I needed to do this to access the rivets directly above them on the side canopy rails. I just got out of sequence here because I was waiting on getting my canopy rails anodized. They were easy enough to drill out...just a waste of time and money...certainly far from the worst thing that has happened on the build so far.
I will note that there were at least two or three rivets on each side that were...how should I say...lets go with...'a bugger' to get to. I could think of some much more colorful words to use, and I actually did use a few of them in the shop...but hey, this is a family site so I'll leave it to your imagination. ;) In the end, I ended up getting pretty clever to buck them and all is well now. I used the end of a 7/16" dia stainless steel rod on one and a 1/4" steel plate for the others that I had laying around the shop. Keep in mind, if you're clever...and you are...there are a lot of things laying around the shop that can be used as a bucking bar in a pinch.


And lastly, I saved some of the 'blue death' to wrap them for protection while I work on the canopy. This was satisfying to get done as it starts to take its final shape...now onward to that canopy frame!
Subscribe to:
Posts (Atom)