
 Although this week's hour total was down (10 hrs), it was a grand week nonetheless. Saturday morning I successfully made the 'big cut'! To you new builders, the big cut is the cut that splits the canopy in two. It is one of the more common areas to inadvertently crack your canopy so its stressful to most builders. In addition to the added stress of doing it...it is considered one of the bigger build milestones. I started out Saturday morning with the intention of doing it Sunday...spending Saturday getting the canopy trimmed up and everything ready to go for a fresh start Sunday. But...everything went so well that I was ready before I knew it and thought..."why not today?" So, after a little bit of deliberation I jumped into it! The anticipation was off the charts...excited but nervous.
First things first...I needed to prepare the "operating table" for this delicate procedure on the patient. Plexi likes warm temps and gets cranky when its cold. My shop temp on Saturday morning was 60 degs. Some guys wont cut their canopy until they have it 80 degs in the shop...as you'll see, I think that's overkill...with a caveat. No doubt, warmth is good for the plexi...I used what I would term "local anesthesia" rather than "general anesthesia". No need to heat the entire shop...just the plexi. I drilled a clearance hole in the center of the operating table for my small space heater cord. This ended up being plenty sufficient as the plywood directed the heat directly onto the plexi...just to give you an idea, it was toasty to the touch during the cut.

Get the canopy cut close to the size you want...doesn't have to be perfect, in fact Van's says it will shift slightly after the big cut so don't final cut it to size yet. Just close enough to get a representative fit. Here is my rough cut line on the front.


Once it is trimmed up well...position it correctly fore and aft and on centerline. Double check everything...mistakes cant happen during this process.

I strapped it in place once I had my positioning correct. I marked the cut line down the center of the roll bar. Once this was done I then installed the rear canopy skin over the canopy to trace the line where the skin overlaps the canopy.

Mark this as a "no cut" line for reference....just to be safe, I also put it in red. Cutting that line by mistake would render the canopy junk!

With everything marked for cutting...carefully move the patient back to the operating table. The idea is that NOTHING moves during the cutting process. The table will take care of most of this, but other precautions should be taken. Van's instructions are very good and I followed them almost exactly. In this photo you can see I added a piece of duct tape across the bottom span of the canopy to keep it from springing out during the cut.

Duct tape is added on either side of the cut line to keep it protected from a slip. Position the canopy so that you can make the entire cut without having to reposition the canopy during the cut...this is very important to think ahead, before starting the cut, so you can achieve this.

I deviated from Van's instructions slightly here. They say you can start your cut where you want...but not in the center. I did just the opposite...I actually started at the center. The most stress in the canopy will be at the center as the sides try to spread. My thought is cut the high stress area first. But with this process, as shown, it is probably fine either way....your call. It is very important to add additional tape as you progress with your cut...this keeps the canopy in place with absolutely no stress (on the canopy...plenty of stress on you!) or movement during the cut.

Try and keep your cut line as smooth as possible...if your initial cut is rough with jagged steps, it will add stress concentrations that are undesirable...think smooth with all cuts even though you will dress the edges later. I say, dont even introduce them in the first place. Once I finished the big cut, I did the aft trim while it was still taped together...easier to work with it in this state.

Once I had the aft trimwork done, I just took a razor knife and cut my tape (which was the only thing holding the two pieces together at this point) and pow...we now have a split canopy. Let me add that all of the support tape made it so that nothing moved even when the cut was completed...that is your goal...the canopy doesn't even know it is now cut in two! :)
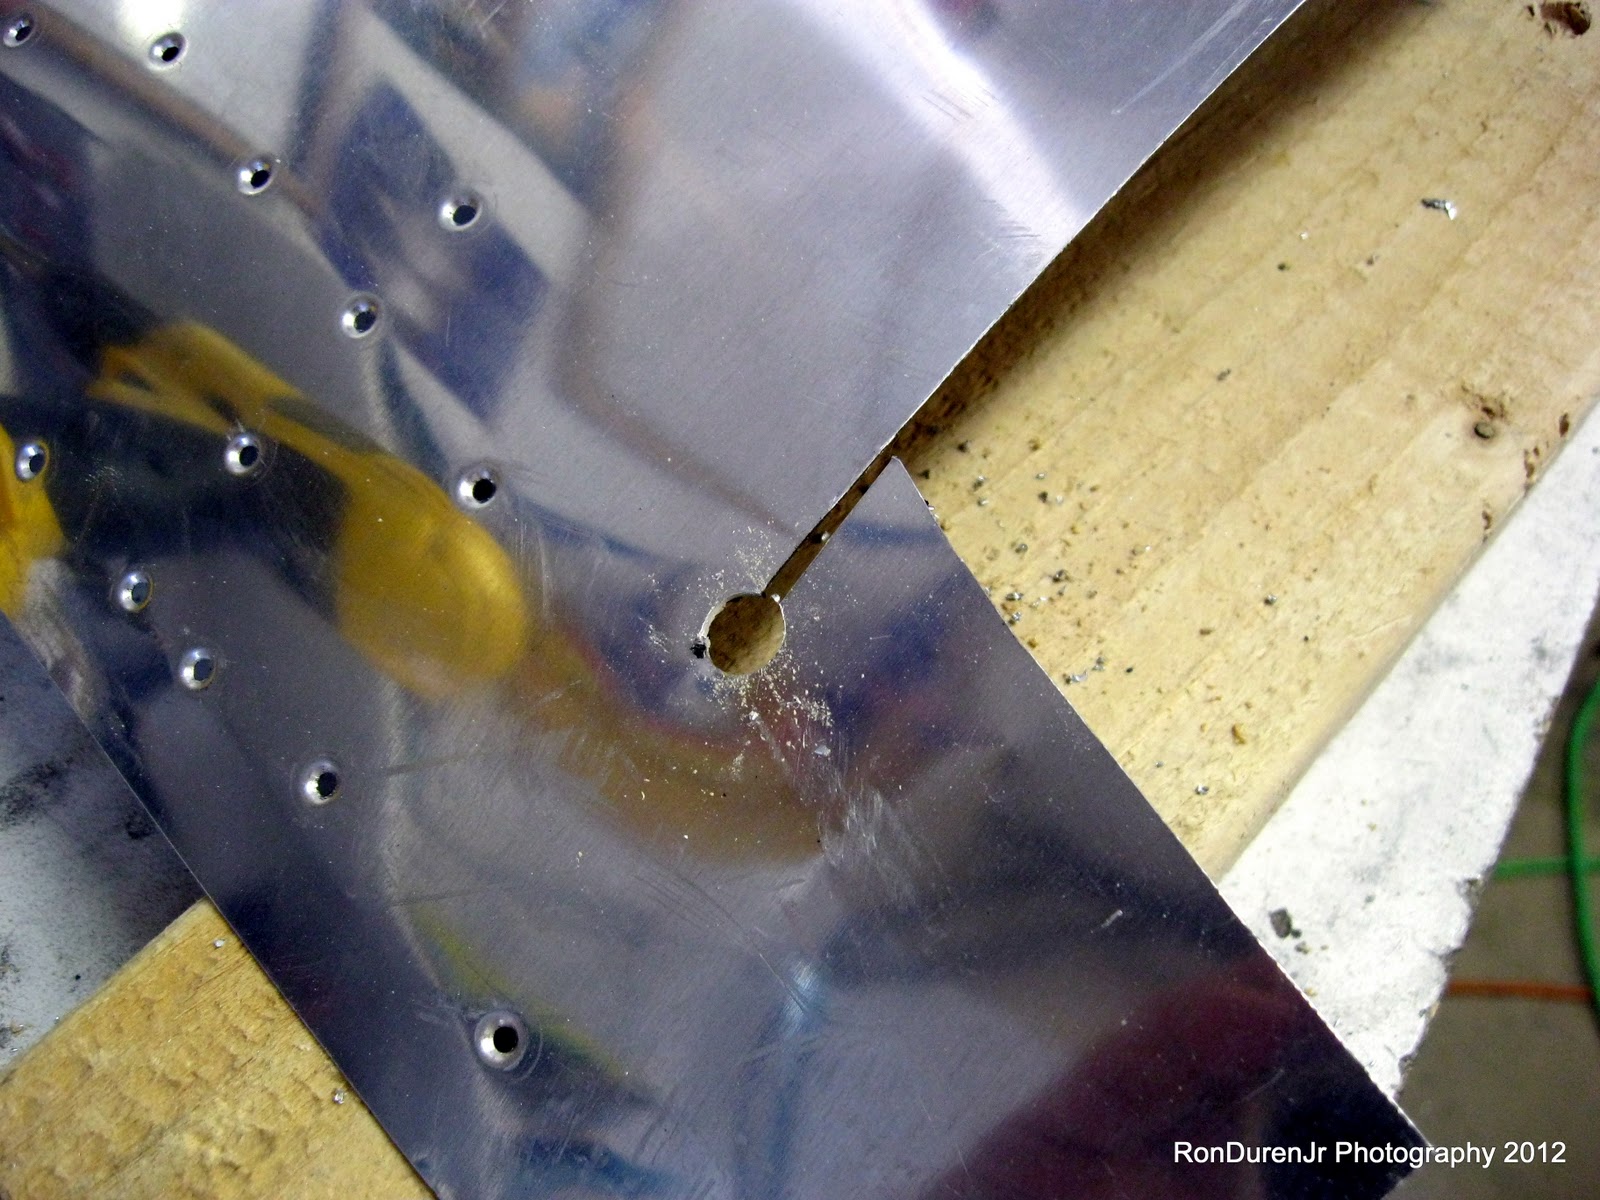
I finally took care of these sharp ears that overlap the canopy. These are a pain and scratch the canopy during fitting if you're not careful...I may cut these off later, but for now they stay. I opened up the hole at the end of the slit so that it could spread around the plexi better and also (although not shown in this pic) took a file to that sharp point and rounded it.

And back on the fuse (see how the "ears" fit over the canopy)...dang, this is looking good. I was pretty ecstatic at this point...I actually can't remember a time in the project that had me this excited! I was stoked!

Posing for a self portrait to mark the occasion....


For guys/gals that are considering the tinted canopy (#2514), here are some contrasted photos to show how dark the tint actually is. It really is pretty subtle...I held it up to my eyes out in the sun and it wasn't much tint, but enough. I don't think it will be any problem for VFR night flight.

Later in the night I had my traditional cigar and a couple beers and a shot of Stranahan's Colorado Whiskey to celebrate this big day (don't forget to celebrate your milestones along the way!). All in all, this cut really turned out to be a piece of cake. Be careful, work slow and follow the instructions...but really if done properly, its not a big deal. (Disclaimer: I can say that because of all the guys that went before me and passed on their experience...that is valuable for a successful outcome). So, in the end, the "Big Cut" turned out to be the "Big Easy" for me...KPR!
Ron,
ReplyDeleteJob well done! That's got to be a huge relief to get the canopy split and no cracks. I'll have to copy your methods when it's my turn. Just wait till you get the front section on the struts and tip it for the first time. Too cool!
Ron,
ReplyDeleteNice job! Looks like you're making great progress!