
Friday, August 26, 2011
First Side Skin HOBBS 797.0 hrs
Quick status update: last night I tackled the right side skin and got it just about halfway riveted in place. I can easily do almost all of the side skins solo...the wrap around corner on the bottom may need another set of hands. Of course, I ProSealed the seams again so that adds some time and a little bit of anguish...I forgot how much I enjoyed ProSeal. :) Sorry no pics, I was too busy riveting...
Wednesday, August 24, 2011
Re-rivet HOBBS 794.0 hrs
Last night I inspected all of my rivets from my last riveting session. I couldn't help but think I must have been smoking dope while I did that riveting! I'm embarrassed to say it was a poor performance. So, I spent some time carefully drilling out the 20-25 bad ones and redoing them. Problem solved. :)
I then proceeded to test fit the first side skin...the right side. I wanted to get one last look, make sure I had everything done before riveting. Good thing I did too, since there are a few small items I need to attend to. But I'll get those taken care of and the next session should be a riveting session as the first side skin is riveted in place. Cant wait.
I then proceeded to test fit the first side skin...the right side. I wanted to get one last look, make sure I had everything done before riveting. Good thing I did too, since there are a few small items I need to attend to. But I'll get those taken care of and the next session should be a riveting session as the first side skin is riveted in place. Cant wait.
Monday, August 22, 2011
Yoga...RV Style HOBBS 792.0 hrs
I had a very productive and fun weekend working on the project. Sandwiched around the Front Range Airport open house (FTG) and a nice visit with Gary, Scott and Deb out at the hangar. The fuselage is starting to come together and its pretty exciting to finally start riveting big pieces together. It is taking shape...although I keep having this feeling of dread that I am missing something on the "laundry list"...Van's does not define these little tasks very well so you are kind of on your own.
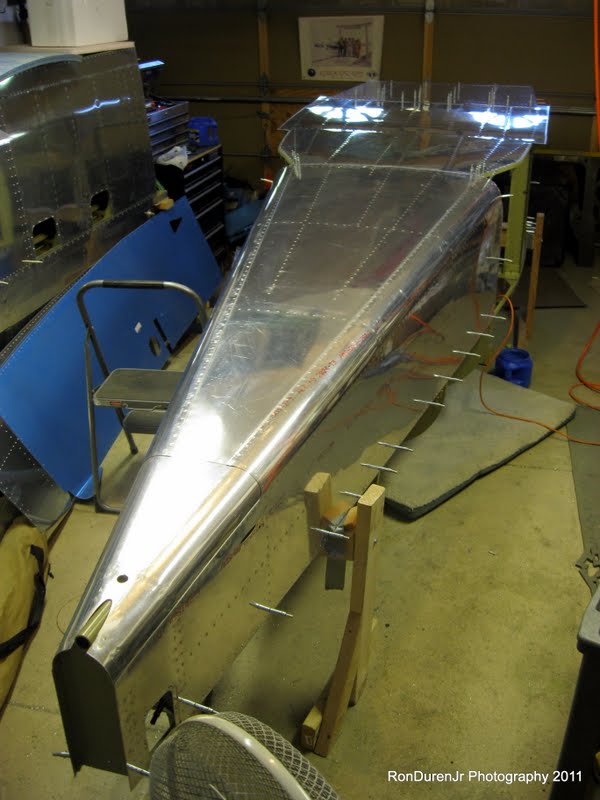
As I mentioned before, doing this solo, I am skipping around in sequence a little. I did all of my prep work with the 'canoe' right side up. Now, as I get ready to rivet the bottom skins on...I flipped it over. Much easier to rivet the bottom skins like this.

Added this clearance hole to the gear attach gussets for a rubber grommet. The fuel line will enter the fuse here.


I added these bolts while I still had good acess...bottoms and side skins removed. After I got done, I inspected these...and I think the bolts are too long for this application. The plans say -5 (5/8") length...I may add another washer because I think the nut is bottoming out on the shoulder?? Van's does a great job with these kits...but always double check things, sometimes things arent quite right.

Here you can see I have applied ProSeal to my bottom skin joints. Yes...ProSeal...ugh! haha! I wanted to get a good watertight seal on the overlapping joints and also want to seal up the firewall from fumes entering the cockpit. The watertight seal might be overkill...but I figured it cant hurt.

Dont forget to machine coutersink these rivets where the floor stiffener angles attach.

Getting ready to rivet...solo...this is gonna be a task


Doing this bottom skin solo was tough. I almost threw in the towel trying to reach the rivets right in the center...my arms just didnt seem to stretch that far. Especially holding a rivet gun and bucking bar. But...somehow, I tried again and was able to get to them...just barely. I probably looked like an idiot while doing it though as I was in some pretty wierd positions to make it happen...paint this picture in your mind...legs spread wide apart, squatting, reaching, face pinned against the side and grunting. haha! Not pretty! Although I've never done yoga before, I couldnt help but think...who needs yoga when you are building an RV!!! I'm actually feeling it a little bit today, muscles are a little sore. ;)

Cleco's slowly being replaced by rivets...looking good! So cool to see a riveted skin, love it! On a different topic...If you look close in this pic, you can see that the lap joint between the mid fuse and the aft fuse is the wrong orientation. I overlapped them wrong. Doh! Dangit, that hacked me off when I finally noticed it last night. After some pondering, I have made the decision to leave it as is, I am too far along to change it now...structurally it is fine and it shouldnt cause any ripple effects that I can see. If you were looking for a blog about how to build a 'perfect' airplane...you came to the wrong place. As I always say, it is little things like this that make the plane all mine...they add character and are things I will laugh about later. ;)

One of my builder friends, Steve McGirr, gave me this idea to "autograph" your plane. Cool idea, this is my first one and it will be hidden by the side skin. I plan to let anyone that helps do the same.
Tuesday, August 16, 2011
Spinning My Wheels! HOBBS 778.0 hrs
I took the weekend off from the project to spend it in the mountains at my friend EJ's cabin near Grand Lake (Thanks EJ!). Had a great time, I feel so lucky to live in this beautiful state and have the Rocky Mountains as my playground.
So, last night I was anxious to get back out in the shop and spend some time with my 'mistress'. I am at a point in the project where I am on the verge of some exciting developments. Namely, starting to rivet the fuselage together. But, alas, I keep finding little things that I inadvertently missed or just postponed until I could get better access...all items that need to be attended to before I can start riveting.
Most of them are no big deal. But there was one that caused me some anguish. I forgot to dimple my match drilled holes in the aft fuselage assembly when I had it apart the first time!! dang! I briefly thought about machine-countersinking them...yeah I know, the lazy way out. But...this is part of my transformation as a builder and a person. If I were building a deck on the patio, I probably would take the short cut or at least I would've in the past...but this being an airplane that my life depends on...gotta back up and do it right even if it kinda sucks. This area--where the aft fuse connects to the mid fuse--is an important part of the structure and I felt it needed to be done properly. So...back apart it came, I also had to drill out a couple rivets in the baggage bulkhead to accomplish this.
There are days in the shop where you are working hard, grunting it out, and really not having much fun because it feels like you are just spinning your wheels and not seeing any progress. Last night was one of those nights. You just gotta grind through them...they are inevitable and are obstacles to a flying airplane that must be overcome. I spent a fair amount of the evening dinking with this, got through it...the aft fuse is now dimpled properly and re-clecoed back together. Next step...riveting the bottom. I will now flip the 'canoe' over upside down like Van's suggests to do the bottom rivets.


Match drilling the plastic blocks that hold the rudder pedals. I couldn't access these with the side skins on, so I did it at this stage (side skins removed)...much easier. I have long legs for a 5'9" guy so they will probably be in the far forward position for me...but I did add some extra holes for adjustment just in case...not sure why really, but I did.

I wanted to do something with my firewall...leaving it bare metal is probably the right thing to do because just about any paint you put on it will cook off during a hot engine fire. As a compromise...I did paint it, but I used this flame proof paint I bought from Aircraft Spruce. Supposed to be effective up to 1200 degs F. An engine fire can get much hotter than that, but alum will start melting around there so I will have much bigger problems than paint fumes if I have an engine fire that is that far out of control and I'm still in the air. The rivets and cross members will be melting since they are alum.

Scuff up the surfaces and clean them with acetone...


Not sure how I like this stuff...it doesn't seem very durable, especially compared to my Akzo Nobel primer. It's mostly cosmetic though, it shouldn't have any wear to speak of so hopefully it wont matter how durable it is. Some guys also put a thermal shield/blanket over this on the cockpit side.

Here are a couple pics of the row of rivets that I forgot to dimple...what a pain! (btw, that's overspray you see on the side skin...the product of trying to paint in a small area and being sloppy about it...doh! not to worry it will be covered/removed by the painter later.)

Wednesday, August 10, 2011
Puttin' 'er Back Together HOBBS 773.0 hrs
Now that the priming has been done, I have been busy reassembling the fuselage. I realized I still had a few 'laundry list' items to check off, so I am getting those done. Soon, riveting will commence.
On another note, every year a guy that goes by the moniker "Slick" does an Oshkosh video that is always top notch...I have posted a couple of his previous years on here as well. Here is his 2011 rendition....enjoy!
On another note, every year a guy that goes by the moniker "Slick" does an Oshkosh video that is always top notch...I have posted a couple of his previous years on here as well. Here is his 2011 rendition....enjoy!
Monday, August 8, 2011
Popeye Forearms HOBBS 771.0 hrs

I then set about fabricating a couple of fuselage stands. I didn't spend a whole lot of time on this. As I've become a more seasoned builder, my philosophy has changed. I used to put a lot of time, money and effort into these stands. Now, I just do the minimum necessary to get the job done. The airplane is the focus, not the elaborate stands. Spend the time on the airplane.
Finally, I started to reassemble the fuse for the final time. Soon, it will be riveted in place...I'm excited to tackle that step.

Filing edges...at this point in the project, you should have your edge deburr process down to a science. I've spent many hours doing this.

My very basic fuse stand...throw on a little foam for protection...I also added a couple gussets for strength later. This was leftover lumber from my wing stands.


Friday, August 5, 2011
Oshkosh Video HOBBS 760.0 hrs
Here is a cool Oshkosh video from this year in case you missed it. Have a great weekend!
Fuselage Laundry List HOBBS 760.0 hrs
Now that I am back from OSH, I am filled with motivation so I've been trying to squeeze in as much build time as I can in my busy summer schedule. Van's mentions there is a 'laundry list' of items to attend to on the fuse before disassembling it for deburring and priming. So, I think I got 'em all covered and have started the disassemble...kind of a drag to see it come apart after all that work. There is a lot of deburring/prep work and priming ahead of me but once that is done...it'll come together for riveting. The metal work on the airframe is winding down amazingly. Lots more to do before it flies, but the bulk of it wont be metal work...wiring, lots of misc details and composite work mostly.


You may have noticed that I am doing this a little different than Van's says in the plans...they say to have your fuse upside down, not sure why at this point? Maybe when I get to riveting it will be helpful...but right now this would be a pain to work on upside down. Anyway, here is a shot of me test fitting the rudder pedal structure.

I need to drill a few sets of holes for the rudder pedals to allow for adjustment. I have pretty long legs for a 5'9" guy so I expect I will have them set all the way back but I also want adjustability built in. Just in case I ever sell it?
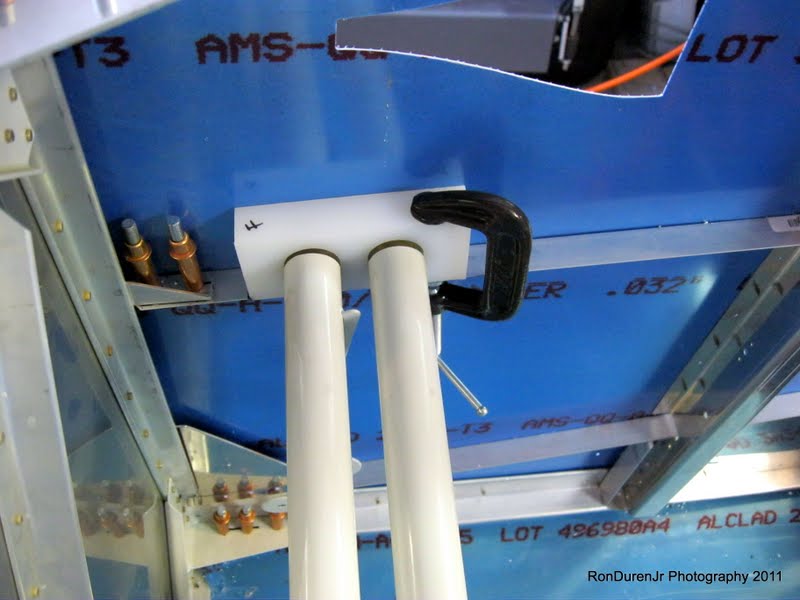
I haven't decided how to drill these mounting holes just yet...maybe do it before I assemble the side skin? Access is very limited. Also, pay attention...these plastic mounting blocks are not symmetrical...they are machined to fit the curve of the fuse so there is a 'left' and a 'right'.

Test fitting the panel structure...not sure why, just because...

Test fitting the cover panels and fuel selector bracket (which I wont use). I'm trying to formulate my mounting strategy for my center console and false floor. I have an idea how its going to go...but I'll figure this out later.

Match drilling these gussets...I still need to add a square hole in these.

Seat belt attach brackets...I wanted to get all of my holes drilled in the longerons before disassembling for countersinking and primer. I am jumping ahead in the plans with these steps..shouldn't be a problem however.

I cleco-ed on the top skin so I could get an idea how these gusset brackets would be oriented before match drilling them. Pretty much just drill them parallel with the longerons and you'll be fine. It really is cool to see how this baby comes together...looking more and more like an airplane all the time!


Here is my misc hardware I brought back from OSH. Does this look like $150 of hardware?? sheesh! Oh well, this isn't stuff you can get at Home Depot so its nice to have some extra on hand.
Wednesday, August 3, 2011
Oshkosh 2011 Review HOBBS 750.0 hrs
I've been back from Oshkosh for a few days now. Had a blast! Learned a lot...looked at a ton of RV's...talked with vendors, met some new friends. Already looking forward to next year. I didn't get everything accomplished that I wanted but it was not for lack of trying.
I sat in on about 7 or 8 seminars this year...topics ranging from, "How to Wire Your Airplane", "Electronic Circuit Breakers", "Electronic Ignition", "Fuel Injection Systems", "How to Re-assemble a Lycoming Engine", "Flying in the South African Bush", "Cross Country Flight Planning" and "Composites for RV's". It really is amazing the amount of knowledge you can pick up while you are at Oshkosh. All free with the price of admission. This was the first time I attended so many seminars, I enjoyed the learning part of it, but it really gobbled up my time for other things...each seminar is an hour and 15 mins long so it doesn't leave much time for other stuff.
While I was at Oshkosh this year it dawned on me that there are probably a lot of my readers that have never had the privilege of attending AirVenture. So I thought I would give you a little tour...and let me emphasize "little"...AirVenture cannot be fully experienced or seen in several days of non-stop walking. The showgrounds are huge...I estimate I walk 5-7 miles a day while I'm there. It is on a grand scale. In fact, this year...6 days and I still didn't get everything done that I wanted. And I know the layout and exactly where I'm going. So, if you go, plan on the fact you probably wont see it all the first time....or second...or third. ;)
A synopsis of Oshkosh...approximately 600,000 people attend each year from all over the world. It is the largest general aviation gathering in the world. 10,000 planes fly in for the show and most people camp right next to their planes. Oshkosh becomes the busiest airport in the world during AirVenture with all of those arrivals. I camp right on the showgrounds with about 30,000 other campers in Camp Scholler. It is the best way to experience Oshkosh in my humble opinion because you are right in the thick of it. They have large, private shower buildings available for all campers. The infrastructure at AirVenture is amazing, nothing is temporary, all buildings are actual buildings that are there year around.

The famous Brown Arch...popular place to get your pic taken. The tiles in this area can be bought and inscribed. Its cool to walk around and read them. Here are a few that I liked.


And here is Rosie and Victoria's tile...
 |
| http://www.vansairforce.net/ Photo by Mark Burns |


The Vintage Grill...they have pretty good food here, much better than most of the food at Oshkosh. I had a steak and some wine here a couple years ago and it was pretty good. They serve beer and wine after 5:00 and have live music. Its a good place to watch the end of the airshow and have a cold one after a long day. It gets pretty packed though.


I see this guy's plane every year and it makes me laugh each time...click on the photo and read what it says.

The very busy control tower...these guys do a great job!

The Fly-in theatre lineup of movies. This is an outdoor theatre that plays mostly aviation-related movies every night...it will hold close to 10,000 people I think? Just bring a chair or blanket and you're all set. Free popcorn too.

Opening day concert...this year was REO Speedwagon...pretty cool, loved them as a young man but this was the first time I had seen them in concert. They can still make good music.


A shot of one of the shower buildings...

Watching the airshow from the new Fratello's tent...alcohol served after 5:00pm...this is standard at Oshkosh. There are no beer stands on site and the few restaurants that serve alcohol can only do so after 5...


My engine of choice...the Aerosport Power IO-375, isn't she 'purdy'?...my color too.

A simply amazing Mustang in the Ford tent...the paint job on this baby was immaculate. They were going to auction this off for charity I think? Only one of its kind.


One of the camp stores on site...a general store with all kinds of supplies. You usually don't even have to leave the showgrounds to get what you need. They also have fresh coffee and donuts every morning.

Camp Scholler...this is what it looks like for as far as the eye can see in all directions.

The campsites in the trees are hard to get...everything is first come, first serve and these go fast. You can also see in this pic, what the rain does to the site...things get muddy in a hurry.

The SOS Brothers beer tent right on the edge of the AirVenture grounds. This is the only place you can get a little rowdy after the sun goes down. They have a huge fire pit, bikini-clad bartenders and live music every night until midnight. I spent all of my nights here. :) There is a large yellow, illuminate balloon above the tent...so its real easy to find.


The first day I arrived, the day before AirVenture officially opened, I ended up at the SOS tent...and met several great guys throughout the day. People from all over the world, all talking about aviation. It was good stuff. I also met my drinking buddy for the week...Peter, the Aussie from Arkansas! We had a great time and I hope to visit his airpark home one day when my plane is done.

Here is the 2011 contingent of bartenders. I ended up meeting them all during my stay. Great gals that put up with a lot of drunk pilots all week with a smile.

Beer bong's for $7...I didn't do any, but it was a popular attraction and it was entertaining to watch

Peter and I with my favorite bartender, Brianna...

They publish a free daily newspaper during the entire show. Its a great way to read the news from the previous day and see whats upcoming on the schedule. Its really well put together and delivered bright and early each morning. Just another amazing thing they do as part of AirVenture. So there ya go, an idea of what its like to attend AirVenture...hope to see ya there next year!
Subscribe to:
Posts (Atom)