Ron's RV7 Aircraft Factory
Welcome to my personal blog. This site was created as an informal description of my build progress in the construction of a Van's RV7 aircraft. A place where family/friends/builders/curiosity seekers can follow along. It is not intended to be a detailed description of every step in the building process as that would be much too time consuming. There are plenty of sites that do a great job in that arena, that is not my intention with this site. My intention is for this to be a philisophical/motivational/inspirational account of the emotional ups and downs of the life changing journey...and it will change your life. I hope this will give you an idea, through my eyes, of what its like to make this transformation. A note to other builders, I am not an expert so do not put your safety at risk by attempting anything you see on this site until you have done your own research, or send me an email so we can discuss it. Any deviations from the plans are not approved, nor endorsed by Van's Aircraft or myself. Thanks for visiting.
Monday, August 6, 2012
Cowl Fitting HOBBS 1440.0 hrs
I am starting to get energized like a shark that smells blood in the water...I can see the light at the end of the tunnel...its faint but I can see it. I have even starting looking around for hangar rentals that are available at FTG. Not quite ready to pull the trigger yet, but we're getting there.
Anyhow...so this weekend, spent some time out at the airport for a Young Eagles event Saturday, picked up my stuff that Bryan Raley hauled out to OSH for me, and then had lunch with the EAA 301 crew. Afterward, Scott stopped by to look at the project and we had a couple beers talking.
My main task this weekend was to get the cowl fitting tackled...mission accomplished, or at least the initial fitting. I need to do this before I can do my baffle/plenum. The prop needs to be mounted for this effort...which you've already seen that I've done.
There seems to be several ways to do this...reading Van's instructions and Sam James...I kind of blended the two. First I did the top cowl...I left a 1/4" gap between the spinner and the cowl as per Van's instructions...didn't really see a need to go tighter. I also left just a little for engine sag...not much though. I figure I can shim it back up if it sags a lot.
Once I had the top trimmed to where I wanted it...and it took a lot of iterations to get there, on and off 15-20 times, I moved to the lower cowl. First order of business...make clearance cuts for the gear legs.
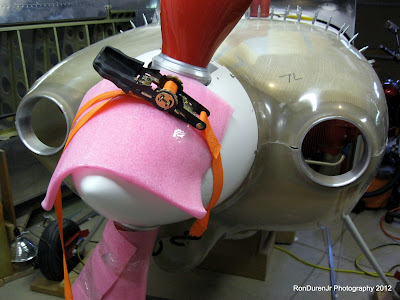
Wrap the lower prop blade to protect it...
Install hinges...I am going hinges all the way around, I like the clean look of it rather than screws.
I trimmed the bottom, near the exhaust outlet, first...
Its difficult to come up with a way to support the front end during fitting...this is what I came up with...a strap hooked into the lower air inlet.
Once I got the bottom trimmed...I did the sides and the finally the seam between the two cowl halves.
I was pretty pleased with how it came out and I have to say the Sam James cowl really goes together well. I didn't have to do much trimming to get it looking nice. The alum inlets are temporarily installed to act as guides for fitting.
Notice how nicely the seams look after just initial fitting...very nice.
Next task, cut the oil filler door opening. You can see a circle on the cowl...this was put on by Sam James and it shows exactly where the oil dipstick will intersect the cowl. A nice aiming point for cutting. After that, I will rivet and epoxy the hinges to the cowl halves.
Subscribe to:
Post Comments (Atom)


No comments:
Post a Comment