This week was a little slow on the project, I had other stuff going on that required my attention. And since time is a limited resource, something had to be neglected. ;) I did, however, find a way to log 7 hrs in the shop nonetheless. Believe it or not, most of it was on the wings. That fuselage kit is calling my name...and its rather loud in my ear, but I also don't like leaving things unfinished. That explains why I am have been progressing on the wing completion rather than diving into the fuselage kit. Although I will probably leave the last bottom skins off the wings until later since there is no hurry to close those up. To keep access to the inside of the wing as long as possible is desirable....just in case. You can access everything through the inspection holes...but why be cramped if you don't have to?
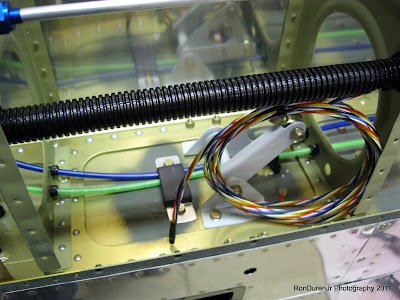
Here is a better picture of my custom made bracket to hold my pitot and AOA lines in place. As stated in a previous post, that is actually shrink tube on the bracket to eliminate any sharp edges. Also ignore the twisted pair wire in the pic, that is for my roll servo motor for the Autopilot. But...it didn't dawn on me until after I snapped this pic that I have it on the wrong wing! For some reason, they say it is supposed to go in the right wing. Easy enough to move it over to the other wing.
SafeAir pitot mast in place, later I will buy the heated pitot tube from Dynon...expensive bugger at about $450. The red 16ga wire is for the heating element in the pitot. The green tube is the pitot line and the blue is for the Dynon AOA system that is integrated into the pitot. I also got that tubing from SafeAir. They have good products.
My wiring coming out the conduit in the wing tip: RG400 coax for a future Archer wingtip antenna, shielded 20ga for the LED nav/strobe, regular 16ga for the landing/taxi light and a piece of nylon cord for the possibility of a future wire run, although it may not be needed with conduit in place? Routing wires through that baby is a non-event.
I cleco-ed the final bottom skin to the left wing (the first bottom skin is done) for a look-see...cool eh? Looks good. I wanted to look at how difficult this baby would be to do solo? This is the one I will probably leave until later however. Cleco-ing it to the wing seems like a good place to store the skin so it doesn't get damaged until I'm ready for it though. You can also see, I have riveted the aileron brackets, aileron and flap fairings in place.
And low and behold, I spent TWO hours doing fuselage inventory and felt like I didn't make a dent in it! aargh! Boy, this kit has a lot of parts in it....many more than the wing kit....lots o' AN hardware. I certainly don't have enough parts bins for all of this stuff. Lots and lots of brown paper and plastic bags full of hardware of all shapes and sizes. I'll keep wading through it as I have time and get it knocked out....gotta be done.
While Dad was visiting I mentioned that my next major tool purchase was going to be a cordless drill. I have been wanting to add one to my arsenal for a while now but gosh they are pricy. Well, today (Apr. 11th) was my birthday (don't ask how old!? haha...old enough to know better but still too young to care!) and Mom and Dad sent me this as a birthday gift!! SWEEEEET! This will come in handy for the remainder of the project when the pneumatic drill isn't the best choice for the task at hand...or just to have two drill motors handy chucked up with different drill bits. Thanks Mom and Dad!


No comments:
Post a Comment