Tax day 2013! Woohoo, time to pay Uncle Sam...hopefully you all have this done, mine goes in the mail today.
It was a good, solid week in the Factory as I close in on 1900 hrs. I am sooo ready to done with building and flying that my motivation has been high as I worked through items on my checklist. I spent a fair amount of time on wiring tasks...getting the Vertical Power wired and just general wire routing, although no pics of that stuff.
Instead, here are some pics of the Infinity grip install. As you know, I started this task a couple weeks ago...but had to take a pause to consider (and research) how to do my removable co-pilot stick. Here is my solution...
First, here is the length I settled on for my sticks as promised. This is obviously with an Infinity grip and the Aerosport products carbon fiber panel. Other setups will most likely vary. Please, just use this a reference to cross check your stick length, do not blindly cut your sticks to this length without your own investigation of your particular setup.
At first, these sticks were a real bugger to mess around with. I ended up hot gluing the PTT switch in place as it seems to be the one that likes to pop out when installing the two halves. Once you get that puppy glued down...its much easier to get a good mate. One other thing, I had a problem with this grip not closing up tight...after double and triple checking everything, I couldn't figure out what was causing this? I ended up taking a rotary file to one (and only one) of the holes drilled in the stick, and opening it up slightly. This solved the problem, I think my hole, even though I drilled it on my drill press was not quite centered. By opening this hole it allowed it to close tight. Since I left the other hole untouched, the grip had no "play" in it. Problem solved.
I bought a nice $50 8 pin cannon connector from Vertical Power specifically for my removable co-pilot stick. Well, unless I am missing something...that isn't going to come close to working for me if I want a fully functional co-pilot stick...which I do. I did remove the blue covering and combined three ground wires into one, but even after that I still have 14 wires coming out of the stick. The only button that I could do without on the co-pilot stick would be the "smoke" button, but even with removing that functionality, I needed more than 8 pins. So, bottom line is although I have the wires routed, I need to source a different connector...probably just a DB15 and be done with it. So, it will take me 5 minutes instead of 1 minute to remove my stick...not a big deal and I'm tired of screwing with this.
In this pic, you will also see that I gave up on trying to get a connector "inside" the stick...it just wasn't worth the trouble. Finally I decided to just drill a hole in the stick. Yes, I realize there are many out there that say, DON'T do this. I say, don't do it without a lot of thought, but I feel comfortable with this for a couple reasons. Yes, this hole will weaken the stick, there is no doubt. But, I purposely put it as high as possible to stay away from the higher stresses near the attach point. The wire should be covered by the stick boot (need to verify this). If I somehow am able to bend this stick at this location, #1...I am VERY strong...and #2, I will definitely have jammed control surface and have bigger problems than a bent stick. Lastly, although every control is important...this is my co-pilot stick and I don't plan to ever fly solo from the right seat so there will always be someone who could take over from the pilot seat with a stick that has no holes in it. That's my logic, you decide what works for you since its your ass on the line.
When I did my pilot stick, it was quite amazing how quickly it all went together now that I had some tricks to work with. The hot glue mentioned earlier being one of them. The other is this tip from VAF...put the halves together without the red PTT button. Just put the two bottom screws in loosely, and then carefully insert the button. Works like a charm, took me about a minute to do this one.
I threw this tie wrap on here, not sure if this is my final solution, but maybe? Also, notice I could not seem to get a rubber grommet in the hole in the stick and I really didn't want to go any bigger with that hole. I may just leave it as is, and keep an eye on it for fraying of the protective sheath.
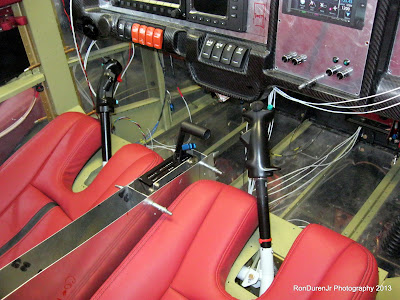
Fit check with the stick in place...oh boy, does that look cool! They are not "connected" together yet, but we're getting there. Both sticks still need connectors and wire routing, but this was a big milestone.
As you can see, since both sticks are the same length, I have the same 1/4" clearance for the pilot side.


No comments:
Post a Comment