Ron's RV7 Aircraft Factory


Welcome to my personal blog. This site was created as an informal description of my build progress in the construction of a Van's RV7 aircraft. A place where family/friends/builders/curiosity seekers can follow along. It is not intended to be a detailed description of every step in the building process as that would be much too time consuming. There are plenty of sites that do a great job in that arena, that is not my intention with this site. My intention is for this to be a philisophical/motivational/inspirational account of the emotional ups and downs of the life changing journey...and it will change your life. I hope this will give you an idea, through my eyes, of what its like to make this transformation. A note to other builders, I am not an expert so do not put your safety at risk by attempting anything you see on this site until you have done your own research, or send me an email so we can discuss it. Any deviations from the plans are not approved, nor endorsed by Van's Aircraft or myself. Thanks for visiting.


Monday, December 20, 2010

Rolling Wing Stand HOBBS 390.0 hrs

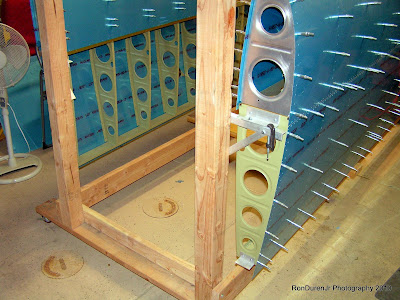
I recently got a request from one of my readers about my rolling wing stand and how it was constructed. I wanted a rolling wing stand for a couple reasons. One, I didnt really want to drill into my garage floor nor my ceiling...not a big deal, but if I could avoid it I would. Second, I wanted to be able to pull my car into the garage if I really wanted/needed to...ie, snow days. I kept material costs to a minimum, but also plan to re-use them for the wing cradles when I am done.

So, with that in mind, I wanted a wing stand that was easy to move but also sturdy and straight. And it couldnt be any bigger than about the size of a car since I have a two car garage. I kept mine pretty wide so I have plenty of room between each wing for working...you could go narrower if you wanted. All of my mission parameters were satisfied and halfway through my wings I have been very happy with the results and I would do it again.

One thing I didnt do very well is square it up. Do a diagonal dimension check before locking it down as mine came out a little parallelogram. Just sloppy carpentry skills on my part. One other tip, you will have to acomodate for a more than likely sloping garage floor so keep that in mind as you build it and position it. Here are some pics...


Cheap Harbor Freight wheels...swiveling and locking, rated at 150# each


Support for the center of the wings to take out the sag...just a piece of all-thread, but the key is to integrate it into the stand so it is completely mobile


I positioned the wheels so that it wouldnt tip over when only one wing was mounted and I also wanted to avoid a tripping hazard and minimize width...this is the position I came up with


The center beam is great for hanging lights (as shown) or prints or air hoses or anything else you might want. I actually used it as a paint stand to paint my HS before I started on the wings.


No comments:

Post a Comment