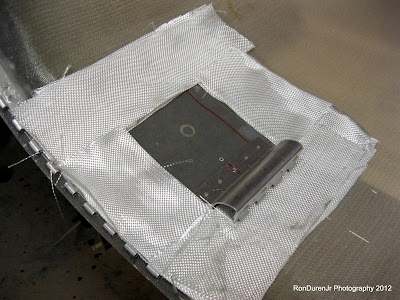
Over the holiday weekend, I tackled the oil door fabrication. At this point of the project, I feel pretty comfortable with what I call simple fiberglass projects such as this one. My skills have steadily increased since my first exposure with fiberglass and it feels good to be at a point where I can tackle something like this without apprehension.
The Van's stock cowl may have a pre-fabbed oil door, but for the SJ cowl, you have to start completely from scratch. I had cut the access hole out very carefully to ensure I could use the cutout as my door. Now it was time to build the 'lip' that will close the gap in the reveal. First, I wanted to try and position the hinge strategically. I didn't have any instructions, so from here on out is all me...just winging it.
What it looks like from the inside as I get things situated...
As I get ready for apply the fiberglass (FG), I used clear box tape on all areas that I didn't want the FG resin to adhere to. This obviously included the door itself. Not only did I use the tape, but I also sprayed all areas that I didn't want anything to stick with my "redneck" mold release agent...AquaNet hair spray! Works just fine for this.
If you look close, you can see that I also added some modeling clay in the gap (reveal) between the door and the cowl. I didn't want resin getting in there that would be a pain to sand. You want to make sure you keep about a 1/16" min gap to allow for paint thickness on the door and cowl.
Once I got it prepped, I cut some 2" strips and laid them out to check the fit.
Next, remove the FG strips, mix up a batch of resin and start getting the strips saturated for placement. In this pic, you see the finished product...along with some peel ply strips on the rough transition areas. I didn't see the need to try and make this completely smooth since it will be on the inside...but I could see the argument to make this cosmetically more pleasing.
Again, notice the modeling clay in the gaps...and the tape wrapped around the door. This is obviously looking at it from the outside.
I let it dry overnight...come back out and carefully pop the door out. If you did a good job with your tape and mold release, it pops out pretty easy. You see that the lip is much bigger than I need it...I will trim this to size in a bit.
Here I am cleaning out the modeling clay...worked like a charm. Although I'm sure I'm not the first to do this little trick...I came up with this idea on my own...was very happy with the results.
Now its time to trim the lip. I didn't want this very big...I settled on about 1/4". Enough to give it a nice clean, closed up look, block out water and air, but also not too big to cut down on the access hole size.
A shot of me using my 1" rotary file mounted in the drill to clean up the rounded corners...
Not done yet, but its starting to take shape. I added some filler to smooth things out and clean it up a bit....and then did some sanding.
Reinstalling the oil door and hinge...the hinge is riveted in place with a coat of filler over the rivets. Once painted...there will be no sign of the hinge or the rivets...yielding a nice, clean look.
This gives you an idea what my 'reveal' looks like around the door...although not perfect (it looks hand crafted), it really came out pretty darn good and I was pleased. I can play with it more later before painting if I want to make things more precise, but for now, this is just fine.
A couple of awesome looking shots (or at least I think so!) of what the door looks like when I installed the torsion spring that came with the hinge. I want it to pop 'open' like this when it is unlatched. That way I can be sure, sitting in the cockpit during my pre-takeoff checklist that the oil door is, in fact, closed and not going to pop open on the climb out...in theory.
Here is a real quick video showing it in action...pretty cool eh?


No comments:
Post a Comment