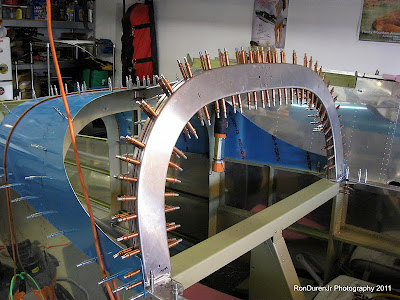
Last weekend I spent a fair chunk of time working on the canopy frame. Its quite a little bit of a time consuming project but I really enjoyed this task. It was exciting to see the canopy shape start to take hold. I also did some custom mods that I am learning I personally really get a kick out of. Putting my 'fingerprints' on the build is very gratifying to me. As much as I enjoy it however...it does add time to the build so choose your mods carefully.
Lots of match drilling in this sub-assembly...which is the time consuming part. There are two 0.063" strips that attach the two halves and Van's originally sent me the lower one cut too short from the factory (at least I think it was their mistake?...I don't remember cutting that piece). They were very gracious to send me another one and even picked up the shipping cost--no questions asked. Great customer service that Van's is known for.
So...I wanted to strengthen the canopy frame as part of my custom mods. My friend Sean Blair told me about a flipped RV where the canopy frame was a mangled mess. Luckily the pilot survived but it got me thinking. This canopy frame is intended to protect the occupants in the event of an accident. Of course I realize this can't protect you from everything but stronger is certainly better....within reason, low cost and low weight are also important.
In this pic, you can see...because of the mistake by Van's mentioned above, I now had some extra 0.063" material laying around. Hmmm, how about using that to double up on the lower ends of the frame?? Voila...nice idea, I think....
Here you can see them cleco-ed in place.
Since those added pieces only covered the lower end of the frame I want to add some strength to the radii as well. Here I added (again with scrap) some stiffeners to the corners, which I riveted in later. I think this was only 0.025" so it wasn't very significant...something thicker would be stronger of course, but this is what I had so I used it.
Here I am carefully doing layout work, squaring things up before match drilling to the fuse...you don't want to mess up when you get this late in the build. I cant just throw away an entire fuselage now can I??! ;)
Attach angle brackets getting ready for match drilling...man, these buggers were a pain to cut to size, they are beefy at 0.1875" thick, glad to have it behind me.
Test fitting on the fuse...looking pretty cool eh?!
And another one of my mods. I didn't like the way the attach brackets were exposed (click on pic above to see what I mean)...just didn't look finished to me, too utilitarian for me. So I fab-ed up a couple of cover plates (I'm getting pretty good at this) that will not only cover up the attach brackets but also add a little extra strength to the attach point structure in the process. Again...low cost (scrap) and lightweight. It remains to be seen if this mod causes me issues with the canopy install, I scoured the canopy plans to check and I think I'm ok...but I can always remove them later if they do. I do like the look of them, they turned out nice....
Here it is riveted in place...as you can see, my canopy frame is finish painted flat black (more on this later). I later painted over the rivets to cover them...even though I think they look kinda cool contrasted with the black.
If you have a three legged stool and strengthen two of the legs...you darn sure better not ignore the third or you aren't doing much good! So...my 'third leg' on the canopy structure was the connecting piece back to the aft fuse. As you can see, I added two angle pieces to stiffen this puppy up. Here you can see them riveted in place and tied into the aft fuse connecting plate.
These parts have been sprayed with self-etching wash primer since I would be finish painting them. That wash primer is really thin, watery stuff...it doesn't spray well for me, comes out splotchy as you can see.
Let me add, just because I made these mods doesnt mean that the design is flawed. In aircraft design, adding strength always comes at a premium of either weight or cost (exotic materials). Van's designed this plane exactly as he saw fit, to compromise between cost and weight so I understand the thinking. I'm ok with a little added weight, some guys arent and thats ok too...its your call, neither is wrong.


No comments:
Post a Comment