Spent most of my day saturday working on the left fuel tank. Finishing up last minute details like running the vent line and the wiring for the fuel sender capacitance plates. I thought these were just small details, but it took me most of the day to do this. It was fun though, I enjoyed this task. I wanted to get everything ready for an early morning start, before the heat of the day, on sealing the tanks. I accomplished that. Lots of pics in this post, see descriptions below.
Flop tube installed, torqued and safety wired in place. I will add ProSeal later to seal up the openings...this is not done yet in this pic. Just prepped for final assembly. You can see my orientation of the flop tube...pretty much straight out...kind of splitting the difference between normal and inverted flight but biased toward normal flight (if that makes sense?).
Bought a pound of 'no clean' solder (expensive stuff, $28), a large syringe and some tongue depressors for mising ProSeal.
Here are my 'AN' fittings safety wired on the flop tubes. It was the first time I have safety wired anything since I worked at Las Vegas Propeller way back in the early 90's. It wasnt my best effort as I was quite rusty...but not too bad either. This safety wire is a realitively new recommendation (SB) by Van's...apparently there were times when these would loosen. I torqued these with the 'quarter turn' method shown on the Van's website.
Vent line routing...
Wiring laid out for connecting the capacitance plates. I will attach a terminal and shrink tube to this later.
This is where the vent line 'terminates' in the tank.
I had to use my rigid tube bender to make an 'S' turn in the tubing to match up with the AN fitting in the end rib. This was a little tricky to get it just right. I certainly need practice on this before doing fuel lines. You really want to be sure you have a nice square mate for a good seal.
I used my Parker Roto flare tool for the first time. I practiced by doing this a handful of times before tackling the real thing. Good thing too, because I didnt do so hot the first couple times as you can see from the pics. I used my Aviation Mechanic Handbook to see how to do this correctly.
Several iterations of my practice parts...went way too much on my first one as you can see but kept improving with each one until I was ready for the real thing.
And here it is ready for install...pretty good matchup. Dont forget to put your sleeve and nut on BEFORE doing the flare!
Screwed into place for a test fit. I will remove the blue protective coating off the washer during final install.
The other side...I removed the end rib and let the excess tube hang over the edge. The other side has the 'S' bend and the AN fitting and is more critical. Get that side done...then mark this end and cut if off as needed. Worked good this way.
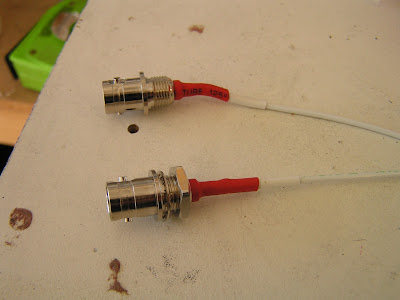
Soldered the coaxial connector to the wire that attaches to one of the capacitance plates. Van's says to solder this and then just goop it up with ProSeal to cover the exposed wire. I'm sure that will work fine since most builders do it this way but there was no way I was going to leave the strain relief to the ProSeal. I installed two piecs of shrink tube to take the stress off the solder joint. I will then cover it with ProSeal later. This looks much more professional.
First piece of shrink tube installed...
And now a second piece of shrink tube. Looks nice eh?
I did a complete 'dry' run with everything installed before ProSealing. I wanted to get everything just right now before the clock is ticking on a batch of ProSeal. I am now ready for action!! Bring on the ProSeal!


No comments:
Post a Comment