I just tackled the first 'tricky' task in my project. The Rudder trailing edge. The trailing edge used to be a continuous formed piece of sheet metal. Now, the design has two seperate skins with an AEX aluminum wedge sandwiched between them as I mentioned in my previous post. Van's recommends using 'proseal' to glue the pieces together before riveting. Proseal is a two part epoxy that is also used to seal the wing tanks. I had heard it was sticky, nasty stuff...and I have to sort of agree. It is definitely that, but it wasnt as bad as expected. Of course, I just did a small job. I used one of the 30 min tubes that Van's sells, along with the application gun also sold by Van's. Worked well, except I only used about half the tube of proseal...so there was some waste involved. But, I think the tube was about $17...so not a big monetary loss. Well, it is now glued and will sit for a couple days to set up and cure before I rivet. The good news is, it is straight as an arrow! I see no noticable deviation from a straight line. If nothing changes while riveting, I will be a happy camper!!
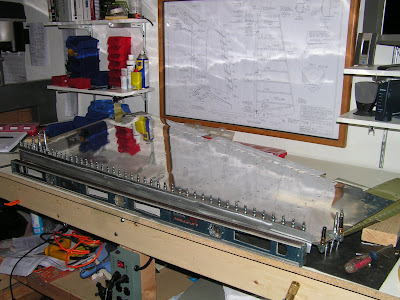
As shown before, this is my setup...I've been happy with this strategy...everything came out nice and straight.

I used a couple cleco clamps on the ends to hold everything in place. I also added a little proseal to the rib-to-skin interface near the trailing edge just for a little added holding power. In addition, I gooped a little around the end of the AEX wedge.

Another view of the other end...the bottom of the rudder, same principle here. You can see a little bit of the dark gray proseal in this picture. So now, I wait...stay tuned to see how the finished product turns out!

 As shown before, this is my setup...I've been happy with this strategy...everything came out nice and straight.
 I used a couple cleco clamps on the ends to hold everything in place. I also added a little proseal to the rib-to-skin interface near the trailing edge just for a little added holding power. In addition, I gooped a little around the end of the AEX wedge.
 Another view of the other end...the bottom of the rudder, same principle here. You can see a little bit of the dark gray proseal in this picture. So now, I wait...stay tuned to see how the finished product turns out!
No comments:
Post a Comment