Ron's RV7 Aircraft Factory


Welcome to my personal blog. This site was created as an informal description of my build progress in the construction of a Van's RV7 aircraft. A place where family/friends/builders/curiosity seekers can follow along. It is not intended to be a detailed description of every step in the building process as that would be much too time consuming. There are plenty of sites that do a great job in that arena, that is not my intention with this site. My intention is for this to be a philisophical/motivational/inspirational account of the emotional ups and downs of the life changing journey...and it will change your life. I hope this will give you an idea, through my eyes, of what its like to make this transformation. A note to other builders, I am not an expert so do not put your safety at risk by attempting anything you see on this site until you have done your own research, or send me an email so we can discuss it. Any deviations from the plans are not approved, nor endorsed by Van's Aircraft or myself. Thanks for visiting.


Friday, October 28, 2011

New Items HOBBS 913.0 hrs

Received some misc parts I had ordered recently. Always fun to get airplane stuff. These items came from JD Air and Avery Tools. Both great vendors, easy to work with and a well deserved reputation for good customer service.


Custom canopy latch from JD Air...this appears to be a cast aluminum part with some post operation machining. It will need some finish work, I am planning to red anodize it once I clean it up.


Fuel tank vent fairings. I am very pleased with these...good quality and they have an alternate air path machined into them. Vans specifies just using a fitting cut at a 45 deg angle and pro-sealing a bug screen on them. Probably works just fine...these just 'class' up the plane a little bit.


I bought a set of washer wrenches from Avery. I knew I would need these for installing the control sticks...guys that have them in the toolbox swear by them.


Tailwheel link and control arm, also from JD Air. There are several companies out there that do an aftermarket control link and I think they are all pretty similar. I like the quality on this one, a little pricy though.


Rudder cable fairings. You can make your own...but these seemed like a no brainer to add on as I needed to order some other stuff from Avery anyhow.


Rudder pedal extensions from JD Air...again, nice quality here. Being the idiot I am...I only ordered one set however. I forgot to order a set for the co-pilot side...whoops.


A follow up on a previous post when I couldn't find any material for the seat belt cable wear blocks...well I found 'em...in the package with the seat belt cable. d'oh! Oh well, my homemade version were just as good...now I have an extra set for when the other ones need replacing.

Tuesday, October 25, 2011

Lots of Progress HOBBS 907.0 hrs

Really cooking along with progress lately sling-shotting past 900 hrs on the project HOBBS...next stop 1000! Here are lots of pics...


Fuel tank vent line...this was a heckuva lot of fun to do. Lots of bends...the hardest ones being where it goes around the rudder cable. This isn't perfect and not as pretty as some I have seen, but I was proud of the fact I did both sides on my first attempt.


I added these mounting tabs to my false floors.


3/4" sound/vibration matting cut and in place for a test fit of the completed floors.


And there ya go...installed, looks pretty cool. I get a lot of satisfaction over seeing something I did from scratch...even something as simple as this. ;)


Here you can see where that afore mentioned mounting tab is located


Remember in a previous post when I said...I don't know how the heck you are supposed to get a bucking bar in to do this rivet?? And I just gave up and put a pull rivet instead? Well, while I was visiting Sean...I mentioned this to him and he said, you aren't supposed to rivet the attach angle in place until after you rivet the skin. I thought...I remember the instructions saying that...hmm, head scratching as I was confused? I get back and look at my project....and had one of those, "golly, I am stupid!" moments....read on to see why I said that.


In this pic, you can see...sure enough, I actually DID follow the plans and left this mounting bracket cleco-ed in place...just needed to remove it to get access to the rivet. Such an idiot that I didn't even notice this when I looked at it before. Sometimes you just don't see obvious things after looking at something for hours and hours. I will remember that when it comes time to look my plane over before the first flight....its a good lesson.


Fixed...I feel better now...thanks Sean....


On to mounting the tail feathers...this is gonna be fun...and nerve wracking at the same time!


First order of business is drilling the elevator control arms...nice and square. I think I was successful...I followed Van's instructions to the letter.


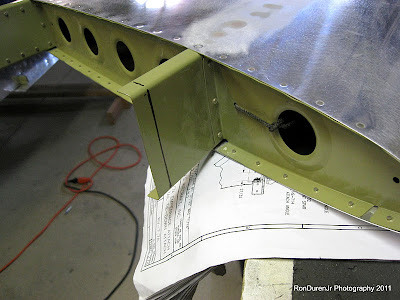
I did my own thing here (I am not recommending this, this is a deviation from the plans...proceed at your own risk). It calls out two small spacers here for each side. I decided to span the entire width, and also add a mounting bolt in the center.


In this shot, you can see my custom spacer bolted in place with five rather than four bolts


I still need to get my VS primed...as soon as I am done fitting it I will get this taken care of


Gotta cut 5/8" off the bottom here...not really sure why they just don't cut this to length at the factory??


Cutting and fabricating the elevator push/pull control rods, nothing to it...easy, peasy. Don't forget to prime the insides


Test fitting the control rods...very cool, everything moves as smooth as silk!


Make sure you remember to offset the VS 1/4" to the left when mounting it to the fuse...yup, the VS is NOT straight...by design. This is an aircraft design technique to help offset the left turning tendency of the airplane. There are various ways to do this, this is just one version.


Installing the rudder cables...as you can see, the cable doesn't actually fit in the -625 bushings!! I scratched my head for a while on this one. Then I read Jason Beaver's blog and learned you just need to remove them, force the cable through (yes, it will go with some coaxing) and then re-install.

Canopy Frame HOBBS 888.5 hrs

Here are some pics from last week's progress...I'm a little behind posting these. The next step in the instructions is mounting the wings. Since that will take two or three helpers and some rearranging in the shop I am putting this off for now until I can coordinate this. So, you'll notice I am out of sequence on most of these upcoming items. Shouldn't be a problem as they really aren't inter-related to each other at this point.


Doing the layout for the canopy frame. I came up with this as my spacing of rivets for the outer flange. Yours may vary depending on your starting/ending points...so don't just copy my figure without doing your calculations.


Match drilled in place...looking good. Although, at this point I realized that my inner strap came from the factory too short. d'oh! So, I will put this effort on pause while I contact Van's and get the right one ordered.


Getting my center panel ready for priming. Bent the heater louvers as instructed...kind of a pain, luckily its not very thick material.


I almost forgot, I had to add a cutout to my false floor panel for my fuel tank vents. I match drilled these from the bottom skin...sure doesn't look like it does it?? Kinda off for some reason? Oh well, you'll never see it when the carpet is installed later.

Friday, October 21, 2011

Finish Kit On Order! HOBBS 888.5 hrs

Just a quick update today so I can get caught up. Been working on various things on the fuse this week and last weekend, lots of little items to cross off the 'to do' list. I'll post pics of my progress in my next entry. I've been kind of 'obsessed' with the project lately...exciting times.

Since I got back from my trip to visit Sean's project I have been ordering quite a few items that I need to keep plugging along. I also just ordered my finish kit today! So, in approx. 8 weeks I should have my fourth and final sub-kit. Wow, what a journey from that first order when I bought the empennage kit and had no idea what I was getting into...I've come a long way. Have a good weekend....I'll be in the shop, how about you? ;)

Tuesday, October 18, 2011

Meadow Lake Trip HOBBS 877.5 hrs

Boulder Flatirons

"Paint if you will, a picture..." (I know, I know...cheesy 80's "Prince" reference...sorry).

I wake up Saturday morning bright and early like usual these days. Grind and brew up some fresh coffee and bounce on out to the shop to start in on the "aluminum mistress." I spend four fun, productive hours working on the plane (more in my next post on what I accomplished). Around 11:00am...I shut down the factory for the day and head upstairs for a quick shower. Alas, the fun had just begun for I had other things on the agenda for this Saturday afternoon.

I drive out to Boulder Municipal airport (KBDU) for a date with the Citabria and ultimately a rendezvous with fellow RV7 builder Sean Blair. I had decided to fly 72 nautical miles down to Meadow Lake (KFLY) airport near Colorado Springs to visit Sean's project and see his new airplane parts he received from Van's. Yep, he just took delivery of his finish kit so I was keen to see that up close and personal since I am just about ready to order my own.

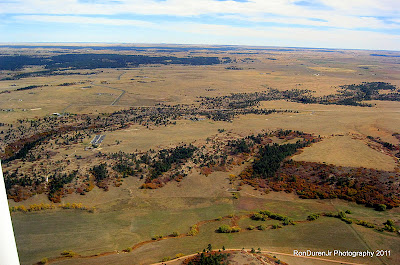
I knew it was going to be a very scenic flight since the fall colors are bursting right now. I was not disappointed. What I didn't expect was the fact that Sean and I spent so much time talking RV's that my return flight was many hours later as I launched just before sunset headed back home. So, not only did I get the great fall colors on the way down but the unexpected bonus was an amazing sunset flight back.

After I found my way to KFLY...first time flying there. To be polite, I enter on the 45 for a left downwind for runway 15 instead of a straight in approach...I see the windsock on short final, slight right crosswind. Of course, there is Sean standing next to his truck at one of the taxiways next to the runway snapping pics. And sure enough, I bounce my 3 pointer right in front of him!! :) Nice huh? He says he didn't see the bounce...I think he was being kind?

We head over to a nearby restaurant/bar and grab some lunch and proceed to talk non-stop about RV's and our projects. From there, we make the trek to Sean's house. I gotta say, upon arrival I was impressed, very nice house, a first class build and shop setup. You can certainly tell Sean does quality work...his neatness and attention to detail put me to shame!


Here are some pics from the trip out....


My 3 point arrival...


Here is Sean's tinted canopy...special ordered from Van's. I really like this and plan to do the same on my canopy. I really don't understand why more builders don't go this route? Its gonna look slick and should be cooler! And its such a subtle tint, I'm not at all worried about night flight visibility.


Sean's immaculately clean shop and nice looking wings!! I just wanted to go home and clean my shop after seeing his. ;)


My trusty steed waiting patiently for me to take her home...it was so cool to finally go somewhere in the plane instead of staying in the pattern doing touch and goes. An airplane is made for travel darnit!


Taxiing out for departure into the setting sun...after roughly 6 hrs of talking aviation and RV's...loved every minute of it. Thanks Sean!


Sorry, but there is nothing quite like seeing the sun set over the Rockies...from altitude!! I gotta tell ya...days like this make me feel so fortunate to be a pilot...I was thinking it was pretty much a perfect day as my wheels chirped under me upon touching down back at Boulder. As I tied her down for the night and slowly walked to my car, I couldnt help but smile reflecting on the day behind me.