

Tuesday, May 31, 2011
Homestead, FL HOBBS 689.0 hrs
Looking at their SPOT track, it looks like Scott and Deb have arrived in Homestead, Florida after traversing most of the US. This will be the launching point for the trip to the Bahama's...I had heard reports of up to 20 planes in this contingent!

Tailwheel Training Lesson 4: HOBBS 689.0 hrs

Crosswind landings were the order of the day for lesson 4. The winds were kicking up pretty good on Friday afternoon as the Memorial day weekend was officially underway. I got off work at 3:30pm and drove the half mile over to SFTI and greeted Lyn. Pre-flight...double and triple checked the fuel caps...both intact and accounted for! ;) We departed Boulder for Ft. Collins-Loveland airport (FNL) with its longer 8500 ft runway-- its about a 10 min flight northeast from our location.
As I said in my previous post, Lyn wanted to get up there for the longer runway but didn't really say why? So off we go, everything is feeling pretty comfortable for me now. At this point I had 4.5 hrs of flight time under my belt and although I was far from a polished TW pilot, I was safe and felt like my skills were adequate to build on.
As we arrived at FNL, the AWOS was reporting winds at 18 kts G24 at 60 degrees to the runway! Oh boy, this is pretty close to a direct 15 kt crosswind component (I didn't do the calcs, just guessing...). 15 kts is typically the max recommended crosswind component for most light GA aircraft like the one I am flying.
It was time to put my new found stick and rudder skills to the test as this was going to be quite a challenge for this green TW pilot, but I was up for it...even a little excited for the task ahead. If I could land in this, I would feel pretty comfortable handling most windy days. As I'm thinking this on our downwind leg, I hear an experimental taking the crosswind runway for a takeoff into the wind...this was not a crosswind he wanted to tackle if he didn't have to, can't say as I blame him. Hmm, maybe I'm being a little over-confident?
I come around on final, line up with the centerline and dip my left wing into the wind and apply some right rudder to hold my track. So far so good, same as a tri-gear, all is well as I proceed to my aiming point. The gusting winds always make things interesting however...I'm making lots of small control movements to maintain a stable approach...glideslope-check...airspeed-check...centerline-check. The pilots out there know what I mean, to the non-pilots I'll just say this is a high workload environment on an approach as you get jostled around with gusting winds and wind shear.
I come down over the runway, level off and slowly pull the power to idle as we cross the fence, then wait for the plane to dissipate some energy before starting my flare. When this happens, I know the airplane is ready to land and I ease the nose up just slightly. I added 5mph (80mph) to my approach speed because of the gusting winds so I'm intentionally a little fast and have more energy to bleed off so it takes a little longer. I set down on my left main gear, wing still tucked into the wind. We hover there for a moment on one wheel, next comes my right main...I'm still on centerline, perfect technique so far.
As the plane starts to slow and I'm thinking there's nothing to this crosswind landing stuff...I am once again quickly humbled at the controls of an airplane.
Let me explain. Most pilots will use a wheel landing for crosswinds so they can carry the extra speed for greater control authority during the landing roll. I had the same plan as you can tell from my description. The main flaw, and well known, with this strategy is there is a vulnerable time as the landing develops. As the airspeed slows and the tail is still in the air, rudder effectiveness begins to disappear. Obviously having the tail in the air, with a crosswind trying to weathervane your nose into the wind, and no rudder control is a bad position to be in. So getting the tailwheel on the ground as soon as possible for steering control is paramount.
But...alas, its not that simple since you cant lower it too soon (or too abruptly) or you will increase the angle of attack on the wing and before you know it you'll be airborne again and bouncing down the runway! Ask me how I know this. Its very much a 'feel' maneuver to know when and how fast to lower the tail on a crosswind wheel landing. Of course I had read all about this in my book, but reading is one thing, "doing" is an entirely different matter.
Of course, this 4.5 hr TW pilot doesn't have that 'feel' yet. As I start to lower my tail, albeit a little too slowly and I consequently get caught in 'no-man's land' and lose my rudder effectiveness, we start weathervaning into the left crosswind...ie, the nose goes left along with the occupants. When this starts happening in a TW aircraft, things get interesting in a hurry. So much different than a tri-gear. You really have to step up the urgency with control inputs before things get out of hand...a ground loop can occur very quickly if not.
So I wrestle control of the airplane back as I veer back to the right...and then again to the left, I finally get my tailwheel down and line us back up for takeoff...zoom, off we go. I take a deep breath, crab into the wind, and think...wow, now that was interesting! ;) And almost on cue like he was reading my mind, Lyn makes a sarcastic comment from the back, "that was an interesting diversion" he chirps into the intercom. And, like always with Lyn and I we both chuckle. This doesn't suck, it's a lot of fun for a guy with a passion for flying...I am having the time of my life! :)
Next time we come around I'm thinking, alright got that one out of the way...now I know what to expect. I figure I'll do much better on this one. As we come down on short final, its not to be, Lyn unexpectedly asks for the controls. A little confused, but in no mood to question him right now as we are on short final...I respond, "your airplane." He counters with "my airplane"...for the non-pilots, these are typical control exchange responses during flight training.
Lyn brings us down, again, left wing low into the wind. We level off and he keeps a little power in...right above the runway...inches from the ground. We fly the entire length of the runway in this wing low attitude...holding centerline and momentarily touching down softly on just our left main gear. Its a great training exercise and really a lot of fun. He gives the controls back to me when we reach the end of the long runway.
Coming around again...you can only guess whats coming. He says, "now you do the same thing...but do it better than I did." I laugh and say..."sure Lyn, not a problem!" And with that, I gotta tell ya I think I pulled it off...I may have actually done a better job than my instructor. Granted he is flying from the back seat and wasn't warmed up...but hey, I'll gladly take it and was proud of my effort.
With this maneuver, even more so than the final approach because we are so close to the ground, the minute control inputs with the rudder, stick and throttle were fast and furious to keep the plane where I wanted it all the while fighting mother nature's mischievous attempts to disrupt my plans. "Woo hoo, that was a kick" I say into the intercom! Although I wanted to do it again, we went back to normal crosswind landings.
We did 4 landings here with these crosswinds before Lyn said he thought we had reached the limit of the aircraft as it was getting difficult to hold centerline. We then flew over to Longmont for 5 more landings, this runway was directly into the wind so it was much easier to manage. Since I already felt comfortable with my 3 point landings, I practiced my wheel landings, which I also felt comfortable with by the end of this lesson. One of which could be described as pretty darn close to perfect. I received a congratulatory 'nice job...I liked that landing' comment from Lyn...always nice to hear in my headset.
All told, we did 10 more touch and goes and logged 1.9 hrs of flight time (6.4 hrs total now). For most people, this might be the point where you would be signed off for a tailwheel endorsement. Since I have to build up 15 hrs so I can rent the Citabria from SFTI, I will continue my training with the other things I want to cover. We are going to try to get a mountain flight in next time...we'll see if the winds cooperate?
Thursday, May 26, 2011
A Novel Approach HOBBS 689.0 hrs
This guy had a novel approach to building an RV7A...I have to assume the garage (if he has one) wasnt an option! ;) The video is interesting as well. Oh well, you gotta give him an 'A' for effort and determination.
And that, my friends, is the only thing that will get you through when building one of these babies. Not skill, not craftmanship, not intelligence, not an A&P or Engineering background, not fancy tools or even lots of money...'Bulldogged' determination as I like to say, is the key to one day seeing it fly.
And that, my friends, is the only thing that will get you through when building one of these babies. Not skill, not craftmanship, not intelligence, not an A&P or Engineering background, not fancy tools or even lots of money...'Bulldogged' determination as I like to say, is the key to one day seeing it fly.
Bahama's Contingent HOBBS 689.0 hrs

RV6A pilot/builder Paul "Rosie" Rosales is legendary for leading large flights of RV's to awesome destinations and blogging about it to motivate us builders. His mantra is, "keep pounding rivets, its ALL worth it!" What a great rallying cry for us to, as he suggests, keep pounding rivets (KPR).
Right now as I write this, Paul and his wife Victoria are making their way across the United States from their airpark home in the California desert to Homestead, Florida to rendezvous with roughly 15 other planes. They just left North Carolina and as you can see, are now heading south.
Final destination for this trip is the Bahama's. The pic above shows their SPOT tracker onboard their RV6A, showing their progress. I have a handful of friends, and many others, coming from all over the US to join them in Florida for the trip down to the Bahama's--including Gary & Caroline, Scott & Deb and Jim & Vicki. How cool is that?
These trip reports are great motivation for a guy like me (thanks Rosie for 'paying it forward' and sharing)...I cant wait to travel with my RV7 when its done. In my mind, I am flying formation with them to warmer climes and a change in latitude, what an adventure! :) This is a great example of the amazing travel possibilities with one of these amazing airplanes. KPR!

No Disassemble #5! HOBBS 689.0 hrs

Btw, the title of this post is a kinda funny reference to the cheesy 80's movie Short Circuit if you didn't pick up on that. :) The #5 reference will make more sense later when I unveil my final paint scheme.
I also finally drilled my tailwheel spring to the aft bulkheads, I wanted to think about this a little before I did it, which was the cause for my delay. Van's doesn't say much about getting that baby nice and straight so I have to expect it isn't that critical...but I sure did a lot of measuring to try and get it perfect. I also bought a nice digital level that came in pretty handy. I think it came out pretty good, at least it looks straight...I guess it will be noticeable if I didn't when I start taxing it and get a feel for the ground handling.
So, now its time for the 'debur-dimple-prime' dance that I enjoy oh so much ;)...and of course, finally putting it all back together for riveting. I have been thinking about my strategy on this riveting step...not sure if it is a one or two person job? I think I can get it by myself by being creative, but if not, I have a few people I could call. We'll see. I've got a lot going on in the next two weeks with the holiday weekend and a mini-vacation to go see my little sister graduate so I'm not sure how much time I will get on the plane, but I know it'll be here waiting for me when I'm ready for her. Enjoy your holiday weekend!
Wednesday, May 25, 2011
Pete Vinton Video HOBBS 685.5 hrs

 |
| http://www.planeandpilotmag.com/ |
Tuesday, May 24, 2011
Aft Fuselage HOBBS 685.5 hrs
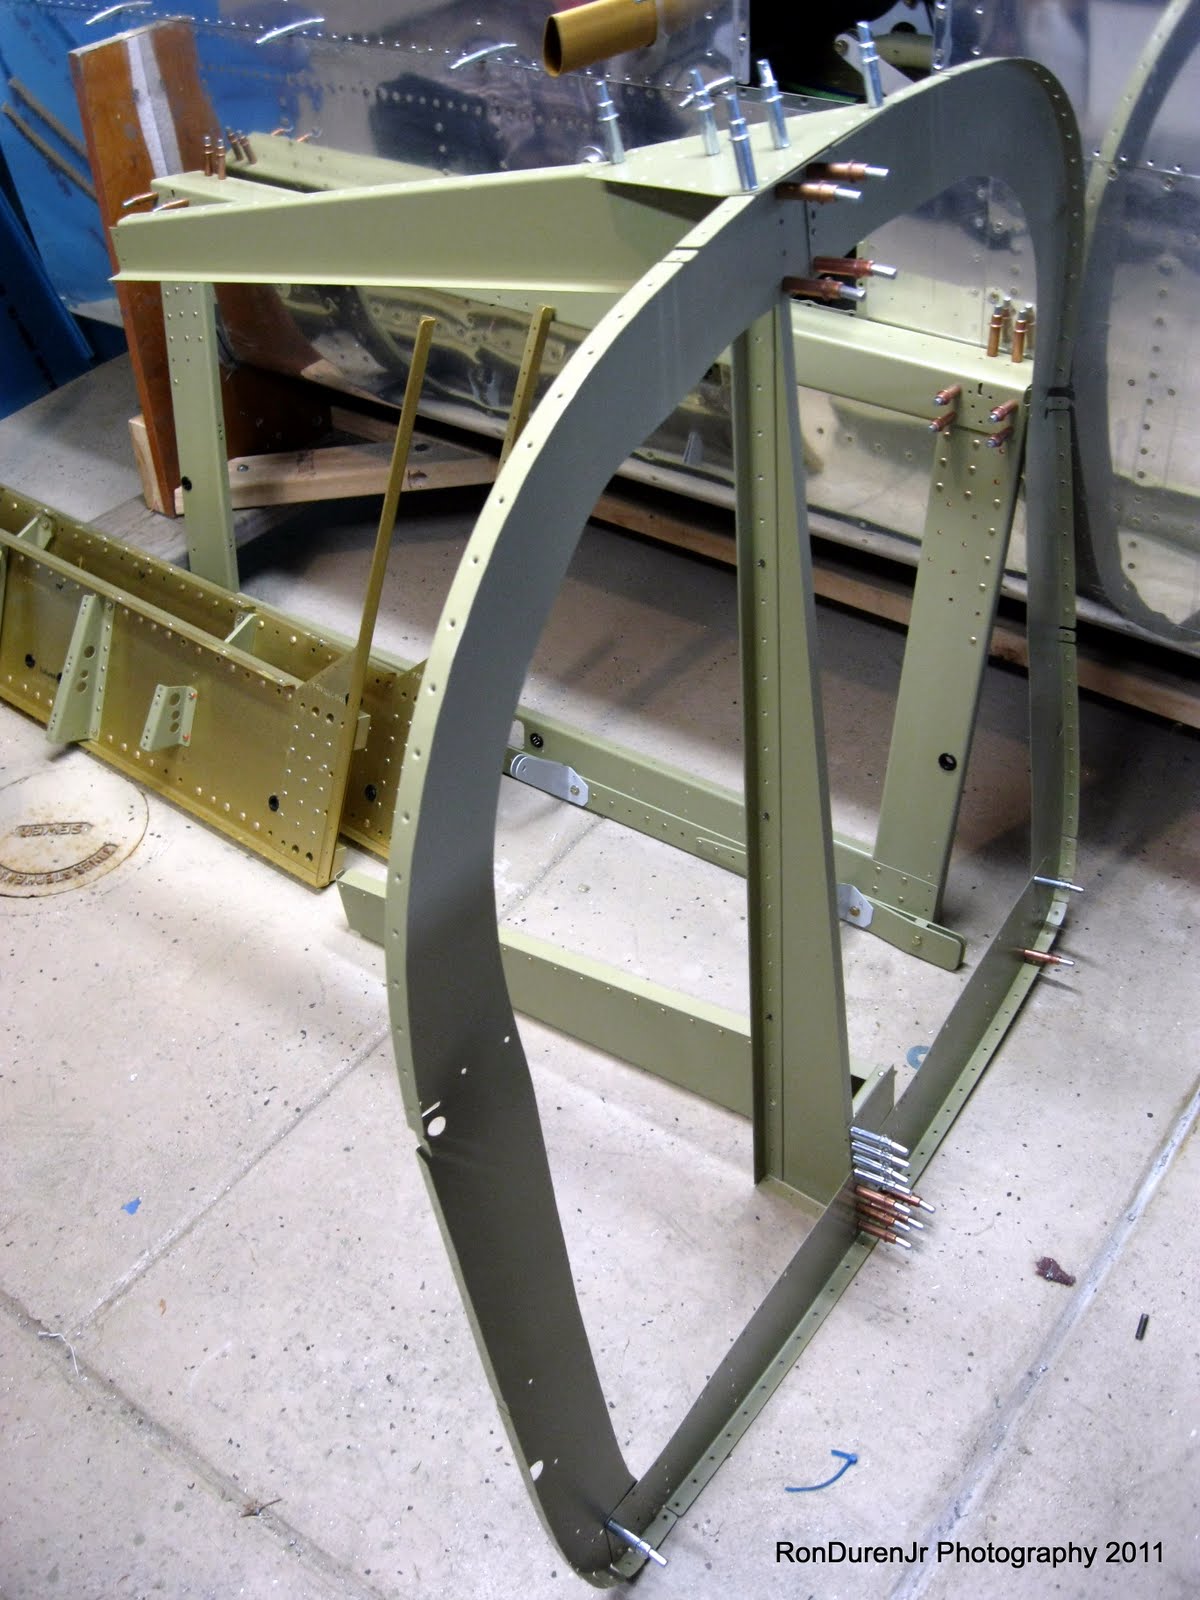
Last weekend I finally reached the point where I could start assembling some of the sub-assemblies I have, up to this point, been building. I gotta say, as I started cleco-ing big pieces together to form the aft fuselage, it was about as much fun as I've had on the project so far! I really enjoyed this.
The wings and empennage were fun too, but the fuselage is a whole different beast. It has a certain allure to it, probably because it is the part of the airplane where the occupants reside. Whatever the reason, this is getting fun....I snapped a lot of pictures.


The wings and empennage were fun too, but the fuselage is a whole different beast. It has a certain allure to it, probably because it is the part of the airplane where the occupants reside. Whatever the reason, this is getting fun....I snapped a lot of pictures.

Forgot to leave these two rivets out--so I had to drill 'em out, I think this is just for the RV7's? This is one place where the tail spring will attach to the fuse structure.

Here you can see me test fitting the upper end of the tail spring. You have to cut out a notch in the bottom of the skin and open up the 'rabbit hole' for the fillet weld. Not too difficult and it fit nicely.


This is a shot of the assembly--minus the J-stringers (aka J-channel or J-stiffeners) running down the side of the fuse. I wanted to get his cleco-ed together before I did my trim work on these. Not sure how smart that was...it was kind of a pain getting them in there. But, it did allow for nice trim work, as you'll see.


I just had to attach my bell fork and tailwheel...just cuz...it looked cool, no fuctional reason whatsoever. ;)

Cutting the ends of the J-stringers was a little tricky. The plans arent very clear about how to tackle this IMHO. My advice is cut the forward ends just like the print shows and then custom cut each one on the aft side (shown here). As you can see, I notched them around the alum bar. You dont have to be so precise...structurally it will make no difference, but it was kind of fun to trim 'em up nice and I liked the way they came out.

You may notice I forgot to flute my bulkheads on the curved areas on top. Whoops...no problem, I can do that later when I disassemble it for dimpling.

Same deal with these J-stringers...had to notch around the tail spring.

And here are a couple more shots with the J-stringers installed and drilled. Van's says to check for straightness of the fuselage before drilling. This really puzzles me...it doesnt say what to do if your fuse is crooked!?? My response is, there is not much you could do...its pre-punched by golly, it is what it is once you cleco it together. If its crooked its because it was fabricated crooked at the factory. Exactly the same argument I had with the wings, its not needed...they dont require a jig precisely because they are CNC punched. Anyhow...sorry about my rant, I did check it, and surprise, surprise it was straight. ;)


If you look close on these last two shots, you can see I have the J-stringer on top of both of the aft tail skins instead of between the two. Kind of hard to explain unless you are actually doing this part of the project, then you would understand. I couldnt tell in the plans if it shows the orientation of this stringer? I did it this way initially (as shown), but I dont think this is the way Van's intended so I am going to switch it when I rivet it. Either way would work from what I can tell.

Monday, May 23, 2011
Tailwheel Training: Lesson 3 HOBBS 676.5 hrs

Saturday morning it was time for lesson 3 in my transformation into a taildragger pilot. Thankfully, I survived "The Rapture" or the predicted apocalypse that was supposed to happen Saturday at 6pm. But, I didn't get out unscathed. :) Let me explain.
I now had two lessons under my belt and 2.9 total time in the Citabria. The mission for this flight was to fly over to Loveland-Ft Collins for some more pattern work. Lyn wanted to go somewhere where we could get on a longer runway. I'm thinking he had some emergency procedure work in mind that he wanted to unleash on me. For example...cutting the power at 50 ft while on climbout. Cool I thought, I enjoy this sort of stuff.
I proceed to do my pre-flight and while I am in busy with that, Lyn breaks out a fuel level checking device for measuring the fuel level in the tanks. If you haven't seen one, its just a clear tube that looks like a straw with indicator markings. You place it in the tank until it touches the bottom of the tank and then place your finger over one end to trap the fuel in the tube. Pull it out and read what the level indicates, simple but effective.
The Citabria has two wing tanks that simultaneously feed into the fuel intake. There is no "left-right" fuel selector in this aircraft like there is in the Skyhawk or DA-40, it is "both" as the only option. The first two flights I had just used the fuel indicator in the cockpit to check fuel level--bad habit on my part--instead of doing a visual check which I should be doing, but I'm STILL learning...as a pilot, always learning.
The fuel level on the gauges reads "empty" on one tank and "half" on the other...when adding the two together, we would read that as 1/4 fuel capacity. Why one tank would be empty and the other half makes no sense to me since they are supposed to feed together? I asked Lyn, he wasn't sure either and joked "maybe someone was flying around all day in a wing low flight attitude?" He ensured me there was nothing to worry about, it was normal in this plane.
I jump up on the ladder and checked the right tank, it shows 30 gallons on the indicator. I look at it and am confused, this tank only holds 18 gallons (17.5 usable) total, how could that be? So down I climb from the ladder and ask Lyn..."why does this read 30 gallons?" He says, "its designed for a different aircraft so we had to use a conversion chart...which, after consulting, says we actually have 14.5 gallons. Ah, much better, but certainly more than the gauge was reading....which is precisely why we should never feel comfortable with the fuel gauges in aircraft. I check the left tank and sure enough, I get no reading...its basically empty.
Ok, so now we know we need fuel, we discuss going over to Longmont as we did on our last flight for a top-off on the tanks before starting the lesson. Takeoff was good, right on centerline...no drift, ok, now I'm getting a feel for this baby.
A short flight of about 5 mins and I enter the pattern on a left crosswind and decided to do a quick touch and go to warm up the hands and feet. Pretty decent 3 pointer to start the day, I quickly assess that I am feeling much more comfortable already. The gains I expected on the last flight seem to have taken hold on this third flight. I come around again and land with another pretty good effort, the winds are calm at 9am and its a nice pleasant sunny day in the Rockies.
We ground the aircraft, pull out the ladder and I fill up the left tank...it gets just a few gallons...over to the right tank, it thirstily sucks up 15 gallons so although it read empty, it actually had about 3 gallons in it. I look around and don't see the fuel cap. I ask Lyn, "do you have this fuel cap?" He says "no"...and all of a sudden I get that bad feeling burble up in the pit of my stomach. We discuss it and try to replay the pre-flight in our memory...was it on when we left Boulder? I said, I wasn't sure, but I couldn't confirm it. Another BAD mistake on my part, I was already beating myself up over this as we discussed our plan going forward.
Well, we decide to head back over to Boulder and look for it on the ramp/runway. As we departed the pattern for the 5 minute flight back, we now could easily see the fuel dumping over the top of the wing and off the trailing edge in a white whispy stream. I think I may include a cruise checklist item to visually look for this on climbout in the future...we didn't even notice it on the way over to Longmont. The low pressure on the top of a wing in flight will essentially syphon fuel overboard like a vacuum.
It can be a very dangerous situation on a long flight if you don't notice it and all of a sudden your tank is dry, which is essentially why I am not happy with myself. I had let myself become distracted and lost my focus on the task at hand. These kinds of simple things can kill a pilot if left unchecked, or you string several of them together into a chain of events that lead to an accident. I know better. As we line up for the landing, I have to consciencely put the event, that's weighing on my mind, out of my head so I can concentrate on the landing at hand...no sense letting this snowball.
After we secure the aircraft on the ramp, we proceed to look everywhere and cant find it. Dang...that's gonna probably cost me. We borrow one from the maintenance shop next hangar over and decide to continue with the lesson but just remain in the pattern at Boulder since we didn't have enough time left for our original plan.
By now, the winds have started to pick up considerably so this might get a tad interesting. As part of my tailwheel checkout I need to do some crosswind work, so this will work out well.
Up we go, the winds now favor runway 26, which points almost directly to the west and the foothills of the Rocky mountains. My last instructor said, he never liked doing pattern work at Boulder when the winds were favoring this runway. Although I had landed on 26 a few times before, I hadn't experienced it very often, its also a righthand pattern which is a little different. The winds whip over the Rockies and burble quite violently sometimes as they transition to the plains of east Colorado. AWOS was reporting 17 knots gusting to 24 (17G24kts) as we lined up for the first landing.
We had a slight right crosswind component, so I transition into a right wing low, side slip attitude. I touch down on my right main in a wheel landing, by design. All is well, then I forget to keep aileron correction in place and neutralize the ailerons...doh, stupid, stupid, stupid! :) Now things go from nice and controlled to plenty interesting as that wind starts to pick up my right wing and I start losing directional control. I finally get a hold of the situation and plant the tail on the ground for some steering control. Whew! Off we go to come around the pattern and try again. In a taildragger, the winds take on a whole new meaning.
We do 7 more landings in these gusty conditions. Plenty bumpy and I was working hard for my money on final while Lyn seemed to be so calm he might've been asleep in the backseat, other than a few timely reminders and comments when needed. ;) Wind checks from the ground were now calling out gusts up to 30 kts! Even the glider tow pilots (BDU is a glider airport also) were on the radio saying they were calling it a day because it was getting too choppy. These are not uncommon conditions out here, mother nature...in concert with those big 'hills' to the west of us, make this a plenty challenging environment to fly in. These are conditions, believe it or not, I have seen plenty in my short flying career.
My landings were nothing to brag about, but they were safe and most importantly I maintained directional control for the most part. Admittedly they were a little rough. In conditions like this, safe is all you are looking for...anything more is gravy.
As we lined up for the last one, I decided as I always do--its an old habit from spending hundreds and hundreds of hours in the batting cage during my baseball days, "lets end on a good one." As I turn final, I turned the concentration level up a notch--good stable approach, glideslope and airspeed nailed...lots of small, corrective control inputs as I'm working hard to keep us stable and wings level, the wind gusts keep bucking the airplane all over the sky like an invisible, mischevious hand.
Down we come on short final, I check the windsock and the wind direction is right on our nose, directly down the runway on this approach so our groundspeed is approaching what seems like walking speed as we seem to hover above the ground. Good level off...flare...and a single, soft chirp of the tires indicating a perfect three pointer. Aaaaah, now that feels good as I let a smile creep across my face and let out a slow sigh of relief. :)
The thing I love most about flying is how challenging it is, being a good pilot is not easy and landings are especially difficult, there are so many variables to contend with on a landing that each one is unique...but the pursuit of the perfect landing is nothing short of a magical quest.
I logged 1.6 hrs and ten more touch and goes, bringing my tailwheel HOBBS total to 4.5 hrs. I now feel I am safe in the airplane for solo flight. Of course that's just my opinion, the insurance company certainly wouldn't agree. In addition, Lyn has the final say in this regard. These days in aviation, everything is done very conservatively...20 yrs ago (prior to 1991), a tailwheel endorsement wasn't even required so go figure. These days it takes most pilots up to 10 hrs of dual training before they are cut loose.
In hindsight thinking about the fuel cap fiasco, I replayed the events in my mind and its pretty easy to now see what happened. As I checked that first tank with the fuel level tube, I jumped down to ask Lyn about the confusing 30 gallon reading I was getting...and then without thinking, just moved on to the other tank without securing the cap on the first one. Simple act of distraction...a good lesson to file away.
So, although I did lose a fuel cap on this fateful day...I thankfully survived the 'end of days'...apparently you did too. ;) See ya next time!
Friday, May 20, 2011
RV-7A In-Flight Breakup HOBBS 676.5 hrs
For anyone that doesn't frequent the VAF site, I wanted to post this Canadian crash investigation report about an RV-7A in-flight breakup. I knew about this accident when it happened and the buzz was that the tail had seperated during a normal straight and level flight attitude. Of course, to hear such a thing gives every pilot some concern if you are building/flying.
The reason for the post is simple, if you are building, or have a flying RV, this report has some great information that every builder/owner should read. It was marvelously done by the Canadian version of our NTSB here in the United States. I wish the NTSB would be as in depth with their crash investigations, if they were, we might be safer pilots. Too many times you can't glean any useful information from an NTSB report...and it usually generically states, "pilot error". This report, on the other hand, is very detailed and well written, and although I think we can agree in the end it was pilot error, it gives you useful details as to why/how.
Before I go any further, let me say my heart goes out to the deceased pilot's family and friends. I hope this post doesn't come across as disrespectful to the pilot or them, that is not my intention. I believe we all have a duty as good, safe pilots to examine crash investigations and learn from them. None of us are perfect pilots, we all make mistakes, we can only try to minimize them as much as humanly possible.
I'll let you draw your own conclusions from the findings. As for me, these are my takeaways. Dont take this as a sermon of me telling you how to fly your airplane, I dont believe in that approach, this are just my views/comments as a way to hopefully make myself safer in the air and a better pilot.
1. The airframe design is sound, I firmly believe a design flaw did not contribute to this accident.
2. Adding weight to control surfaces should be carefully considered. I have done this sparingly on my plane, and although I believe they are safe, please be careful when doing your own. It does affect flutter characteristics, in fact it is directly proportional (ie, as weight increases, the possibility of catrastrophic failure due to flutter also increases).
3. With our advanced avionics (EFIS systems) and video camera's on board our planes these days, we are essentially able to provide 'black box' sort of information for post-crash analysis as this investigation clearly shows. This, in my opinion, can and will be very useful in the future to help us learn from others mistakes and ultimately fly safer. I advise everyone to program their EFIS to actually 'record' data during flight...sometimes, as with Dynon, its not the default setting...you manually have to set it up through the menu.
4. Don't exceed the airframe specifications, simple as that. Although, I'm sure this pilot didn't intend to. Flying at 34 knots above Vne is never a good idea, every plane has a point where it WILL break. As one poster stated on VAF, "you do that, and you're a test pilot", plain and simple.
5. A seemingly simple 'game' of "follow the leader" or pursuit formation flight can have disastrous consequences when done by a low time pilot also trying to video the lead plane. Both of these, in fact, seem like harmless fun all by themselves...but can lead to trouble if not given the respect they deserve. Think about how distracted you could become in that scenario, and before you know it, you are in deep trouble with no escape route...as quick as that. I would expect this would be an information overload situation for a low time pilot, get some real experience before doing this, and hopefully don't do it at low level.
6. Get some training if you want to wring out your RV with advanced flight techniques. Although these maneuvers by themselves dont appear to be advanced, the way they were conducted was. This guy had just a little more than 3 hrs aerobatic training and under 300 hrs total time. Just because your RV is aerobatic and you are legal to perform them, that doesn't mean you can handle every flight phase, or possibly get yourself into some real trouble. Learn how to do it properly and gradually build up your skills and activities. I dont advocate not doing it, because I plan to, just prepare yourself accordingly.
7. Lastly, and most importantly, this accident was preventable and didn't need to happen. If me posting this saves one pilot, it was well worth it to me. Fly safe guys and gals, and have fun while doing it!
Longeron Bending HOBBS 676.5 hrs
Last night I finished up the longeron bending task. For those of you that dont know (I didnt before I became an aircraft builder), the longerons are angle aluminum that runs the length of side of the fuselage and ties all of the bulkheads together.
The task was certainly interesting, it takes some artistic ability and finese...physically a little strenuous, but not too bad once you get the hang of it. Its a very rewarding process, as you feel pretty good about yourself when you get done and the curve matches pretty much exactly with the print. And let me add...its not too bad when you have a set of longeron bending dies to use (once again, big thanks Sean Blair!). Those babies were pretty handy, I think it would be much more time consuming without them...doing it the way Van's describes in the instructions. Essentially they will bend the longerons to the prescribed RV curve. It took me a little while to really understand the process but after I did, it was a piece of cake. The whole process probably took me about 2 hrs total, but if I were to do another set, it would be an hour, tops.
Now that this is out of the way, along with my bulkhead assemblies, things are really about to get exciting. The next step is putting the rear fuselage (tailcone) together. From there, it should be no time before I have a 'canoe' to sit in! I've been waiting for this point in the project with a lot of excitement and anticipation. :)

Bulkheads riveted together, pretty straightforward and done with the rivet squeezer so its a piece of cake. Just pay attention to the many drawing callouts to leave rivets out until later and make sure you get your empennage attachment bars (center bulkhead) on the correct side of the bulkhead. Also note, the aft bulkead (left) has -426 rivets flush on the aft side.
This is the rear baggage bulkhead-it separates the baggage compartment from the tailcone. Notice several places will be riveted later in the fuse assembly, that's why you see cleco's.

Aft bulkheads...

Now for the longerons, first step...cut 'em to length, then remove material from the aft end (see above) as specified in the plans.

Do a good layout, mark the top, sides and critical locations for the curved section. You dont want to bend these suckers in the wrong orientation. I cut out and taped my template directly to the table, no sense in making an elaborate template as Van's suggests. I also added index marks every two inches for reference. Although, in hindsight, I would increase this to every 3" as the bending dies are 6" long so shifting them half the distance--3" every time seemed to work out nice when I did the second one. I think 2" is overkill for what you are trying to achieve.


This is what the bending dies look like, with instructions. A couple things I found helpful. First they are very tight when the angle alum are inserted for bending. I had a hellluva time getting them off after the first few attempts. I then sprayed some WD-40 on them to act as a sort of release agent...that helped quite a bit. Second, it takes a lot of force on the vice to get a full bend...I used a soft mallet to get it snugged down. Third, I recommend going to a full set on your bend. The first one I kept trying small increments of bend to 'sneak' up on the required curve, afraid to overbend it. The dies are designed with the correct curve...trust it and and just bend them full tilt on the first try, no need to sneak up on it as I don't think you can overbend them with these dies. Needless to say, the second one I did in this fashion took me about a half hour total...much quicker. And lastly, I got really close to the prescribed bend with the dies but then just clamped the angle to the table and tweaked it ever so slightly by hand to get the last little bit of bend in there. As you can see, I think they came out pretty nice...does it look like the profile of a fuselage??

Wednesday, May 18, 2011
Tailwheel Training: Lesson 2 HOBBS 670.0 hrs
"It was the best of times, it was the worst of times", the famous quote from the Charles Dickens novel sums up my second lesson quite well. After finishing strong on lesson #1, where I actually felt like I was getting this whole 'little wheel in the back' thing down, I figured that would transfer directly into lesson #2 and I'd have this mastered in no time.
Well, I figured wrong. My first takeoff was like I learned absolutely nothing in the first lesson as I was struggling to hold the centerline. I was a little baffled by that to be honest, takeoffs are really not that difficult, or so I cockily thought? I had been warned about an intitial steep learning curve associated with getting my tailwheel endorsement, I suppose 1.1 hrs of flight time isn't enough to have it mastered eh? ;)
We cruised over to Longmont for a quick landing and fuel fillup since Avgas is cheaper over there than at Boulder...21 gallons at $4.89/gallon. SFTI has a policy where they encourage their members to seek out cheap Avgas whenever possible and then obviously reimburse you. A way to keep costs down, no problem, I'm down with that.
So, this lesson we started out by going out to do the airwork that we didn't do in lesson #1. Out we went to a suitable area north of the airport and climbed to 7500 MSL (remember BDU is at 5300 MSL out here in the Rockies). First on the agenda was a couple steep turns...no problemo and plenty fun, I enjoy those.
Second, Lyn says, "lets do a power on stall." I'm thinking "ok, how about we warm up with a power off stall first?" :) But, I keep that thought to myself and say "alright, lets do it", and proceed to set up for a power on stall, which always makes this low time pilot apprehensive. They are squirrely! I liken it to holding a water hose in your hand a couple feet from the end, with water shooting out of it, and trying to keep the hose straight up and down in a delicate balancing act.
So here we go, full throttle...back on the stick and up we go, all I see is sky...seemed like we were standing on the tail, and sure enough...as we approach the stall, not enough right rudder and we break to the left. It felt like we actually were starting to enter a spin (although movement is always a little exaggerated in the cockpit), but I did catch it with the rudder and brought it back wings level. That makes ya catch your breath as you're looking down the wing at the ground, that's for sure! haha! As the nose comes up in a power on stall, that nose will want to swing to the left...of course I know this, but it still caught me off guard this first time. I haven't done a power on stall for quite some time so I was obviously a tad rusty.
We then did a power off stall, which was perfectly fine...straight break, nothing crazy with this airplane as you would expect from a trainer. We then practiced some forward slips...left and right, and then again, left and right. Full rudder deflection slips, cool. I watched our VSI and saw we were dropping like a rock at about 1500 fpm! Nice, exactly what a good slip should be doing...getting you down in a hurry while keeping airspeed manageable. Ok, nothing to it, I now felt very comfortable with slipping the Citabria. We also did a simulated engine out...again, no problem. Typical stuff.
Lyn asks "how did all of that feel?" and I said I was ok with all of it except the power on stall, which I felt like I botched. He says, "ok, lets climb up to 7500 ft and do another one." Ok, I'm game. This time was much better...although, I still was fighting to keep us wings level. But, using only quick, small rudder inputs (no ailerons to pick up a wing, it will aggravate the wing drop...so keep the stick centered), I was able to balance the plane on the edge of the stall. Its a great exercise in learning to use your rudders properly and a must for tailwheel pilots. I will practice this more until I am comfortable with it.
Now for some landings. Again, I started out rough...much like the initial takeoff, I felt like I hadn't learned anything. But...after awhile it started smoothing out and things got much better. I actually nailed 3 or 4 perfect 3 pointers during the day.
On one of those perfect landings, Lyn cut the power abeam the numbers on downwind and said..."you just lost an engine". Ah, the ol' trick from my primary training...I like these, its all about energy management. I brought that baby around on short final nice and high to make sure I had the runway made and then slipped her down and smoothly touched down on all three gear with a quiet chirp. It might've been my best landing of the day. I think I actually cracked a smile in satisfaction after Lyn said, "nice job". I told him maybe we should cut the power every time. :)
That felt good...and let me tell you, as a tailwheel pilot, I've already learned a perfect landing is one to be proud of because it doesn't come easy...you will earn it. I think in a tri-gear you can actually get lucky sometimes and have a nice landing. A 3 point landing in a TD takes much more than luck in this pilot's opinion, it doesn't happen by accident.
So, around and around the pattern we go...16 touch and goes! I was now incorporating side slips on final quite often to set up for a nice approach. I felt like I was getting the hang of the 3 pointers...but my wheel landings now were atrocious!! haha!
I've always loved pattern work, I could fly t-n-g's all day long. But after the 15th one, I realized I was getting worn out. I jokingly said to Lyn, "I'll bet you're getting tired back there, how about we knock it off?" He chuckled and replied, "sounds good". I'm starting to really like ol' Lyn as I get to know him.
We head back to BDU and make a 4 mile straight in approach , I excecute a nice 3 pointer to end the day, always nice to end on a good one. I then practiced some S-turns as we taxied the length of the runway back to the hangar. Even though its not needed in the Citabria, its good practice and kinda fun. We shut down and as I secure the aircraft, I scribble down 1.8 hrs of HOBBS time on the aircraft billing/log sheet.
It then dawned on me as I climbed out of the cockpit, all of a sudden it hit me like a ton of bricks, I was flat out exhausted....completely drained. I felt like I had just done 16 night carrier landings on a pitching deck!! :) You block it out when you are flying and lost in concentration, but once you are safely on the ground its like releasing a pressure valve and you realize just how hard you've been working. But, what a great feeling, I am enjoying this ride. Stay tuned for the next one.
Monday, May 16, 2011
Tailwheel Training: Lesson 1 HOBBS 670.0 hrs
 |
| My trusty steed, 160hp 2005 Citabria Adventure, N214LH |
Throughout this process, I will blog about my experiences of becoming a tailwheel pilot. You can see, much as with my builder blog, what its like through my eyes to take this journey. Strap in, clear prop!...I hope you enjoy the ride. :)
Leading up to this lesson I had spent some time preparing myself with some ground school. Sean Blair loaned me two instructional DVD's that I watched (big thanks to Sean). The first was Tailwheel Essentials, and the second was Tailwheel 101. I considered Tailwheel Essentials to be adequate, but Tailwheel 101 is highly recommended with very useful and intuitive explanations (although I didnt get this one watched before this lesson...I watched it last night). I also supplemented these DVD's with the late Sparky Imeson's book Taildragger Tactics.
Sparky was a 20,000 hr local pilot that specialized in mountain flying instruction, I was fortunate to have met him at one of his seminars, he was a character with great stories and I can only imagine he was a good pilot and instructor, although I never had the privilege of flying with him. But, I will say, as knowledgeable as he is about the subject matter, being an author is not his strong point. Its still a good book just because of the knowledge base...but you just have to get around his writing style and organization, or lack thereof (or maybe that's just me?...I'm kind of picky about such things).
With all of this new knowledge crammed into the ol' noggin, it was a good point to start flying. You can only go so far with ground school...the flying is where it will actually start to make sense. I am taking my training at Boulder municipal airport (BDU) at Specialty Flight Training, my instructor is Lyn Dague. Lonnie, the chief flight instructor (and owner I believe?) are good people and my dealings with them so far have been good.
The plane, as shown above, rents for $128/hr wet and Lyn's time is billed at $50/hr. Maybe a smidge more expensive than some places, but certainly within reason. During our discussions, Lonnie informed me that to actually be signed off to rent the Citrabria solo after I get my tailwheel endorsement, I need to satisfy two of three requirements that SFTI has in place for insurance reasons: 125 hrs TT (which I have), 25 hrs tailwheel and 15 hrs in type.
So, it looks like I will be flying with Lyn beyond just getting my endorsement up until I get 15 hrs in type. I wasn't expecting this and hadn't budgeted for it, but I will squeeze it in. No worries, its still time in the logbook and great experience...and the extra 5 hrs with Lyn (I had budgeted 10 hrs) will only be a $250 cost adder. Lonnie did offer a nice little nugget however, he said I can combine training as I build my 15 hrs. Awesome, I will add a mountain checkout (yes, we have actual mountain flying instruction here in the Rocky Mountains and I highly recommend it to 'flatlanders') and a CFI spin endorsement. These are both items I had planned to add to my training anyhow, so it will work out well.
Now lets talk about the lesson. The original plan was to do some airwork so I could get used to the plane. Typical stuff...slow flight, stalls, steep turns, etc. Well, in a very rare occurrence for us here in Denver, we had 2100 ft. ceilings the morning of my lesson. No stalls on this day...we wouldn't be able to get high enough to safely conduct them. Of course, we did have enough room to do some pattern work so we moved to plan B.
I did my preflight, strapped into the front seat with the 5 point seatbelt harness and Lyn walked me through some of the details of the cockpit. I started her up and she roared to life and purred like a kitten...I was instantly falling in love like only a pilot could understand. :) As the flight progressed I liked this plane more and more. Very responsive throttle and aileron control. The elevator stick forces, however, were quite high--much, much higher than the Diamonds and probably a little more than the Skyhawk as well. If you were severely out of trim, I would guess it would be very difficult to maintain control of the nose because of these high stick forces...I filed that tidbit away in my memory.
Taxing a taildragger with calm winds, such as we had, is not much different than a tri-gear. The biggest difference being that you dont have as much forward visibility in the taildragger (TD). The Citabria has a fairly flat deck angle for a TD, so its not too bad. S-turns were not required. The other big difference is your stick position...full aft (in calm conditions), in your gut to keep the tail down, is the way to go in a TD. Its a new habit that needs to be formed for this type of flying.
We taxied into position on the active runway for takeoff. Now things start to drastically change from the Tri-gear environment. Line up on center line, directional control is everything when flying a TD, and cant be emphasized enough so starting on the center line is important. Gradually apply full power in about a 3-5 second time span. Stick back initially...as we start our roll, relax pressure on the elevator and the plane will gravitate toward the trimmed takeoff position. When you feel the tail wanting to come up...then slowly add forward stick to help the tail up into the air. Continue to accelerate in this position and then pull back to break the surly bonds. Sounds pretty simple eh? And, for the most part, it is.
However, be beware, when you raise the tail (if you do it too quickly it will be pronounced), the gyroscopic forces from the prop will give you a left turning tendency so you need to feed in some right rudder to counteract this. Much different and pronounced than a tri-gear. I, of course, forgot this on my first takeoff and swerved to the left before catching it. Doh! This was my first indication that things are gonna be different in a TD. I was now introducing myself to the rudder pedals for really the first time in my aviation career...by the end of the lesson we were well on our way to developing an intimate relationship. ;)
We would be doing full stall, 3 point landings for this lesson. Although the POH lists approach speeds of 60-70 mph for the 7GCAA, Lyn wanted me to come in at a conservative 75 mph. That seemed a little fast to me for 3 point landings as the plane stalls at 51 mph according to the POH. But hey, what do I know? So, 75 mph it was, although I still think it was too fast.
I soon learned that, to actually nail a 3 point landing is plenty difficult as all three gear should touch at exactly the same time in a full stall to be perfectly executed. That, my friends, takes some good aviating as your pitch attitude and the timing of your level off are crucial. I kept hitting my main gear first in what would've actually been a good landing in a tri-gear, only to find out that wasn't good enough in a TD. The touchdown of the mains was followed by my tailwheel kerplopping down shortly thereafter. Followed by ballooning back into the air because of the increased angle of attack and then settling back down again...bounce, bounce...to do it all over again! Woohoo! It reminded me of my rodeo days, it was like sitting on the back of a mean ol' bucking bull with a bad attitude! :)
And, there again, was that rudder thing. The first few landings, as we started to slow down the plane on the ground roll, it would start to veer one way or the other like it had a mind of its own. I was too subtle with my rudder inputs to stop the drift before Lyn helped me. I was allowing the aircraft to control me instead of the other way around. One side of the runway to the other it seemed! Poor Lyn was probably scared to death!!! haha! Or maybe he's seen this hundreds of times over the years? I soon learned, and Lyn reinforced (as did my DVD's), that as the plane slows down, you will need bigger rudder inputs because of the decreased amount of air going over the rudder. It took me a couple times to get this through my head...my rudder inputs were too small to change course as needed. But be careful, as you accelerate, its the opposite...smaller rudder corrections are needed.
As we progressed through 1.1 hrs of HOBBS time and 10 touch and goes, I was steadily improving. Although I never managed an actual 3 point landing, I was getting much better at wheel landings as I salvaged my botched 3 point attempts. My directional control was markedly improved by the end of the lesson. Toward the end I was actually doing a tap dance with the rudders on short final to kind of get my mind ready for...rudder, rudder, rudder. Small rudder inputs...left, right, left, right...all the while flying straight. It reminded me of running in place during my HS football days...same motion. That little exercise was a huge help (and described quite nicely in 'Tailwheel 101'...I hadnt watched this video before this lesson darnit) and I highly recommend it. I think I inadvertently had stumbled upon the famed, "rudder dance", when I did this exercise. It was the lightbulb moment of the first lesson.
One other thing I wanted to bring up. The 7GCAA Citabria has no flaps, which took some getting used to. In light of this, forward slips are an essential tool to have in the aviators toolbox. I am actually a big fan of slips and feel pilots nowadays don't use them nearly enough. Its an 'old-school' tactic that should be revived. Being cross-controlled close to the ground scares a lot of today's pilots I think. But a slip is nothing to be afraid of when done properly...always keep the nose down and never use bottom rudder (skid), always top rudder.
So, anyway, I do slips quite often in the Diamond and thought I was fairly good at them. The first one I attempted in the Citabria wasn't a very good one to put it bluntly...with its much bigger fuselage, it behaved quite differently than the Diamond. Consequently I quickly aborted my feeble attempt as I didn't feel comfortable with it. As we came back around on downwind I mentioned this to Lyn in the backseat that I wanted to practice some slips at altitude on the on next lesson to get a feel for it in the Citabria. He said, "well let me show you one." He instructed me to purposely come in high on final and then let him have the controls...which I did.
He then proceeded to do a left slip that was so drastic it actually made me uncomfortable! :) I was looking out the side window at the approach end of the runway and it seemed like we were crabbed at a 45 degree angle! haha! "Dang" I said to Lyn, "now THAT is a slip!" He kinda chuckled from the backseat and said "yep." Did I mention that Lyn is "old-school"? I don't want to guess his age, but suffice it to say, he has been doing this awhile. He probably learned to fly in a time when slips were second nature to pilots because of non-existent or marginally effective flaps on the planes of that era. He must've had full rudder deflection or nearly full rudder fed in to get that flight attitude. I have some learning to do when it comes to slips...dont be shy, I had never experienced a slip like that....wow!
To sum it up. I really enjoyed the crap out of this first lesson and cant wait for the next one. But as I said at the outset, it was humbling, I have a lot to learn. A tri-gear aircraft will let you get away with sloppy aviating, a TD will not. There is no way anyone can argue that becoming a TD pilot doesn't make you a better aviator. If someone clings to that argument, I would guess they have never flown a TD? It doesn't take super human skills by any means, it just takes much more precision and attention. Exactly why I wanted to become a TD pilot to begin with....I am not disappointed in my choice.
More Fuse Bulkhead Work HOBBS 670.0 hrs
I spent the weekend prepping the remainder of the fuselage bulkheads for priming. You know the drill. They are now ready to start riveting together, first as sub-assemblies, and then to start attaching them together with the longerons to create the fuselage skeleton structure. I've spent about 40 hrs up til now getting all of these parts ready to go, this is where its going to get fun. Its comical, even the instructions actually make this comment. Consequently, this should be a fun week as I start riveting stuff together.


This is the bulkhead that seperates the baggage compartment from the aft fuselage. I am amazed at how flimsy this thing is. I know it will stiffen up when it attaches to the fuselage and longerons, but there certainly isnt much to it.

This bulkhead, along with the alum bar, is where my empennage will attach. Cool to start seeing how it all will eventually go together.

I primed a big batch of parts...as many as I could manage at one time. Here you can see some of the parts cleco-ed together and screaming to be riveted together. This is always my favorite part...prep and priming, the grunt work, is done--now lets build an airplane! ;)


Friday, May 13, 2011
Fuse Bulkheads HOBBS 662.0 hrs

Just a quick status update before the weekend hits. I spent this week working through the fuselage bulkheads. Not too much to them, I'm hoping to get them prepped/matchdrilled/deburred so I can prime this weekend. Reading ahead, it looks like once I finish up these bulkheads, it will be time to start bending longerons.
There is, however, one thing that will be getting in the way of my construction progress this weekend....saturday morning I start my tailwheel training!! Woooohoo! My chariot will be a blue/white starburst 2005 Citrabria Adventure (similar to the pic above). I'll certainly be posting the details of my training along with some pics as I progress.
Monday, May 9, 2011
Midfield Entry HOBBS 658.0 hrs
 |
| http://www.aopa.org/asf/publications/sa08.pdf |
I wanted to take a minute to discuss operations at nontowered airports. Over the weekend, as you know, I was part of a flight of 5 aircraft that flew to Greeley (GXY) for breakfast. Scott and I, along with Gary were a flight of two. Rudy and Chuck were also a flight of two, and I believe Jerry was flying as a single bringing up the rear.
Greeley airport has a restaraunt right on the field and is very popular with the local pilots for breakfast. I had heard that is was one of the ten busiest GA airports for weekend breakfast traffic...not sure if thats true, but it does get busy. Since saturday had great weather and everyone had spring fever it was particularily busy even for them....the busiest I have seen it in my two dozen times flying there. Greeley, mind you, is also nontowered.
Here's the scene. As we approached, Scott made his call, as all pilots should at about ten miles out. "RV flight of two going to be entering midfield left downwind." There wasnt much chatter on the radio when we made that call so pattern congestion wasnt a major concern at this point. We were the first of our group of five so we were leading the pack. As we got close to the airfield and had a visual, we started hearing more traffic calls. It was getting busy.
We crossed over the runway at midfield and made our call announcing our position. Right after that, we hear of a Cirrus executing a go-around and also someone else makes a radio call and says they are also at midfield for left downwind. That always gets your attention, so Scott and I have our heads on a swivel looking for that traffic that is supposedly occupying the same airspace as us?
After a few tense seconds...I spot a yellow Cub, right off our left nose not more than what looks like about 500 ft away...BELOW us...we couldnt see him because they were below traffic pattern altitude and right in our blind spot! Very dangerous and is exactly why its so important to be disciplined with your TPA. Low and behold, things were getting intense as another Cub appears flying in trail behind the first. I couldnt help but think of the line in Top Gun, "there were bogeys like fireflies all over the sky." :)
Now that we have the traffic in sight, Scott makes a call to say we are going go go wide to give the slow flying Cubs some spacing for landing. The Cirrus calls immediately after us that "he has the RV flight of two (us) in sight and will slip in behind them in the pattern." So, some semblance of organization is taking shape although we now have approx 7 planes in the pattern at the same time.
Well, then the organization dissapears quickly as the Cirrus--with no radio call announcing his 'new' intentions--cuts inside our flight of two and turns base and proceeds to climb right up the backs of the two Cubs that are now on short final. Now it starts to get testy as the Cirrus comes on the radio talking about an RV cutting him off in the pattern (might've been referring to Chuck and Rudy's flight of two behind us? Since it was behind us I cant comment on what happened there?... Chuck said he didnt think he cut him off). So Gary responds with, "thanks for cuttting US off!" Apparently according to the Cirrus pilot if someone cuts you off, its somehow ok to cut someone else off? Not sure about the logic there but thats a good attitude to have when people's lives are on the line?
Anyhow, to wrap this up, a Bonanza landed...followed by the two Cubs, then Scott and I, then Gary...and then the last three of our group came in behind us. It was the most congested pattern flying this young pilot had ever experienced.
We had breakfast and talked about the events quite a bit. We all felt like we had excercised good airmanship and had done the right things. After we got back to home base...as I said, we hung out at the airport for several hours. The guy that had been flying the Bonanza and landed ahead of us stopped by to talk to us and deliver a serious message to us. He apparently knows most of the guys in our group at least in a casual sense...this was the first time I had met him. He is a retired air traffic controller as well so you figure he knows what he is talking about?
Basically, he says that what we did, executing a midfield entry into the pattern was 'illegal'. We, as a group, were kind of like...really? We didnt think that was accurate but no one had a FAR/AIM laying around to prove him wrong. So we listened to his message and didnt say much.
Well, later several of us did check and it turns out he was wrong...a midfield entry is a perfectly "legal' alternative way to enter the pattern at a nontowered airport. You can read all the details in this AC. In fact, all traffic pattern entries shown in the AC are "advisory in nature, not regulatory"...so nothing illegal occurred.
But then the question then becomes...ok, so it wasnt illegal, but was it safe? Thats the bottom line...losing your life, even if you're not breaking the rules is not the outcome we desire. ;) Thats a good question. Should we have done a midfield entry with that much traffic present? I'm not sure?...but as pilots, you should be thinking about it yourselves and developing your own strategy to such an event if it occurs. Read the Advisory Circular...educuate yourself and fly safe. And if you are going to lecture your fellow pilots about right and wrong, make sure you have your facts straight.
 |
| http://www.aopa.org/asf/publications/sa08.pdf |
Subscribe to:
Posts (Atom)