Ron's RV7 Aircraft Factory


Welcome to my personal blog. This site was created as an informal description of my build progress in the construction of a Van's RV7 aircraft. A place where family/friends/builders/curiosity seekers can follow along. It is not intended to be a detailed description of every step in the building process as that would be much too time consuming. There are plenty of sites that do a great job in that arena, that is not my intention with this site. My intention is for this to be a philisophical/motivational/inspirational account of the emotional ups and downs of the life changing journey...and it will change your life. I hope this will give you an idea, through my eyes, of what its like to make this transformation. A note to other builders, I am not an expert so do not put your safety at risk by attempting anything you see on this site until you have done your own research, or send me an email so we can discuss it. Any deviations from the plans are not approved, nor endorsed by Van's Aircraft or myself. Thanks for visiting.


Friday, April 25, 2014

First Air-to-Air Photos

 
Last Sunday, on Easter 2014, we got the first air-to-air photos of my plane. Good friend, Scott Mills, flying his RV9A (N339A) offered to fly formation with me with fellow RV7 builder Sean Thomas riding shotgun as photographer. There were two goals for this flight. One, the obvious, finally get some pictures. Second was to compare airspeed readings between the two of us.
 
Well, as much as I was sure my airspeed indicator was about 5 kts slow because of my earlier stall testing...turns out, it was matching Scott almost exactly..within a knot every time we checked. Both indicated airspeed and true airspeed synced up between us. I am now convinced, all airspeed indications are indeed, correct.
 
I had originally stated that I was stalling at about 45 kts...and I thought solo stall speed was 49 kts. Its actually not! 49kts (more precisely its about 50 kts) is correct for gross weight (1800 lbs). Solo stall speed with flaps is actually a leisurely 51mph, or roughly about 44.3 kts, so my measured 45 kts seems just about right. Again, this is part of learning the capabilities of my new plane and its systems.
 
Its staggering to think how much I have learned since I started this adventure over five years ago...and its still ongoing. For a guy that loves to learn, it has been an amazing journey. Hopefully as you read my blog, it's helping you learn faster than I, through my trials and tribulations. "Oh yeah, Ron had this same problem."

 
Here are just a few of the pics shot last weekend. Scott still has most of them on a thumbdrive, as well as some from my first flight. Pretty cool to see the old girl, my creation...in her element. As cool as these are to see however, I cant wait to get her painted and do this again...real soon. She is a little unsightly right now, hasn't put on her ball gown, but she's still beautiful to me...unsightly or not. :)


Lastly, a nice closeup off Scott's wing...thanks Scott and Sean! It was fun to have some company for a change.

Almost There

I wanted to post a quick update, since its been awhile. This week has been a drag, as the airplane has been down for maintenance all week. Compounding my frustration was the favorable weather calling out to me. Its amazing how addicted you become to flying your plane whenever the weather allows.
 
What's the story behind it being down for maintenance, you ask? Well, I had put in an order for two cases of Phillips X/C 20W-50 oil. I had decided to do my first oil change and move away from straight mineral oil.
 
There are many opinions on if and how long to use mineral oil for break-in. I plan to do a engine break-in post later to summarize this. For now, just know that Aerosport Power says the first 25 hrs should be mineral oil. Since my engine is under warranty...that's my plan. I waited a little too long to order the oil and was desparately waiting for it to show up...$175 for two cases of oil by the way, once you add on shipping costs...ouch!
 
Monday afternoon rolls around and I finally have my oil. I start my first oil change...easy peasy, the quick drain plug worked like a charm. I then proceed to change the oil filter (I had bought a case of 6 filters back in February) and realize the threaded portion is too big for my engine! Crap...a quick check reveals I ordered the wrong Tempest filter part number!!! I was one number off...dangit.
 
With no oil filter on hand, I was dead in the water. I quickly placed an aircraft spruce order on my iPhone, but the expected delivery was not until Friday...today. So...I debated putting the old one back on...not a good idea. Or borrowing one, but none were immdediately handy...in the end I decided that this would be a good maintenance break to get the plane ship shape for the May 1st trip to GLO Custom in Dallas, Texas next week. The filters should arrive via FedEx today and flying should resume...and the maintenance break was used wisely, more on that later.
 
I am now at 32.8 hrs on the HOBBS, so closing in fast on my 40 hr flight test specification. I will admit, I am only going to get the bare bones done for the flight test FAA checkoff...Vso, Vx, Vy, maximum weight...that's about it if I remember right. I will re-enter phase I (only 5 hrs) for aerobatic testing after paint. I have been really distracted by the engine break-in issues...and quite honestly I am still developing trust in the airplane and my capabilities before doing serious aerobatics.
 
I will update the issues list and give you an update shortly. The learning curve during phase I has been just as steep or steeper than when I was building. Being the owner/operator of an aircraft is a whole new world with its own set of education, completely different than building. The good news is, I am getting to know my airplane extremely well, which is a good thing.

Thursday, April 10, 2014

Just Maybe...

My last flight was a darn good one! And maybe, just maybe, the best flight yet. Let me explain, I was about halfway through my flight and had just crossed over the 17 hr tach time threshold when I noticed my CHT's drop about 30 degs. Now of course, OAT, mixture and altitude influence your CHT's...but I'm thinking nothing changed significantly with those variables to explain the rather noticeable drop in CHT's. If you've been following along...what that possibly could mean, is that I may have FINALLY broken-in the engine! If so, that will be a huge relief.
 
Give me another flight to verify before I declare victory. I also want to pull the bottom plugs to see if they are dry...which I've read is a tell-tale sign you are indeed broken-in. For now, though, I am pretty excited about this latest development.
 
The good news didn't stop there. I spent some time the day before playing around with my aileron rigging to get a handle on this heavy left wing issue. Previously I had synced the flaps...they were about 0.3 degs different from each other, they are now identical according to my digital level. That didn't fix my heavy wing...but maybe helped ever so slightly.
 
Feeling comfortable about my flap rigging, I turned my attention to the ailerons. Essentially what I did was use the flaps as my zero datum and align the ailerons up with them. This is not how vans says to do it...but I am going off script a little bit here. After this flight, I can tell you this didn't solve the problem completely...but we are now in the ballpark, it was much better on this flight. I will tweak it a little more in due time.
 
Moving on...I did my AoA calibration. The process is you just bring up the in the half screen flight setup menu on SkyView and then do down through the step by step list. You start by oscillating the plane through 5 degs climb and 5 degs descent...do this four cycles. Then, perform a stall...and push the stall button once you are done. The plane will be able to determine the highest AoA during the sequence and records that as your critical AoA. Nothing to it...I performed three stalls and pushed save. Unfortunately, my slow 45kt stall speed was verified. Still need to address the slow ASI issue.
 
One of the things on my to-do list is to calibrate my fuel tank sensors now that I have them wired properly. Since draining tanks into a gas can in the hangar is pretty much a pain in my ass...I decided to run the left tank dry in flight. I personally feel, you should have an idea how your plane behaves when it runs out of fuel...if for nothing more, to not be surprised when it happens. Its all part of getting to know every nuance about your airplane, which will make you safer. 
 
I had intended to do this at the outset and didn't add fuel to the left tank during fillup. I had a pretty good idea how much fuel I had in the left tank and knew approximately (by time and fuel burn) when to expect it...but then I got distracted with something else. Here I am, flying along, fat, dumb and happy...and bam, it goes dry. The engine starts faltering and backfiring...that got my attention...pronto! Fuel pump on...switch tanks...and after a couple more seconds of the same behavior, it smoothed out. The engine never shut down and the whole sequence was about 5 seconds total I would guess. Another item checked off the list.
 
Every great flight has to end with a great landing. Sure enough, I finally greased a landing...I know, it took a while. But this one was as smooth as butter. One of those landings where the only reason you know you're on the ground is because the altimeter stopped moving. ;) Hopefully that will lead to more good ones in the future as I get a better feel for her...we are bonding, the mistress and I. 

Wednesday, April 9, 2014

I'm Rolling...


Got a somewhat quick one hour flight in yesterday. The winds were rather unpredictable and I didn't want to get caught with unfavorable winds for landing. My approach didn't help much, as I returned to 14ktsG23 with a pretty decent crosswind component. For my first crosswind, at least in Wablosa, it had plenty of rudder authority and didn't seem too bad overall.
 
The HOBBS is now showing just about 18 hrs, so 22 more to go before I am released from my test area. On this flight, I decided it was time to start exploring the flight envelope a little bit. Probably the easiest aerobatic maneuver you can do is a simple aileron roll. If you've never done one, its very basic. Pull the nose up to establish a slight climb attitude (some say 30 degs, which I think is a little overkill), this nose up attitude will help offset the loss of lift in knife edge and inverted flight as you come around. A competition "slow roll" is a whole different animal, much more difficult....the aileron roll, in contrast, is not a competition maneuver. Nose up, neutralize the elevator and then full aileron (or a magnitude of input of your choice...these were not full deflection rolls) left or right. Hold it until you come back wings level and neutralize aileron. Nothing to it...
 
Easy...yes, but still something that gets you a little anxious in this scenario. I have been trained in the Pitts, but it was all dual instruction. I have never done any solo aerobatics. I have a brand new airplane, one that I built, coupled with the fact I am doing solo aerobatics for the first time. It does cause some apprehension, I'm not going to lie. But once you do it...it kind of breaks the seal and you cant wait to do more. The airplane has been upside down...and it amazingly didn't fall apart! ;)
 
Here is a video of my first rolls in Wablosa. I apologize for flying directly into the sun, which didn't help the filming any. I also forgot to hook up the audio to my intercom...so you cant hear my whooping and hollering, which is probably for the best. This produced a rather large RV grin!

Monday, April 7, 2014

Stalls and Knots

Over the weekend, I logged about 4.5 hrs flight time--as Dynon calculates it. Mostly it was more engine break-in time...70-75% power, 2550 RPM kind of stuff. So far, no indication we are broke-in...as you might expect, this is beginning to concern me. But I keep saying, what can I do? The die is cast at this point, If I somehow glazed the cylinders, its done at this point. I'll just keep running 'er hard and hope for the best.
 
As I work through my open squawks (see last post), I made some progress on a couple items. First, I wanted to dig into my airspeed indicator accuracy a little more. On my to-do list was power off stalls. The first one was with half (20 degs) flaps just to get a feel for it...see if anything squirly was going to happen. Nada...zip...zilch, broke straight ahead, no wing drop, nothing to be concerned with.
 
Although, I'll warn you if you haven't stalled an RV before, its doesn't give much airframe buffet before it goes. It comes on quickly, but shows no nastiness once it does. Ease off the stick and she's flying once more. I then added full flaps, slowed her down, and stalled it twice more. My IAS was showing about 45kts when it broke. Definitely not correct...Van's states 49 kts for this flight configuration, and mine, because of its weight, might be more like 50+kts. Unless I'm missing something, my guess is my airspeed indicator (ASI) is about 5 kts slow. A pitot leak perhaps? But it was tested for leaks by the professionals...and supposedly had none. More digging to come as I troubleshoot this...
 
I then decided to play around with my autopilot. On the ground, like I mentioned in a previous post, it was wigging out. Doing some reading of the manual, my guess is it was confused by the zero airspeed condition...by default it has a minimum airspeed configuration. I figured...why not try it in flight? I knew the disconnect button worked on the panel and on the EFIS from ground testing...and I also knew I could override it manually if I had to. I tentatively turned it on...to see what she would do? On it came...and worked perfectly. Over the course of my weekend flying I played around with virtually all of the basic functions. This is essentially the first time I have flown an A/P...it was pretty cool.
 
With the A/P now working. I decided to do some GPS speed runs to test the accuracy of my KTAS readings. I used the A/P to keep me level and on course. Essentially, what you do for this test is pick a heading...record your heading, true airspeed and GPS groundspeed. Turn 90 degs, record data again, then turn 90 degs once more  and record a last time. Plug those into your spreadsheet of choice or this online TAS tool. This will tell you what your true airspeed should be.
 
Cross check that with what your EFIS was telling you. Mine came out to 167.92 kts, which correlated almost perfectly with my EFIS readings. Overall, it still seems slow to me for high performance cruise flight, but I'll deal with that conundrum later. So, keeping score...KTAS has been verified and looks good...IAS, however, does not.
 
 
My test area in the Northeastern corner of Colorado is, as I've alluded to, barren and flat. Not much to see. There are, however, two small "towers" that are about the only interesting geography I could find. (Edit: I was just informed these are the Pawnee Buttes.) Of course, now that I have found them I buzzed them on both weekend flights...just for fun. Here is a screenshot what it looked like...low level at about 195 mph. Also, if you look on the horizon you will see white columns...this a rather large windmill farm that's also cool to see from the air...but isn't everything?
 
This video link shows a one minute snippet as I pass by the towers. The music was coming through my iPad mini via Bluetooth into the PAR100EX and my headset. You can see in the video, there was some light turbulence bouncing me around. I did a little 500 ft zoom climb at the end, if you look close you can see the VSI and altimeter winding up pretty good as I did this. This puppy is fun to fly and I haven't really done much with her yet...I'm doing my best to take it slow. Some simple aileron rolls are on deck however.

Wednesday, April 2, 2014

Squawks

As I work through my test period, I will keep a running list of open and eventually closed "squawks". I will present them here and keep updating them as I progress so you hopefully gain some insight into your own issues once you start flight testing.
  1. COM2 (PAR100EX) non-operational - I was not receiving or transmitting on COM2, even though it had worked previously. Adding to the confusion, I used my handheld radio and was able to transmit and receive inside the hangar. That made me think the antenna was functional. After checking all wires again, I decided to pull the floor pans and ensure the coax was plugged into the antenna. Sure enough, it wasn't...and was not noticed by myself or the DAR during inspection. So, why was I getting transmission on my handheld? I think the coax was acting as a crude antenna...enough to get the handheld at 10 ft, but not enough to get the ATIS. Closed.
  2. High CHT's - I spent some time doing fiberglass work and adding high temp RTV to as many gaps as I could find for more efficient airflow. The next flight will tell how much it improves my CHT's, which are running about 375-425 deg F right now. Open.
  3. Engine not breaking in - Called Aerosport Power and asked them if 10.5 hrs on the tach is enough time for break-in. They told me not to worry, it sometimes takes longer, although they didn't say why? Maybe my high operational elevation here affects it somehow? Open.
  4. SkyView fuel sensors not calibrating properly - When I tried to calibrate my capacitance sensors one gallon at a time, the voltage read 3.41V and never changed as I added fuel. A call to Dynon support identified that I had the capacitance sensors hooked up to the wrong pins on the EMS. They should be "capacitance" not "resistive" (float type). I need to rewire these and try again, but I think this issue is solved. Resolved.
  5. Air drafts in cockpit - Added rubber door seals to the tip-up canopy, this helped quite a bit. Even with my overlapping fiberglass skirt, there was a fair amount of air entering the cockpit before I did this, which affected my comfort as well as my COM squelch. Closed.
  6. Air drafts at wing root area -  I have aileron boots from CAD, but I was still feeling quite a bit of cold air coming in from the wing, which surprised me. I believe the problem is that I didn't use rubber grommets for my pitot tubing, vent lines and wiring penetrations coming in from the wing. My advice, use rubber so it seals better than plastic snap-in bushings. I didn't think this would be that big of a deal, but it just may be. Now I need to figure out how to fix this after the fact. Open.
  7. No airspeed indication - As mentioned in a previous post, this was a simple matter of having the airspeed and AoA tubes crossed up. I swapped these around and was good to go, problem solved. Closed.
  8. Slow airspeed indication - Again, plenty of detail in a supplemental post, but long story short I was confusing IAS with TAS. Seems like my airspeed indicator is doing its job and is not slow after all...GPS testing will most likely confirm this later. Closed.
  9. SkyView autopilot not functioning properly - I did what appeared to be a successful calibration of my A/P servo motors, but when I tried to do a simple "turn to heading bug" or "wings level" while on the ground it kind of wigged out. It kept going full stick deflection in one direction and bumping into the hard stop over and over again like it was confused. I need to dig into this further on actually how to operate this...very well could be operator error.  Open.
  10. Heavy left wing - My feeling is this is simply a rigging issue. I have a fairly heavy left wing...not just a little heavy, but quite a bit. The aileron trailing edges look good. I am playing around with my aileron and flap rigging right now to try and straighten things up...stay tuned on what I find out. The other possible issue is my left wingtip trailing edge is not perfectly aligned with the aileron...I didn't think this would have an aerodynamic impact, but I will take a look at this also if my rigging adjustment doesn't fix the problem...may need to split the trailing edge and re-fiberglass. Open.

Plenum Sealing

I had a VAF reader compliment my plenum design (previous posts can be found by clicking the keyword "plenum" in the right column), or more specifically how I did the front end (behind the flywheel). I had decided to remove the plenum this week to finally seal up all the gaps I could find with high temp RTV and do some tweaking to the fiberglass also.
 
Keep in mind, it still isn't done...its still a little bit rough, but you get the idea. I wont know for sure until later how well it performs, but I think this solution is going to work just fine. It is very securely mounted, I can move the entire airplane when I grab the plenum.
 
 
I basically just used the standard baffle kit from Van's and cut it to fit my installation. Once I had this in place, I put some packing tape and mold release on the sheet metal and laid up fiberglass to make the transition from plenum to baffles.
 
I then cut some of the rubber material supplied in the baffle kit and laid it over my front (black part) bracket. This sandwiches between the plenum and the bracket as a sort of rubber washer. I used some high temp RTV to hold it in place.


These two pics show the transition of the two inlets. As you can see, I didn't use any fasteners in this area and am relying on a nice tight mate between the plenum and baffles. It does fit real nice, so I'm hopeful this is a good enough air seal.


These shots give you an idea how I modified the Van's baffle kit to fit my installation. Notice how much I cut down the deflectors also...time will tell how well I did on that as I balance out the thermals on the cylinders.

 
Again, another shot of how the inside of the plenum looks. One thing I failed to mention was that I had to extend the SJ plenum to overlap my front bracket.

 
I then used tinnerman washers and flathead screws to mount it from the top. Notice the two above and in front of the oil cooler.

 
Another detailed view of the top/front.


Detailed views of how the inlets look when installed.

 
Lastly, another view of the other side. I hope these pics and description give you enough to go on for your own solution. Or better yet, take what you see here and make it better. I personally like how this turned out, but the proof will be in the pudding...how efficient is it for cooling? Time will tell. The next flight should tell me a lot, now that I have sealed it up better.

True Airspeed vs. Indicated Airspeed

In a previous post, I mentioned that I didn't think my airspeed indicator was reading properly and it had me scratching my head. I even mentioned a 11-12 knot difference between it and my GPS groundspeed. After some research, digging around and plain old memory refreshment, I have to confess I feel like a complete idiot. Once again, since I always want to be completely honest with you about my mistakes, here's a doozy for ya.
 
I was confusing my indicated airspeed (IAS) with my true airspeed (TAS). I knew, from my pilot training, that TAS was IAS adjusted for non-standard conditions (temp and altitude). That wasn't a mystery...what was a surprise to me was just how much it was different at the altitudes we fly at here in the Denver area (my home airport is at 5600'). Compounding the IAS vs. TAS spread is the fast speeds of the RV, which also magnifies it. In my previous post, I said I thought the IAS and groundspeed (with zero winds aloft) should match. TAS is what I should have said; (not IAS) those should match for that particular condition. Another lesson learned...they just keep coming, I do enjoy learning new things. 
 
Not to make excuses, but I have very little time flying behind a modern glass cockpit, and none recently. All of my flight training was in a round gage 30 yr old Skyhawk. I have never had much experience with TAS being spit out of my EFIS for me to view in real-time during a flight. I suspect many of you can relate. I had to break out the ol' E6B flight calculator to get TAS back in those days. This is a whole new world to me to have all of this flight data at my fingertips in the cockpit...and now I'm learning what to do with all of that information. Again, this illustrates the point of not only honing your stick and rudder skills prior to first flight...but also your glass cockpit familiarity, its not trivial. I could've done a better job with that in my preparation.
 
 
By the way, in my research, I came across this handy little tool for calculating TAS. Its an estimate, but should be pretty close. From this screenshot, you can see that 160 kts IAS at 6000' translates to 179 kts TAS, almost 20 kts difference! So, that's my so called airspeed indication problem. Its working just fine is my guess.
 
 
One of the really cool things about these modern EFIS's is their "black box" capability. The SkyView will spit out all of your flight and engine parameters to a file that you can download after your flight to a thumbdrive. Its incredibly useful to analyze your flights during flight testing and beyond. Above, I have isolated the TAS and IAS values for comparison and plotted them on an Excel spreadsheet (click to enlarge). This gives you an idea the spread between the two in reality (from my last flight). I was doing a little bit of climbing and diving at various points in this sequence, which is why you see quite a few spikes and valleys...straight and level is boring!  

Flight Testing

As I settle into my flight testing now that the first three flights have been completed, I thought I would give you some of the details of what lies ahead. Since my prop and engine combination are not STC approved (a certified combination), I am forced to do 40 hrs of test flight (vs. 25 hrs otherwise). In that 40 flight hrs, I must demonstrate (i.e, test) the operating limitations that I plan to operate the aircraft under. For example, if I say it is spin approved...I have to prove that by doing spins; rolls...same deal...loops, etc. This also applies to limits in my POH: weight, fuel, g-load, Vne and so on. I will need to test all of these configurations to ensure safe flight.
 
Beyond that, there isn't much detail to what you absolutely HAVE to do during your 40 hrs. They expect the basics to be done: Vso, Vs1, Vx, Vy, etc. I know plenty of pilots that mostly just fly around in circles for 40 hrs. That's definitely your call. For me, I want to actually "test" the safety of the airplane in all flight phases before I allow a passenger to ride in it. I will be using Mike "Kahuna" Stewart's flight test cards, which are available off the internet. I have modified them to suit my needs and personalize them in general. 
 
In addition to flight testing, this is your time to bond with your new airplane...get to know each other intimately. What better way to do that than to explore the flight envelope. I am already feeling more comfortable with her after every flight. By the time the 40 hrs is complete, I will have vastly more confidence in the airplane and what it can do. That's a big deal and a worthwhile goal.
 
 
This is the test area designated by my DAR. You can request an area in your application, my request was essentially all of eastern Colorado. With an airplane that cruises at 200+ MPH, a large area is very desirable. I'm not flight testing a piper cub for goodness sakes. My request was essentially ignored by my DAR, which was pretty aggravating...although at that point I wasn't going to argue as he has your future flight status solely in his hands. 
 
If you click on the map above, you will see a pretty close representation of where I can fly during my 40 hrs. The furthest point of the triangle is Sterling, CO...about 95 nm from my home airport in a straight line. At RV speeds, that's about 35 minutes away. I now have 7 flights completed...and this area is getting pretty boring pretty fast. The good news is its wide open, desolate country, with not much of anything going on...plenty of dirt roads and open fields to set her down if something goes wrong.
 
Even with my gripes about the small area and ugliness of the terrain...I still, amazingly enough, get excited to fly to Sterling! That's what RV flying does to you...it really doesn't matter what you are flying over as long as you are flying your creation. It is quite addictive...this RV-ating.


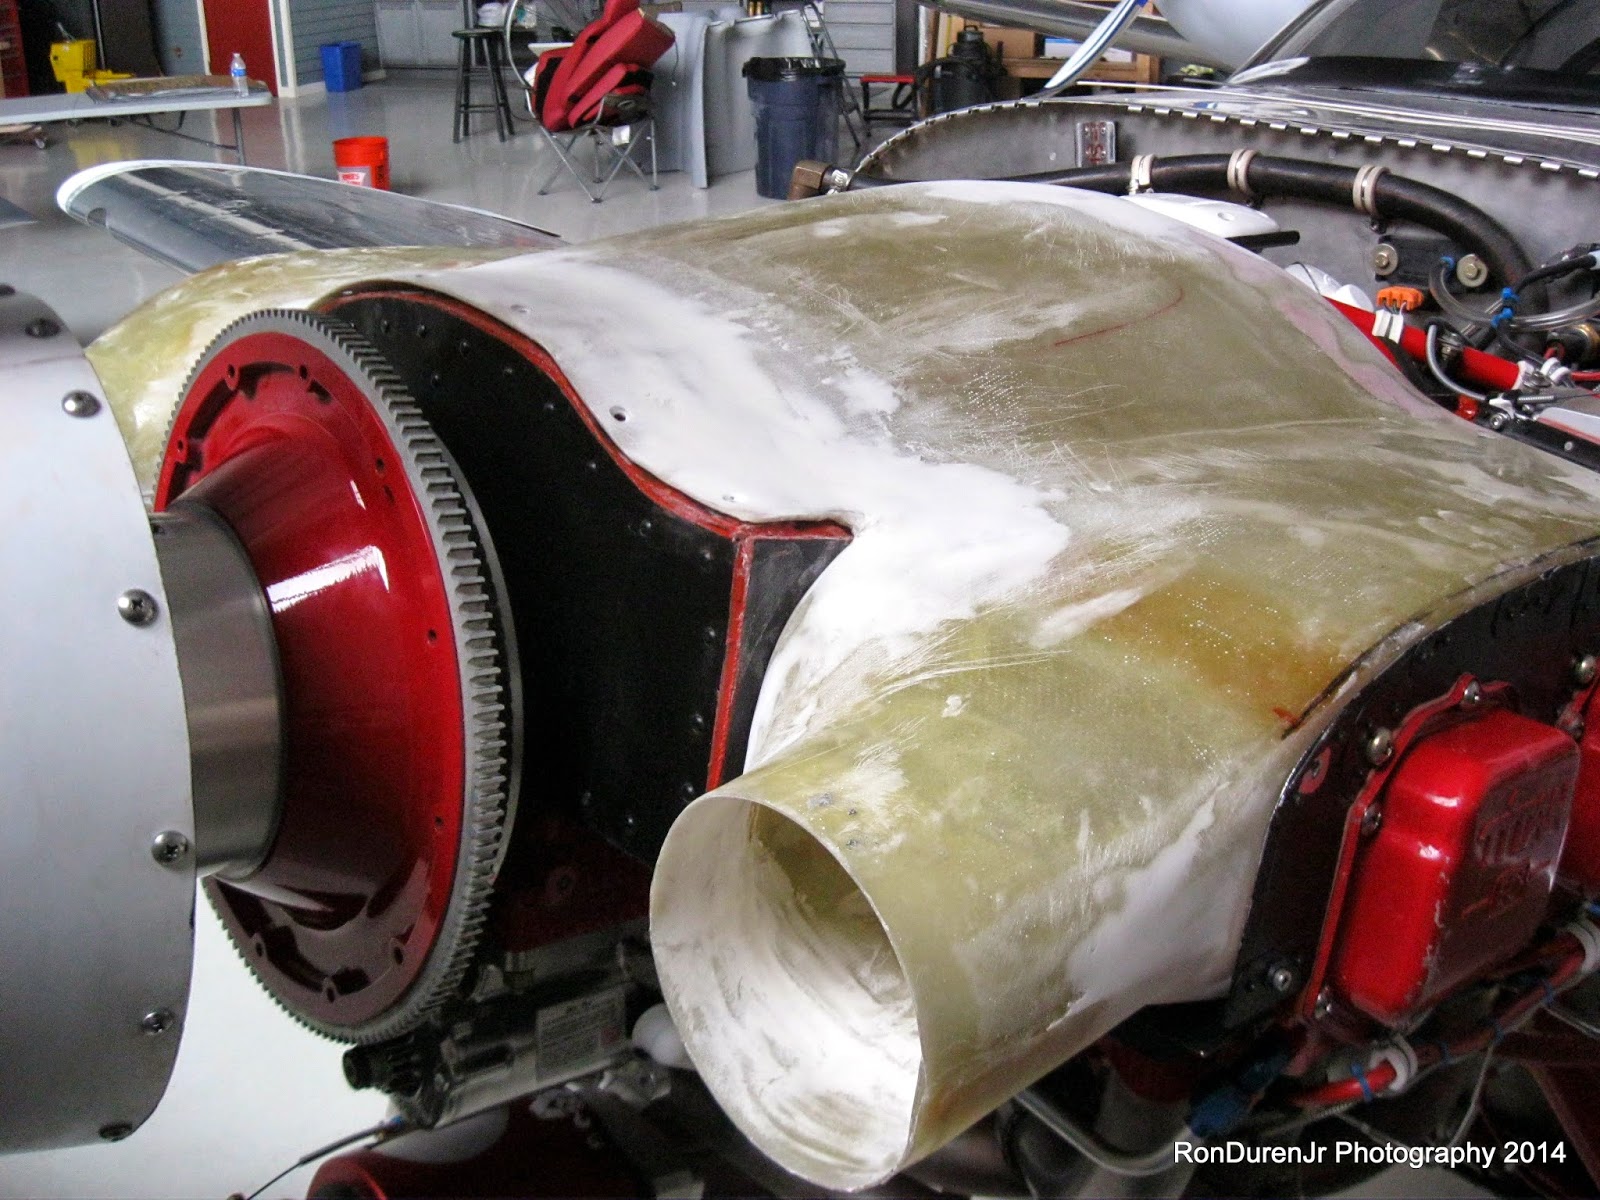
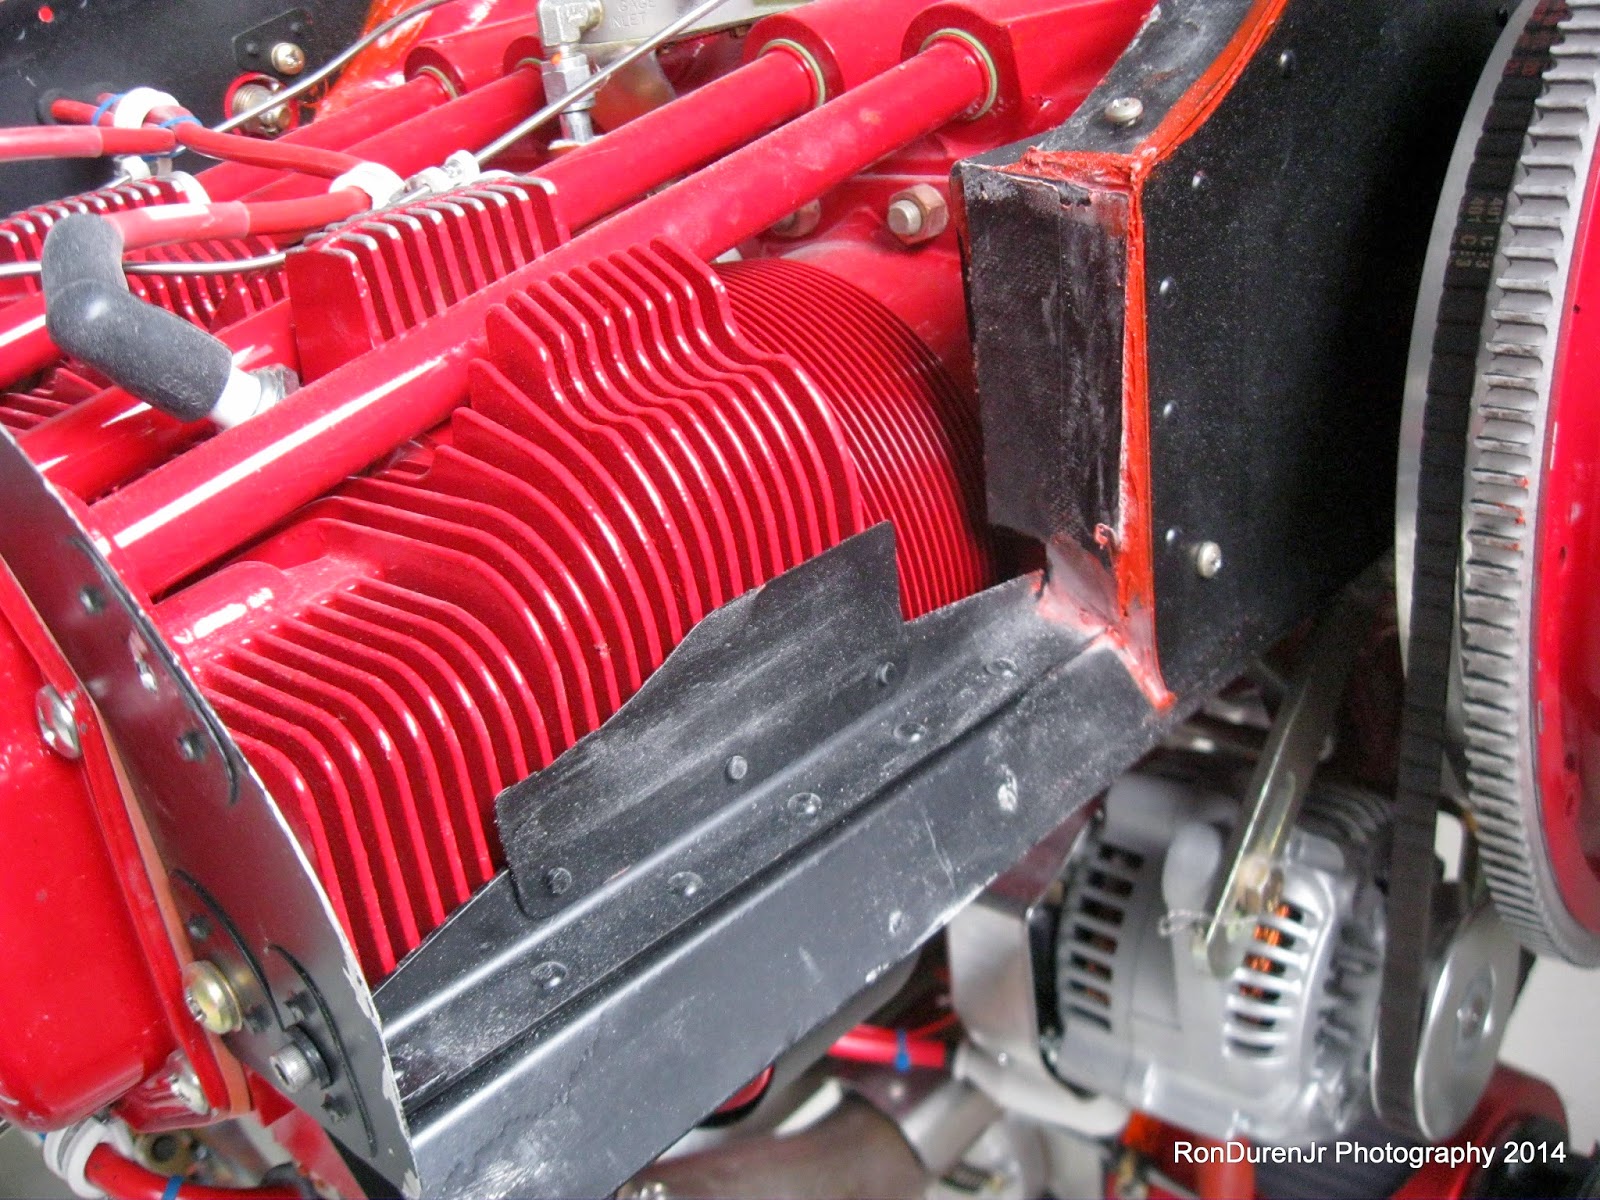
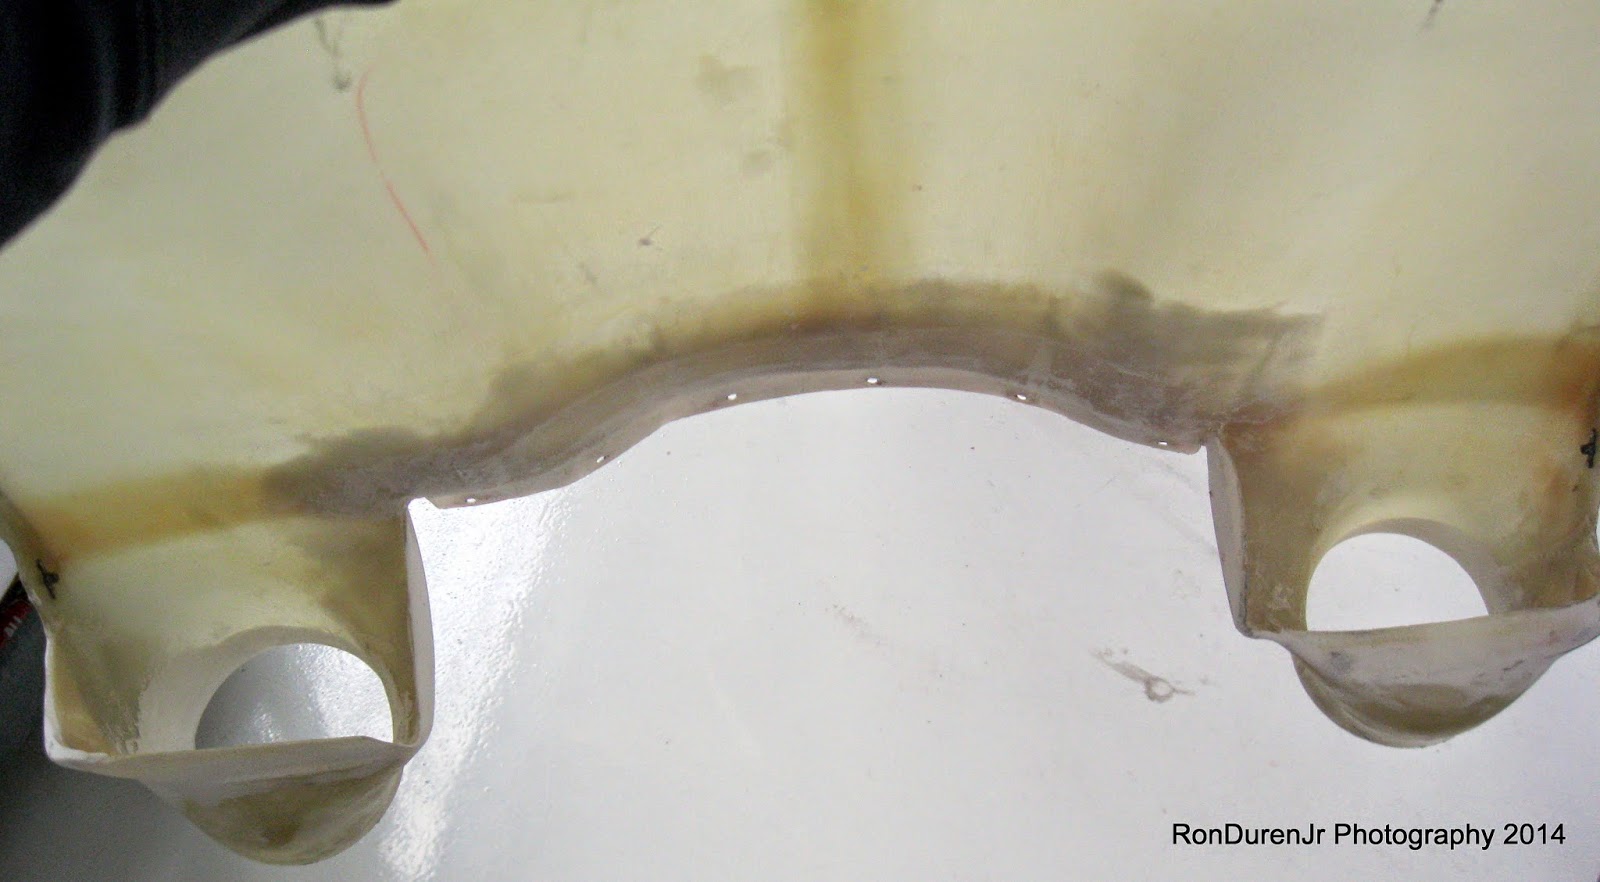
These screenshots show the objectives of the first three test cards (the details are omitted for brevity)...which have all been completed. I will publish these (28 of them) as I progress so you can follow along. After the third test card, the fourth flight card is slow flight testing. I decided to work on getting the engine broke-in before doing that one. After seven flights, I now have 10.5 hrs tach time on the engine and it hasn't shown any indication it is broke-in yet (i.e., CHT's coming down, oil consumption coming down, etc). CHT's are running about 375-425 deg F, although I haven't done any sealing of gaps yet on my plenum. Oil consumption is about a half quart per hour right now. 
 
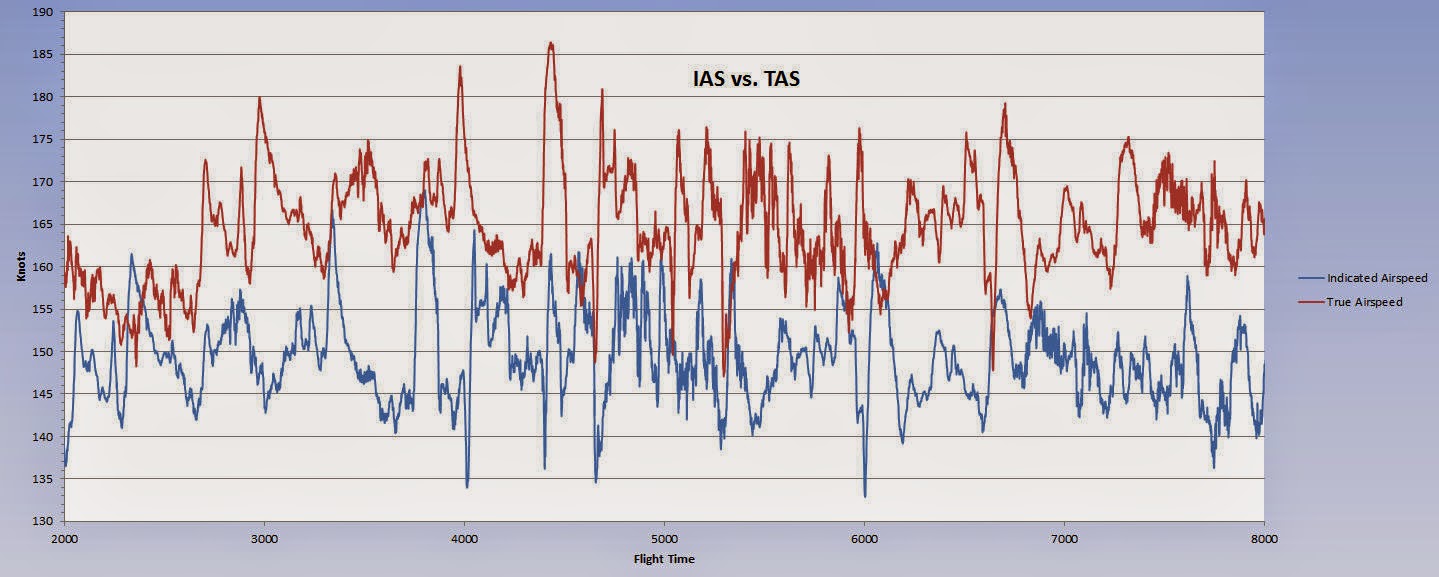
I called my engine manufacturer Aerosport Power and asked them, should I be worried? They said, nope...this isn't unusual. I was instructed to keep running her hard as I have been (70-75% power) and if nothing happens in the next ten hours to call them back and we'll talk again. I may mix in some other test stuff while I do it, like GPS airspeed indicator testing. They also said, try to do longer flights if possible...not 45 min or 1 hr. I've been doing essentially 2 hr flights the last three, so I am good in that regard. Hopefully soon she'll break-in and I can breathe a sigh of relief...and get on with other flight testing.