Ron's RV7 Aircraft Factory


Welcome to my personal blog. This site was created as an informal description of my build progress in the construction of a Van's RV7 aircraft. A place where family/friends/builders/curiosity seekers can follow along. It is not intended to be a detailed description of every step in the building process as that would be much too time consuming. There are plenty of sites that do a great job in that arena, that is not my intention with this site. My intention is for this to be a philisophical/motivational/inspirational account of the emotional ups and downs of the life changing journey...and it will change your life. I hope this will give you an idea, through my eyes, of what its like to make this transformation. A note to other builders, I am not an expert so do not put your safety at risk by attempting anything you see on this site until you have done your own research, or send me an email so we can discuss it. Any deviations from the plans are not approved, nor endorsed by Van's Aircraft or myself. Thanks for visiting.


Friday, July 22, 2011

Rudder Pedals and Oshkosh HOBBS 750.0 hrs

Heading to Oshkosh in the morning, so this will be my last post until I get back. I'm pretty excited about this trip for some reason? I think its because I am going early rather than late, it will be a completely different perspective. This will be my 4th consecutive trip...almost getting to be an old pro...well, maybe not quite.

So I spent some time getting the fuel tank attach angle bracket and baggage side panels done, then moved onto the rudder pedals.


I bought this handy cutoff tool from HF specifically for all the angle alum you need to cut on the fuselage. It has been the best $30 tool purchase I have made, highly recommended.


This is an angle bracket you need to fabricate for the tank attach bracket. Pay close attention to this detail drawing...specifically the 4 17/32" dimension. I wouldn't have dimensioned it this way personally, and it surely tripped me up. I thought it was an overall length dimension and as you'll see its not.


This is what it looks like if you do what I did...my match drilled hole ended up too close to the edge. I ended up redoing this puppy. I have plenty of this angle in the shop so no big deal except for the time lost.


A pic of where it installs...click to enlarge...


And this is the steel fuel tank attach bracket that it will attach to.


Trimming the baggage side covers to the appropriate geometry.


Baggage side covers installed...looking good, starting to look like a finished airplane...kinda...


Seat floor pans cleco-ed in place...not sure why, just b/c it looks cool? ;)


Getting the rudder pedals fabricated and ready for attachment.


Matco master brake cylinders...these are the 'standard' for Van's kits. I probably will swap these out for a higher end version from Grove. Matco's are low-end and have issues with sticking. Some guys put springs on them to alleviate this. Others just upgrade to Grove, which are markedly better from what I've heard. They're not cheap however, each cylinder from Grove runs about $165.


Four pedals...almost ready to go, need some more prep work. I am, as you might guess, doing dual brakes on my plane so you can fly from the right seat if needed. Also note, I looked everywhere through my parts trying to find the second set of rudder pedals. I finally looked in the dual brake kit that I ordered as an option...and that's where I found them...duh, sometimes I wonder how I got through Engineering school? Save yourself some time...look there first! :)


Monday, July 18, 2011

Forward Fuse and Baggage Area HOBBS 746.0 hrs

Just a quick post to update you on the weekend's activities. I finished up the forward fuselage and started framing the baggage area. So, its cranking along...the fuse has been fun so far. Reading ahead in the plans, there isn't too much left on the laundry list before I start disassembling it for deburr and priming. Then it will be time to put it back together for riveting.

There are a couple of modifications that I plan to do however that will add some time. I am installing a false floor in the forward fuse and also a center console. So, once I get the 'required' issues done, I will start to tackle those two items. I'll post pics in my next post.

Thursday, July 14, 2011

AirVenture is Coming Up HOBBS 738.0 hrs

http://www.airventure.org/

Well, its almost that time of year again...yep, "Christmas for Aviation Enthusiasts!", the pilgrimage to Oshkosh, Wisconsin is just around the corner. I was looking back at my previous trips since I started building...they occurred at 95.0 hrs and 262.0 hrs, I am now at 738.0. It made me realize I am a little short of 500 hrs since last year..I had originally planned on a 500+/yr pace so I'm gonna try and step it up going forward. Its tough sometimes to keep at it, how guys do these in two years is beyond me. But I, for one, want a flying airplane sooner rather than later. At this time next year, hopefully I will be at 1250 or more?

I am doing things a little different this year. I usually attend the last half of the week, this year I am going early. I will arrive on saturday before the show officially starts (on monday). I've always wanted to grab a chair, a cooler of beer and park my butt down next to the runway and watch the mass arrivals of airplanes coming in. I listen to the live tower feed every year and its quite fascinating. So, I'm looking forward to this new twist.

Of course, I have an entire laundry list of items/vendors I want to check out. Plenty of purchases and decsions still left to be made before I am done. In addition, this is a great oppurtunity for stocking up on needed tools, supplies and AN hardware...helps save shipping costs.

Forward Fuselage HOBBS 738.0 hrs

Now that I have all of the fuselage cleco-ed together, my efforts are focused on getting the forward fuselage taken care of. Its a lot of match drilling support brackets, fabricating gussets, misc brackets, etc. Important stuff, this structure will carry the loads from the engine mount that will be installed later.


I thought the plans said to attach the side skins and bottom skin, but for the life of me I cant see how you can get to some of the required holes for drilling these brackets. There are a couple that I will drill later when I remove the side skins. But, here you can see the angle alum that I am match drilling to the side skin.


This was a tricky little gusset to fabricate, as you can see it has two very slight bends in opposite directions. As tricky as it was, thankfully it came out very nice, I think I got lucky. ;) I still have another one to do though.

Tuesday, July 12, 2011

Cruising Along HOBBS 734.0 hrs

Once I got the center fuselage section done, it was now time to attach that to the aft fuselage (tailcone) assembly. Definitely an exciting moment in the project...my enthusiasm was somewhat dampered as it took me a little bit of maneuvering to get it done. It wasn't as straightforward as it sounds. I had to jockey the two large assemblies around quite a bit to get the holes lined up and cleco-ed. It would be easier with another person to help, but I got it done.

I did this while it was laying on a pad on the floor and raising the tail slightly. Once the center fuse was securely attached, I then added the side skins and the longerons. I then lifted the entire assembly up onto the saw horses. No...I haven't built a fuse stand yet...I wanted to get a feel for how I want to do that?...how high off the ground should it sit? Should I support the fuse at two places, or three? Do I need it to be mobile (on wheels)? etc. Having it on sawhorses makes me a little nervous though so I need to address that soon.

From there, it was kind of a whirlwind at how fast big parts were coming together. Albeit, only cleco-ed in place rather than riveted, but very cool nonetheless. The firewall and forward fuse was the next big chunk. I now have what is really starting to resemble an airplane. :)


This is how it looked when I first lifted it up onto the sawhorses.


Fitting and match drilling the arm rests...have to do a little fluting on these as you can see.


The instructions say to install the side skins...do a few minor things, then remove them to add this bend and reinstall. I would just add the bend immediately...no need to attach them twice in my opinion. But here you can see by the red arrow the area to be bent. This has to transition into the curvature of the aft fuselage.


I did mine a little different than the plans say and I was pleased with the results. I used a piece of water pipe I had from prior build activities. I just used my hands to massage a nice curve into the sheet. It doesn't have to be perfect, but the closer you get it, the better.


You can see in this pic, the finished results. However, notice that I have the orientation of the overlap wrong. How each skin overlaps the other can be a little confusing while looking at the drawings. I once worked as a roofer and, although I missed this one, the concept is pretty intuitive to me. Just think about how you would overlap flashing on a roof...how would you want the water to run off? In this pic, the water would run right inside the fuse, which obviously isn't desirable. I will fix this when I reassemble it for riveting. Edit 07/13/11: Checked the plans last night, this orientatin is actually how its called out. I dont agree with it...and it looks like it would be easy to do it either way?? I'm probably making a big deal over nothing?


Here you can see by the red arrows where you have to notch the longerons around the empennage attach brackets. DON'T notch the attach brackets...Van's warns you about this in the plans as well.


Here is a shot of the forward end of the longeron. You have to trim this back so you have 3/4" from the edge of the side skin. As you can see...I ended up cutting approx. 1/4" off mine. Just used a die grinder/cutting disk...nothing to it, worked out well.


I was pretty amazed at how well my longerons matched up with the curvature of the fuse. You bend these longerons up according to the plans, plenty of twists and turns. But in the back of my mind I kept thinking...I'm going to have to do a lot of tweaking to get them to fit perfect. Wrong..follow the plans the best you can and its amazing at how well they come out (the longeron dies were probably instrumental in this). I did have to massage the 17 deg twist where it attaches to the firewall, but not by much. Anyway, I really enjoyed looking at seeing the nice smooth curvature in the fuse...pretty cool.


Match drilling the longeron/skin/steel attach bracket. This took a little doing to get the holes lined up nicely. Don't get lazy here and shortcut this, make an effort to do it like Van's says. This is an important part of the structure and you don't want to be oblonging these rivet holes.


Now I am starting to add the support pieces (match drill) to the side skins and floor. This will be my next work session. Seeing this all come together has been a blast!

Friday, July 8, 2011

Mid Fuse Done HOBBS 725.0 hrs

Last night I finished up riveting the mid fuse assembly...or at least as far I can go with it for now. There are a couple areas that will be riveted later. Now its time to attach the mid fuse to the aft fuse and make a canoe...very exciting! But first...I need to build a fuse stand of some kind. To attach the two you need, at the very least three sawhorses. And I'm not crazy about putting my fuse on three wobbly sawhorses...not stable enough for my taste. So, this weekend I will tackle that...as you might guess, I've pretty anxious for this. :)


Again, I was able to rivet this assembly solo...it took every inch of my relatively long arms to reach the rivets in the center but I pulled it off somehow. I just went slow and took my time. I did all of this riveting in three work sessions...riveting by yourself...stretching, grunting and groaning...wears a guy out. ;) Here you can see the progress before I carefully turned it over onto the other side for better access to the remaining rivets.


And here are a couple shots of a finished assembly. The corner brackets where the cleco's remain will be riveted later per the plans. Cool eh?

Wednesday, July 6, 2011

Intimate HOBBS 721.5 hrs

Over the long holiday weekend I was able to make some really good progress (16 hrs) on the middle fuse section. I finished by starting to rivet the skeleton together before I wrapped for the weekend. Next I will attempt to get to the rivets on the bottom skin.

I thought this section would go faster but soon learned that it is a fairly labor intensive sub-assembly. And...if I thought I was done doing ribs once I had the wings behind me, I was dead wrong. Between the seat ribs and the baggage ribs...plenty of fluting, yeah, remember that? deburring, dimpling and priming...time consuming.

It dawned on me...as I've evolved as an aircraft builder over the last couple years, how I've changed. When you first start on a sub-assembly such as this one, it all looks so confusing as you scan the prints and read the instructions....that hasn't changed.

But, as a seasoned builder, it now quickly begins to make sense...I find myself reading the instructions less and less as I now have a pretty good feel how things go together when I look at a print. The other thing I've noticed...by the time you spend ~30 hrs building something, by the end, when you are riveting it together...you are very intimate with every detail of the construction. Funny how that perception changes so drastically during the build.


These two tie-in pieces were kind of hokey the way Van's had them called out. I redid mine, and somewhat copied the way Jason Beaver (good RV7 site) did his to add a little robustness to them. I still don't think they will do much in the way of strength, but whatever...these are improved over the Van's version.


I kept thinking I was missing something as I was building this middle section? The crotch strap attach points!?? I seen no mention of them in the plans so I was left scratching my head, wondering why? Finally, after rummaging through my remaining parts I found a separate kit that had everything I needed.


Doing layout...mine came out crooked which kinda ticked me off. But...you wont see it, and it wont compromise the strength...build on. Just be careful when you do yours, they can easily get crooked.


I am going with either Hooker harnesses or more likely, Crow harnesses. Both of which use a 5/16" gap so make sure you adjust from what the plans say...the Van's version are not as thick.


Dan Checkoway had added a small hidden compartment in his baggage area for a quart of oil and tool kit. I don't think it was his original idea, but I liked it nonetheless. So, here I am cutting one (6" x 14") into my baggage floor.


As you can see, plenty of room for a quart of oil. It can also slide forward under the edge of the baggage skin. I will ProSeal this compartment, prime it and carpet it later for a nice finished look.


And unlike Dan, I did two of them, one on each side. I also am adding a piano hinge and cam lock. He used screws/nutplates. One side can have a quart of oil and small tool kit and the other can be used to lock up valuables when needed. Since it will also be under the carpet, it will be concealed for a little added security.

Disclaimer: whenever you cut something out of the original design...you must consider the consequences of what that might do to the integrity of the structure. I realize a cam lock wont offer any strength like a nutplate would. I don't think the aircraft will have high flight loads in this area, so I feel ok with it...but I could change my mind later. Just keep this in mind when and if you do mods...nothing is without its consequences, weigh them carefully before proceeding. I stared at this for an hour and a half, thinking about it, before I cut metal. :)


In the plans, it says to add some holes for adel clamps for wire routing if you plan to mount your battery in the tail. Not sure I will do that, but I liked the idea of adding extra holes for cable routing of any kind if I needed it later.


Dimpling the bottom, middle fuse skin...this bugger was kind of a pain to horse around...its shape makes it almost square, harder to manipulate than the rectangular wing skins. But...there's only one...and I knocked it out without too much trouble.


A removable bracket that will allow access for the control column to be added later.


Installing nutplates...did I mention that? ...another time consuming task on the ribs.


I used solid rivets (vs. pull rivets per the plans) on the crotch strap brackets. I figured why not as long as I have access to do it? I still have to drill a mounting hole for the strap attach point since the Crow's are slightly different here too, but I can do that later when I get my harnesses.


As you can see, I have this AN3 bolt (on the left side of the pic) torque sealed from earlier...I need to remove it for the outer seat rib. Oh well, not a big deal.


These outer seat ribs (far left in the pic) need to be match drilled to the bottom skin. As you can see from this pic, these ribs have a nice curvature to them whereas the others are straight. So, what you have to do is, flute them...but instead of fluting them to straighten them out like we normally do...over-flute them so you can get that needed curve. Lay it down next to your holes as a guide and you can perfectly match the curve.


Here is my centerline that I drew as a guide. As you can see, when the curvature comes out right, you can nail the centerline during your match drilling.


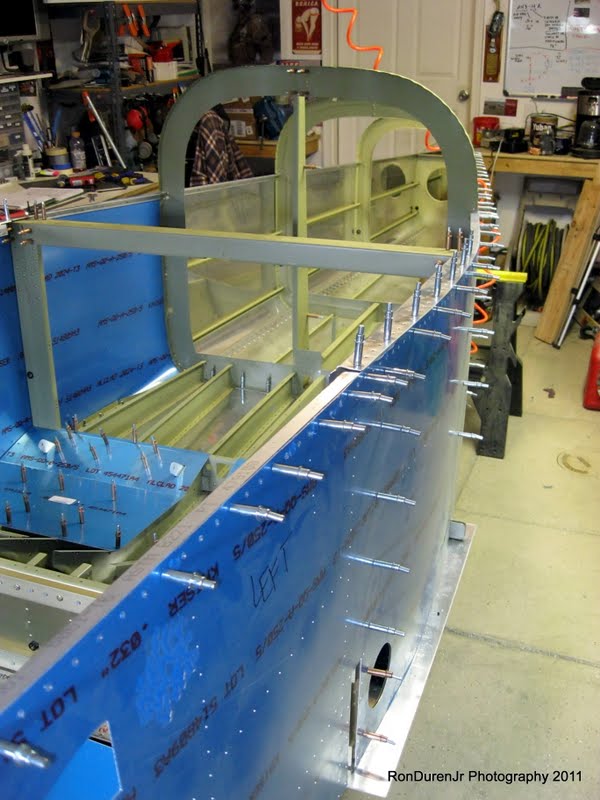
And here is my first riveting on the skeleton...attaching the seat ribs to the rear spar carry-through. Each rib also gets an AN3 bolt top and bottom. I torqued these...and then went back and double checked them again, then applied torque seal immediately after the second go 'round. These are important and you dont want to miss one. I think some builders are way too anal about too many things...but with stuff like this, you cant be too anal in my opinion....this is a vital part of the aircraft structure.


As you can see, the cleco's are slowly being replaced by rivets....aaaaaw, what a great feeling to see it start coming together permanently. I will add, the baggage ribs were a little bit of a pain, not much room to work with...I used my offset rivet set on some of them.