Ron's RV7 Aircraft Factory


Welcome to my personal blog. This site was created as an informal description of my build progress in the construction of a Van's RV7 aircraft. A place where family/friends/builders/curiosity seekers can follow along. It is not intended to be a detailed description of every step in the building process as that would be much too time consuming. There are plenty of sites that do a great job in that arena, that is not my intention with this site. My intention is for this to be a philisophical/motivational/inspirational account of the emotional ups and downs of the life changing journey...and it will change your life. I hope this will give you an idea, through my eyes, of what its like to make this transformation. A note to other builders, I am not an expert so do not put your safety at risk by attempting anything you see on this site until you have done your own research, or send me an email so we can discuss it. Any deviations from the plans are not approved, nor endorsed by Van's Aircraft or myself. Thanks for visiting.


Tuesday, April 26, 2011

Top Gun Re-release HOBBS 640.0 hrs

http://www.amctheatres.com/topgun/
Its pretty hard to believe that Top Gun hit movie theatres in the summer of 1986 and was the top grossing film that same year...25 yrs ago! Wow! Where has the time gone? I still remember, like it was yesterday, as a newly graduated, pimple-faced, 18 yr old going to see it at the theatre. And of course walking out afterward thinking that it had to be the coolest movie ever. I was certainly ready to become a Naval aviator and fly Tomcats after that....but alas, things didnt play out that way.

Even today, I realize its kind of cheesy, but its still my favorite movie of all time. I mean, whats not to like?...in your 20's, dating a hot blonde (although my choice for casting would've been Michelle Pfieffer [pictured] for that role) who happens to have a PhD in Astrophysics, flying a 30 million dollar airplane on the governments dime and cruising around on a crotch rocket with no helmet in LaJolla, CA. Shoot, that would be the life! :)

AMC is showing limited engagements Apr. 30th and May 2nd, click this link for locations...I plan to be there, and daydreaming back to the summer of '86.....it was a good summer. :)

Sunday, April 24, 2011

RIP Pete Vinton... HOBBS 640.0 hrs


Today I got the sad news my friend, Pete Vinton, died yesterday while presumably at the controls during a Carbon Cub demo flight. I cant say I knew Pete well, but I knew him well enough to call him a friend, and it goes without saying that today I have a heavy heart.


Its kind of eerie the timing of this unfortunate accident, Pete just called me out of the blue about a week and a half ago, wanting to catch up since we hadn't talked in awhile. He was bragging (more like rubbing it in!) about all the flying he was going to be doing in the next week...flying for United on a trip to the far east and then ferrying a Cub from Yakima. We both laughed and joked..."life really sucks huh?!!" In the roughly 3 yrs I have known Pete he had never called, on a whim, just to say hello--that was a nice gesture. I will always be glad he did, so we could have one last conversation about what we were both passionate about...flying airplanes.

Photo of Pete with Jessica Ambats, (photo courtesy of Jessica Ambats) 

When I met Pete, we both hit it off instantly. He was a good ol' boy...a redneck if you will, and I mean that in the best sense of the word. With my rodeo background and also growing up a redneck, we had an easy repore between us that's hard to explain. He did have a large University of Nebraska flag in one of the hangars, and since they were our hated rivals at the University of Colorado, I wasn't too fond of that...but we got past that with some good natured back and forth ribbing while tossing back a couple of cold beers. :)

Pete had an impressive aviation resume, he was a 10 yr Navy pilot flying off carriers during the first Gulf War. He was currently still flying triple-7's for United and was a check pilot for them as well if I remember right? He was also a regional sales rep and factory demo pilot for CubCrafter's in Yakima, WA. So he had plenty of hours in the Cub as well. To say he was a well qualified and experienced pilot would be an understatement, so this news certainly is a shock.

In the 777 simulator with Jessica Ambats, (photo courtesy of Jessica Ambats)

To borrow a quote from Top Gun, "if you fly airplanes (jets) long enough, something like this will happen. When the first one dies, you die too." Well, this is the first time a friend of mine has died as a result of aviation and I'll admit it hit me rather hard. Unfortunately, I'll be lucky if its my last. Most old pilots have more than one tragic story to recount of aviators "gone west" much too soon.

When I first started flying, I was cocky enough to think I will never die in an airplane because I will be too good of a pilot. I will put in the extra hard work to hone my stick and rudder skills and make good decisions to ensure nothing bad could ever happen to me in an airplane. I've changed that tune as my flying career has matured. I now know good pilots die, this isn't the first time I have seen it happen from afar...experienced and qualified pilots die. Make no mistake about it, its not always the idiot that 'augers in' as some pilots like to believe. I would be crazy--in absolute denial to think, as would any pilot, that it couldn't possibly happen to me. I have come to terms with the fact I may someday die in an airplane.

Mind you, I certainly dont want to perish at the controls of an airplane, and have no death wish. I still plan to do everything in my power to make sure (and I have specific plans regarding this topic of discussion that I will discuss in later posts) that doesn't happen...but I know, even with that, it still could. I always have to be vigilant. I hope to never lose my "healthy fear" of flying to ensure it keeps me on my toes, complacency has no place in the cockpit.

To the non-pilot, the first question when hearing something like that is..."then why in the world would you continue to do it if it could kill you? Why are you willing to put your life on the line just to fly?" Thats not a simple answer and each pilot might answer it slightly different, but the common theme would be a passion for flight. Pete certainly had this passion, as do I and almost every pilot I know.

I don't consider flying, in of itself, dangerous. Its just very unforgiving of the wrong mistake at the wrong time and I'm ok with that. I like to be held to that high standard when I fly. Second, I would rather live passionately for 43 yrs than in absence of it for 86. Safe and comfortable, on my soft couch, is not for me and it wasnt for Pete. The pure joy and passion I get out of flying is worth the risk to me, and maybe the inherent risk involved is exactly why I feel so alive when I fly?

Pete, and pilots like him, have seen and experienced things in an airplane that most people could only dream about. I will miss him, but I certainly dont pity him, he lived a great aviation life and it goes without saying he died doing something he truly loved. There are worse things.

Bottom line, as one of my flight instructors cautioned me when I was learning to fly. Flying is a lot of fun and as pilots we certainly love to experience the joy of flight. But never forget, fun or not, and certainly never lose sight of the fact its serious business...treat it as such. Fly safe my friends....

One of my favorite quotes...in honor of Pete and the life he lived...a fitting tribute,

      "The function of man is to live, not to exist. I shall not waste my days trying to prolong them. I shall use my time." ~Jack London


The only picture I could find of Pete in my archives. This was at the Rocky Mountain Airpark open house last year. Pete was on the radio directing the air traffic. It was a great day of aviation!

Copyright Jessica Ambats


A final toast to my friend, thanks for the conversation....I shall miss it.

Sunday, April 17, 2011

Firewall Finished HOBBS 640.0 hrs

This week I finally finished up the fuselage inventory...it took me about 5 hrs total! Van's has to have the most cryptic inventory organization system known to man...I'm sure it makes sense to them how they group these parts but I promise you it makes no sense to me! Very confusing and really not very efficient...for example, several bags of the same type of rivets, not the most cost effective system. Not to criticize, but I would love to have a shot at running that company. :) Even with that...all was present and accounted for once again. Glad that's over.

I also finished up some wiring details and routing the vent line on the right wing and then riveted the right bottom inboard skin in place...solo, once again. This one was a little harder because of me being right handed...I was using my left hand on the rivet gun for much of the work. A little awkward...but you gotta get proficient with both hands when building one of these. So, now the only thing left to do on the wings is the bottom, outboard skins and the aileron and flap mounting, which I will do later. For now, I am moving on to the fuselage and more fun stuff.


The fuel pump doubler on the firewall shown here is not needed for fuel injected systems so there is no sense installing this (click on the photo for a larger view)


And here are a couple shots of the finished product. The firewall recess in the center will be riveted later, apparently access to the brake lines is easier when that is not in place. You'll also notice, unlike past assemblies with me, no priming is visible. I used a rattle can to prime the mating surfaces and then will prime and finish paint it later as an assembly since it will be visible behind the rudder pedals. With the fuselage, the painting process will take on a new flavor as I plan to paint my cockpit as I progress. 

(Edit: 05/09/11 - After doing some research, I wont be painting my firewall and I dont advise you do either. Think about what its job is? To protect you from an engine fire. The stainless steel will do that as its melting point is quite high, but when its being heated to possible temperatures of 1500+ degs by an engine fire, the last thing you want is paint fumes/smoke filling your cockpit. I have not yet decided on what my firewall will have on the cockpit side--still doing research--but it most certainly wont have any paint/primer.)

I started by trying to be clever and back rivet this assembly since all of the rivets on the engine side are flathead -426's. I quickly abandoned that idea, because of the flange orientation it didnt work well at all for me. I resorted back to a bucking bar and that worked much better. Now that the firewall is done, its on to the main center section bulkhead...this is going to be fun!


My friend Sean Blair from Colorado Springs sent me this RV7 decal for my birthday! Hee haw! So, of course I had to proudly put in on my car. Pretty cool eh? Not sure where he acquired this...but thanks Sean!

Thursday, April 14, 2011

Classic Aero Designs HOBBS 628.0 hrs


I requested, and received my material samples from Classic Aero Designs last week. This will be the company I buy all of my cockpit accessories from. I really like their products, it will give the plane a professional, production look and feel to it.

This will include side panels, carpeting and of course the seat upholstery and embroidery. While building an airplane, you have to function much like a project manager, there are always details that need to be researched and decided upon. To run a successful project without delays, you will have to always be ahead of the game in your planning for long lead items. I'm certainly not ready for the upholstery yet, but the time, at least for me, will be here sooner rather than later.

The ones on the left are the 'ultra leather' samples, the others are leather. I gotta say, the ultra leather is pretty impressive. I originally was planning on leather, but now I am undecided after seeing the samples. The ultra leather feels nice and is lighter and cheaper than the leather. Hmmmm...gotta ponder this.

Bell Tailwheel Fork HOBBS 628.0 hrs


Recieved my Bell tailwheel fork yesterday. It will obviously replace the Van's stock version, which has less ground clearance and isn't as robust in my opinion. Very cool piece of hardware and the Bell brothers were nice to deal with. I originally contacted Doug Bell, Jr. (RV8 owner) and he handled all of my correspondence and answered my questions. Then Mike Bell handled the finances and shipping. This baby set me back $220, shipping included. 

The whole process took about 2 months I would guess so not too bad, especially considering I was in no hurry. The Bell TW fork has been well received by the homebuilt community as being a quality product. The problem for awhile was actually getting your hands on one. I heard of guys waiting over a year to finally get their fork. They now seem to have fixed that delay in processing.

Here is a pic with the Van's tailwheel installed..just because I thought it looked cool! ;) I may go to an after market (lighter) version later but right now I am undecided on the actual tailwheel I will use.

Monday, April 11, 2011

Wing Work and Inventory HOBBS 627.0 hrs

This week was a little slow on the project, I had other stuff going on that required my attention. And since time is a limited resource, something had to be neglected. ;) I did, however, find a way to log 7 hrs in the shop nonetheless. Believe it or not, most of it was on the wings. That fuselage kit is calling my name...and its rather loud in my ear, but I also don't like leaving things unfinished. That explains why I am have been progressing on the wing completion rather than diving into the fuselage kit. Although I will probably leave the last bottom skins off the wings until later since there is no hurry to close those up. To keep access to the inside of the wing as long as possible is desirable....just in case. You can access everything through the inspection holes...but why be cramped if you don't have to?


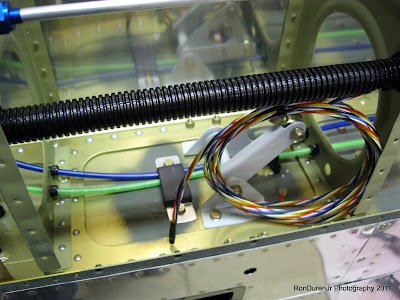
Here is a better picture of my custom made bracket to hold my pitot and AOA lines in place. As stated in a previous post, that is actually shrink tube on the bracket to eliminate any sharp edges. Also ignore the twisted pair wire in the pic, that is for my roll servo motor for the Autopilot. But...it didn't dawn on me until after I snapped this pic that I have it on the wrong wing! For some reason, they say it is supposed to go in the right wing. Easy enough to move it over to the other wing.


SafeAir pitot mast in place, later I will buy the heated pitot tube from Dynon...expensive bugger at about $450. The red 16ga wire is for the heating element in the pitot. The green tube is the pitot line and the blue is for the Dynon AOA system that is integrated into the pitot. I also got that tubing from SafeAir. They have good products.


My wiring coming out the conduit in the wing tip: RG400 coax for a future Archer wingtip antenna, shielded 20ga for the LED nav/strobe, regular 16ga for the landing/taxi light and a piece of nylon cord for the possibility of a future wire run, although it may not be needed with conduit in place? Routing wires through that baby is a non-event.


I cleco-ed the final bottom skin to the left wing (the first bottom skin is done) for a look-see...cool eh? Looks good. I wanted to look at how difficult this baby would be to do solo? This is the one I will probably leave until later however. Cleco-ing it to the wing seems like a good place to store the skin so it doesn't get damaged until I'm ready for it though. You can also see, I have riveted the aileron brackets, aileron and flap fairings in place.


And low and behold, I spent TWO hours doing fuselage inventory and felt like I didn't make a dent in it! aargh! Boy, this kit has a lot of parts in it....many more than the wing kit....lots o' AN hardware. I certainly don't have enough parts bins for all of this stuff. Lots and lots of brown paper and plastic bags full of hardware of all shapes and sizes. I'll keep wading through it as I have time and get it knocked out....gotta be done.


While Dad was visiting I mentioned that my next major tool purchase was going to be a cordless drill. I have been wanting to add one to my arsenal for a while now but gosh they are pricy. Well, today (Apr. 11th) was my birthday (don't ask how old!? haha...old enough to know better but still too young to care!) and Mom and Dad sent me this as a birthday gift!! SWEEEEET! This will come in handy for the remainder of the project when the pneumatic drill isn't the best choice for the task at hand...or just to have two drill motors handy chucked up with different drill bits. Thanks Mom and Dad!

Thursday, April 7, 2011

New Splashscreen HOBBS 620.0 hrs

With the announcement of the new name, you'll notice I redid my blog splashscreen. Although Mr. McMaster has a great looking plane (many thanks to him for letting me borrow his image for the last several months), I felt like it was time to part ways with that view for my site. I felt like I was ogling another man's wife. ;) It's time to start forging my own identity with my plane from here on out.

The goal was to create an attractive graphic of an RV, but keep it obscure. Kind of like a top secret view of what's coming in the Skunkworks factory. :) With the final view only to be unveiled when its complete.

I fired off an email to Chris Sands, again asking him for permission to use one of his photos. He was gracious enough to again say yes and thanked me for asking. This is the photo I used, nicely shot by Curt Gearheart. I dabble in amateur photography myself and I really liked his work on this photo shoot of Chris's plane. After I did some creative photo editing, you can see the final product for the site. Hope you like it, I was pleased with the results.

Builder: Chris Sands/Photography: Curt Gearheart

Wednesday, April 6, 2011

Whats in a Name? HOBBS 620.0 hrs

To borrow a commonly used question...What's in a name? In this case...a lot. The names people give to their airplanes is fascinating to me. Some are very clever, which I enjoy, and some don't even bother, which puzzles me. You could probably guess where I reside on that scale?
This airplane is my passion, quite possibly my 'once in a lifetime' adventure that I am pouring my heart and soul into. To not name her would be unthinkable in my eyes. Like the great fighter pilots I read about as a kid, your bird has to have an interesting name. 

Anyone that knows me would also realize that I put a lot of thought into things of this nature. I have had this particular name chosen for quite some time. I was going to wait until she was an actual airplane (and not just a pile of aluminum) before making it public. But like a kid on Christmas eve, I couldn't wait. ;)

I would like to introduce Wablosa. I'm sure your first reaction when reading this is...huh?? What kind of word...name is that? Well, its the Lakota Sioux (famous Lakota include Crazy Horse, Sitting Bull and Black Elk) word for the red-winged blackbird native to most of North America. Its songs are described in Lakota as tōke, mat'ā nī ("oh! that I might die"), as nakun miyē ("...and me"), as miš eyā ("me too!"), and as cap'cehlī ("a beaver's running sore"). Loosely translated, Wablosa means 'wings of red'.

As you know by now, my color scheme is red/black and I have always enjoyed watching the red-winged blackbirds that frequent the marshes at the wildlife refuge near my house, swooping and diving on a warm summer afternoon. A bird...nature...my colors...a Lakota word...it was perfect, and definitely unique. Like a thoroughbred race horse with an eye-catching name, my plane, when she takes to the skies will also wear a colorful moniker.

http://en.wikipedia.org/wiki/Red-winged_Blackbird
 
http://en.wikipedia.org/wiki/Red-winged_Blackbird


Sunday, April 3, 2011

Fuselage Work Commences HOBBS 620.0 hrs

Its official, I have begun work on the fuselage and more specifically the firewall which is the first sub-assembly. Although my inventory is only partially done...I did enough of it so I could start on the firewall. The firewall is stainless steel and seperates the cockpit from the engine compartment. Besides being a a fire barrier in the event of an engine fire, also keeps engine heat and fumes out of the cockpit during normal operation. Later I will close up any gaps along the edges with ProSeal to get a nice airtight seal.


In preparation for starting the fuselage I went down to Harbor Freight and bought this tool for $30. There is a lot of angle alum to cut in the fuse kit so this will come in handy


There is a fair amount of fabrication on the firewall assembly. Its very enjoyable work, although these two brackets were a bitch to rough cut to size.


I searched everywhere for all of these gussets...only to find them in one of the many bags in the kit. If you click on this photo for a larger view, you will see the bag number...save yourself some time.


Same deal with these spacers...


Cleco-ing the firewall together to match drill everything. Be careful with the stainless steel, it has sharp edges. It also takes some special precautions to drill.


Putting all of the gussets in place


The brake line doubler plate. You have to drill two holes in the SS, use a slow speed and some lubricating fluid when cutting. It will help save your drill bits.


I made a mistake here, this bracket should be spaced 3/32" off the bottom angle. I looked at the plans and it looks like this will just attach to the stiffeners in the floor and should work as it is. I think the spacing was just included so you wouldn't have to radius the edge of the bracket, which I did for a proper fit. At this point, I don't plan to redo them as I don't see the need. You...on the other hand, should avoid this and do it correctly. ;)

Bottom Wing Skins HOBBS 613.0 hrs

I have to admit, I am bouncing between fuselage work and finishing up the wings right now. I'll do a separate post for the fuse work. This one concerns my activities on the wings. I spent a few hours finishing up the interior details before riveting on the first bottom skin.


As I prepared to rivet my bottom skins solo, I knew that I would be using my tungsten bucking bar almost exclusively because of its small size. I also knew all of the riveting would be done "blind" so I wanted to protect the interior ribs and spar as much as possible while I did my work. That meant covering the edges of the bucking bar. I have used duct tape before and I have heard of some builders using old bicycle tubes. I came up with this idea, a large piece of shrink tube...hit it with the heat gun and voila, a nicely protected bucking bar.


I also wanted to put my new fuselage prints into blueprint "sticks". I checked on prices at a local blueprint supply store and they wanted $200 for a set of four!! Huh?! Screw that, I'm building an airplane and the 'can do' attitude that goes along with that. I bought some aluminum extrusions at the local hardware store that are used for door reveals for $6 each. Added some screws I had laying around and for a whopping $12 my prints are now secured nicely.


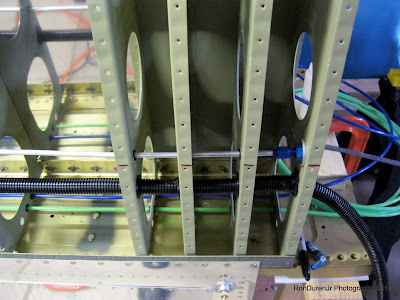
Here is how my wiring conduit, vent line coming from the ER tank and my pitot and AOA lines. Note: I should've put the conduit on the top of the wing to have it out of the way for riveting the bottom skins on. Although that was a bad  layout decision on my part, it still looks nice and professional. 


If you look close, in this photo you can see a custom bracket that I made (wrapped in shrink tube) to capture the pitot and AOA lines as they crossed past the bell crank. I wanted to ensure there was no possible way they could either interfere with the bell crank or rub on it.


Another closeup shot of the conduit and vent line running through the wing walk doublers.


And here is my first bottom skin (left side)...I'm about 2/3 of the way done in this photo. I got tired...its slow going and not easy. [On a side note: Don't ask me what I got on this wing skin?? I got something on it that doesn't want to come off?] Anyway, the riveting wasn't too bad but wasn't too fun either. Somewhere in between the two extremes. The 'solo' part was actually not bad...in fact I'm not sure two people would help much. Its very tight spaces and reaching blindly with your bucking bar. I cant imagine two people trying to squeeze into that space. Obviously the worst part is in between the wing walk doublers near the rear spar...it gets better as you progress from there. All I can say is its good I have pretty skinny arms!! :) Its tight!

Friday, April 1, 2011

Sun-N-Fun Tornado HOBBS 610.0 hrs


For anyone that hasn't already heard, a tornado touched down at Sun-N-Fun, damaging and destroying many aircraft. Here is a video that shows some of the devastation. I can only imagine finishing up my RV7 and being excited to attend my first fly-in with my shiny new plane, only to have it totaled in a storm. There would be tears shed, I can promise you that. My heart goes out to all who were affected.

Builder Visit and Movie Night HOBBS 610.0 hrs

Last weekend, at my request, Scott, Gary and their wonderful wives Deb and Carolyn hosted a movie night out at the hangar. It was kind of a short notice deal so we just ordered pizza instead of our usual potluck style movie night. Prior to the movie I hosted a builder visit at my project. It was a great afternoon and evening of talking RV's and airplanes and flying. The movie Scott chose was Memphis Belle, one of my favorites.

My Dad really got a kick out of the whole day and evening. We finished the top skins on the wings, had some people over to see the project and then spent the evening in Gary's hangar surrounded by good people and fine airplanes. Not a bad day huh?

Both Dad and I were thinking, "pinch me". During the movie I noticed him turn around to look at the airplanes behind us. I cant think of many things in life that make a 65 yr old feel like a kid again. It doesnt get much better than that! :) Thanks to the Zilik's and Mills's for putting it all together.