Ron's RV7 Aircraft Factory


Welcome to my personal blog. This site was created as an informal description of my build progress in the construction of a Van's RV7 aircraft. A place where family/friends/builders/curiosity seekers can follow along. It is not intended to be a detailed description of every step in the building process as that would be much too time consuming. There are plenty of sites that do a great job in that arena, that is not my intention with this site. My intention is for this to be a philisophical/motivational/inspirational account of the emotional ups and downs of the life changing journey...and it will change your life. I hope this will give you an idea, through my eyes, of what its like to make this transformation. A note to other builders, I am not an expert so do not put your safety at risk by attempting anything you see on this site until you have done your own research, or send me an email so we can discuss it. Any deviations from the plans are not approved, nor endorsed by Van's Aircraft or myself. Thanks for visiting.


Thursday, March 29, 2012

Another Learning Curve HOBBS 1181.5 hrs

As I start down the path of using SikaFlex for the first time...another learning curve is in process. Gosh, there has been a lot of them so far...and more to come. Its not a particularly difficult system to work with but since its the first time being exposed to it, I am once again learning as I go. Reading posts from other builders definitely helps...but in the end, you wont really know what its all about until you dive in and get your hands dirty.


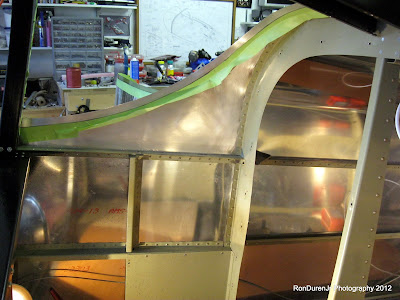
So, here I am getting everything prepped...tape, scuff, cleaner/activator and primer...in that order. The ink black primer is the one to be careful with...it is blacker than black and doesn't come off easy. So tape well and be careful with the application. I used the foam brushes for applying both the activator and primer...worked good, no brush marks. I also bought some expensive 3M fine line tape...a lot of guys use electrical tape with good results.


Applying primer to the roll bar...let the activator sit for 10 mins...primer for 30 mins.


Popsicle sticks for proper spacing...and now applying the goop...the 295UV SikaFlex.


My approach was to tackle this in two separate work sessions. First one is to glue the canopy in place. After its set, then go back and do your cosmetic fillets. First go 'round I tried to do this with my finger and it didn't work very well...I ended up taking it all off because I wasn't happy with how it turned out. In discussion with my friend and fellow RV7 builder, Sean Blair, he suggested trying a plastic spoon and that really worked great...definitely a good tip.


I recommend removing the tape soon after application unless you are really good about not getting any on the tape (which I wasn't). If you wait until it dries, it will try and peel away the good with the bad.


Here are a couple shots of me filling time with the empennage fairing...this thing has really turned out to be a pain in my rear...kinda tired of dealing with it. I know it looks like crap in these pics...but once I put a coat of filler primer on it, it will look much nicer. :)


Thursday, March 8, 2012

Rear Canopy Prep HOBBS 1168.5 hrs

Most of my activity lately has been focused on getting the rear canopy ready to glue with SikaFlex 295 UV. Since this will be an easier task than the main canopy, I figure its a good place to familiarize myself with SikaFlex without too much pressure. Most reports I've read say you can do the rear window in a short work session by yourself.


My first step was to do any fine trimming needed for a good fit. This required putting the plexi on and off several times. Cutting and then polishing all edges, finally getting it just right. I will tell ya, this is easier (less stressful) if you are doing a 'targa' strip like I am because your edge doesn't have to be so perfect.


Starting to plan my 'spacer' strategy. I am using two popsicle sticks taped together to get a nominal 1/8" gap (~3mm). This seems to be the general target for RV guys, although SikaFlex recommends 4mm. The problem with my plane is I didnt factor this gap into the construction so I have, shall we say, "challenges" to this approach. I'm still undecided exactly how I plan to address this...but for initial fitting, I used 1/8".


A slight diversion from the rear canopy took me to the struts on the forward canopy. I got these babies installed and its looking good! Beyond the superior in-flight visibility, I love the look of a tip-up...not sure why, becaue a lot of guys like the sliders. Maybe it's because the fighter planes of my childhood were F-16's and F-14's...tip-ups, not sliders.


Even though I am doing one half at a time...I did want to do a sanity check with the forward canopy to see if I saw any problems before I glue the rear canopy in place. It will need to do some of the same minor trim work but its looks fine for now.


Now I set about trimming the protective plastic back and adding tape for my edges...i.e., make sure the SikaFlex doesnt get anywhere its not supposed to. Just like taping for paint.


I scuffed the inside skins, not only for the SikaFlex but also because I plan to paint them black later...these will be visible even with the full CAD interior package.


Scuff the SikaFlex surfaces on the Plexi with scotchbrite for good ahesion.


My SikaFlex materials...ready to rock and roll. This was about $100 worth of supplies and should do the entire canopy. I plan do a test piece to see how it all works before committing to the canopy...stay tuned.

Thursday, March 1, 2012

Pilot Romance HOBBS 1159.0 hrs


This is a great video I happened to see on VAF, I got a kick out of it and I hope you do too. I emailed Axel asking permission to post it here, he and his wife said "go for it". Thanks Axel!

Its good to see a non-pilot, significant other enjoying themselves so much...as pilots we just don't understand why others don't "get it" like we do? We just want someone to share our passion with, not too much to ask is it? That is what I call "Pilot Romance"...as good as it gets.

Two things struck me about the video...how relaxed she was, obviously confident in her pilot and the airplane, and two...while others were probably focusing on the lovely young lady during landing, I was watching the rudder flick back and forth and the elevators come up on landing. Nice aviating Axel. Ah, the sweet beauty of flying a taildragger....