Ron's RV7 Aircraft Factory


Welcome to my personal blog. This site was created as an informal description of my build progress in the construction of a Van's RV7 aircraft. A place where family/friends/builders/curiosity seekers can follow along. It is not intended to be a detailed description of every step in the building process as that would be much too time consuming. There are plenty of sites that do a great job in that arena, that is not my intention with this site. My intention is for this to be a philisophical/motivational/inspirational account of the emotional ups and downs of the life changing journey...and it will change your life. I hope this will give you an idea, through my eyes, of what its like to make this transformation. A note to other builders, I am not an expert so do not put your safety at risk by attempting anything you see on this site until you have done your own research, or send me an email so we can discuss it. Any deviations from the plans are not approved, nor endorsed by Van's Aircraft or myself. Thanks for visiting.


Friday, October 18, 2013

Cowling Surgery...Again HOBBS 2260.0 hrs

I think I posted about the fact that I got my control cables all nicely mounted and then did a cowl fit check, only to realize that my mixture cable was hitting the cowl. I could not get full travel with the mixture control. Dang! So, I did some research on VAF. The good news is that this type of problem is not uncommon so there were workarounds available. Essentially it boiled down to three possible solutions for me:
  1. Ship the servo back to the manufacturer and have them "reverse" the action on the mixture arm. This would easily get it out of the way, but I would need to redo my mounting bracket that I spent so much time getting just right and was happy with. It also was going to cost me $240 plus shipping cost and time.
  2. Change the control arm from an "offset" version to the "straight" (no offset) version. Precision Airmotive (SilverHawk servo) told me they would do this swap for free...minus shipping of course. That was cool of them. 
  3. Add a "bulge" in the cowl to clear the current setup. This caused me quite a bit of angst. I know most builders wouldn't think twice about doing this...but then again, most builders aren't as concerned about aesthetics as I am. My plane 'HAS' to look nice to soothe my soul! :) That's just the way I tick.
 
 
My thinking went like this, I didn't want to spend the $240 to swap the arm action...I am officially out of construction money at this point. Swapping the lever for the straight one was my first attempt at fixing this...easy, low cost...why not, lets give it a try.
 
That did make it better, but I still had an interference problem...no bueno, this is not a solution. Remember I also need extra room for engine movement during g-loading and normal engine vibration.
 
Next step was option #3...ugh. I spent a couple weeks carefully considering this before committing. Can I do it with as little aesthetic impact as possible? I finally agreed that I thought I could. So...enough thinking & analyzing, lets get to it!
 
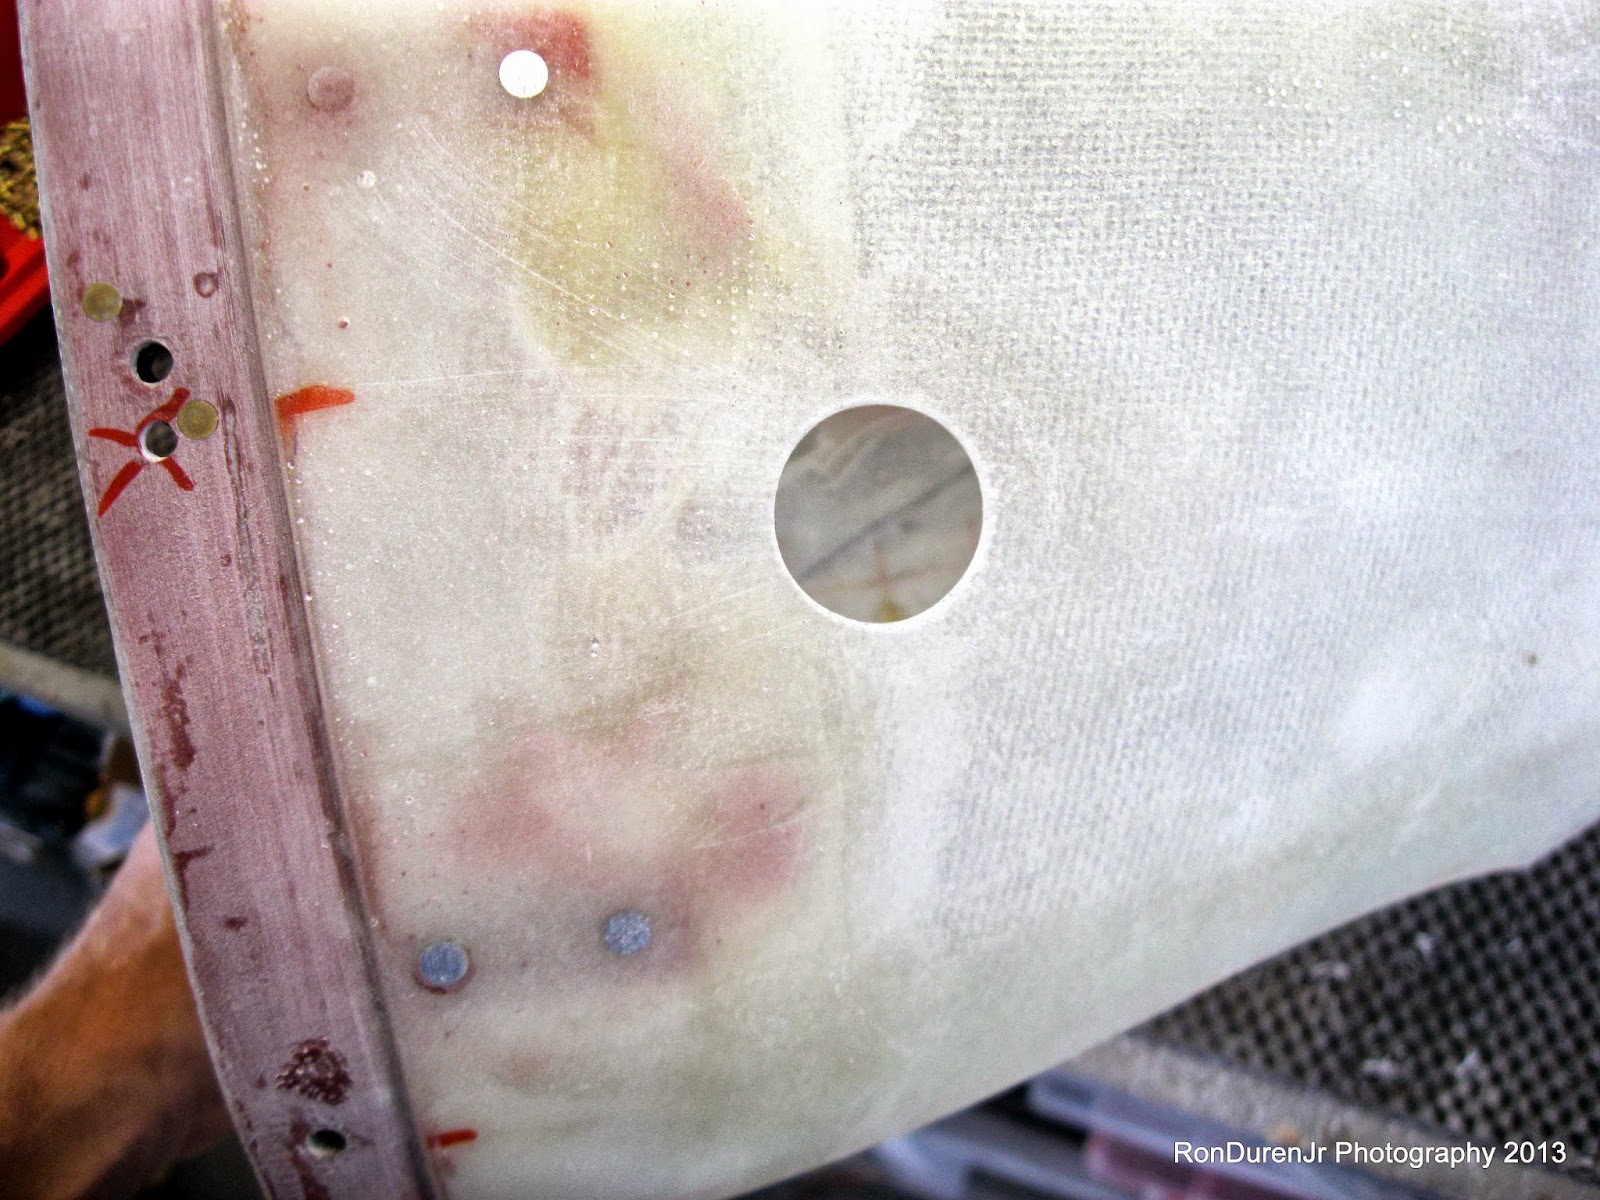
Same deal as the wheel pants...get the modeling clay out. In this first pic you can see the dark spot is the modeling clay on the outside of the cowl. With the translucent SJ cowl, its easy to verify I have it in the right location.


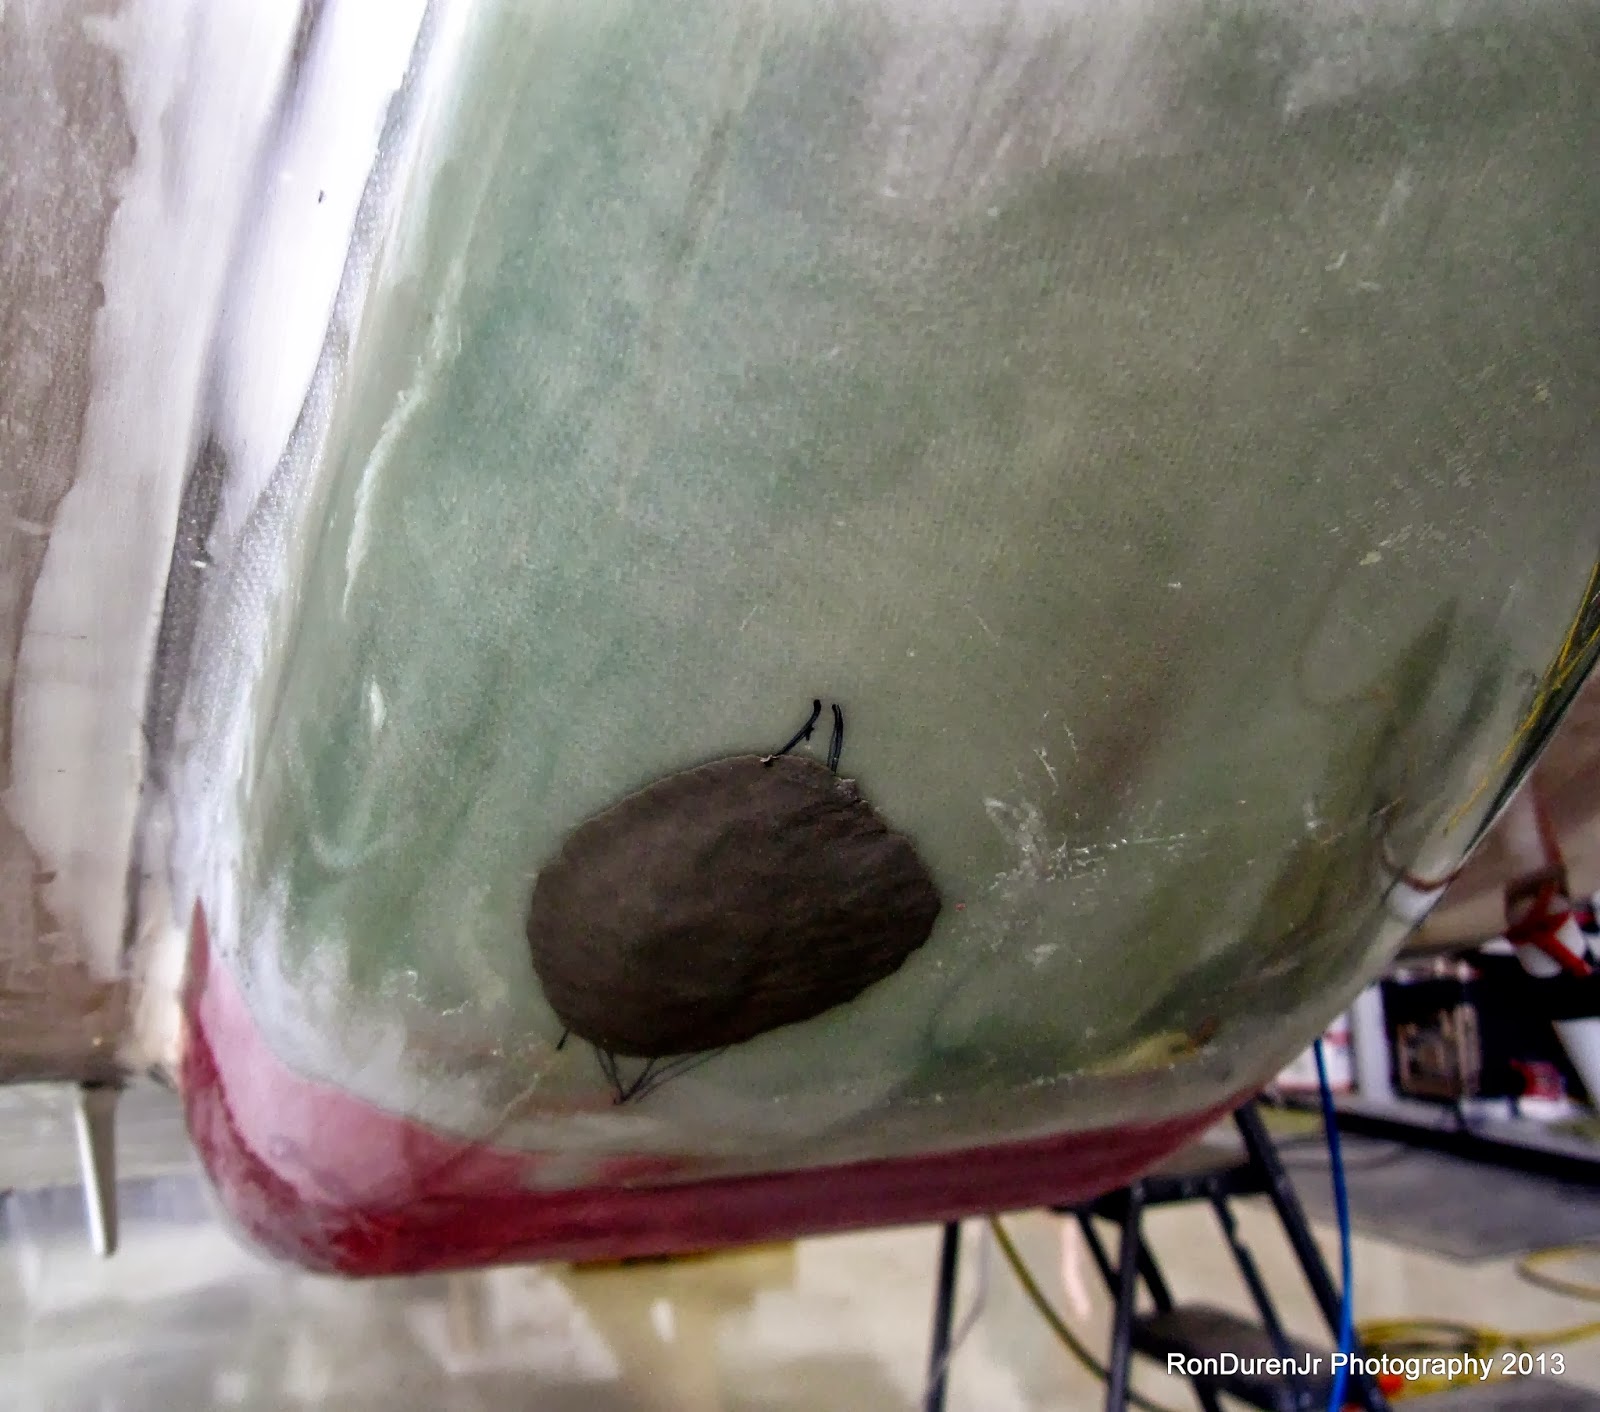
This is what it looked like from the outside. I spent more time and care to make this one as smooth as possible before glassing. This "bulge" would be much harder to hide than the wheel pants.
 

Scuff your surfaces well...and do your layups...let it setup over night.


Here are a couple shots...side and front view...of what it looked like before doing the layup. As you can see, its hard to spot, even though it is a dark color. Once I get it painted, I think it will blend it quite well. Although, in a perfect world I'd rather not have this bulge...I don't think its going to be a big deal a year from now...small stuff.

 
A blurry shot of the inside of the cowl before doing my trim work. As you can see, the clay is sandwiched between two fiberglass walls at this point.
 
 
Break out the die grinder or cutting tool of choice. Cut and then dig out the clay. Notice the sharpie marking...that was my target.

 
I then did a little bit of blending work with the die grinder to smooth the transition. Although not shown, I then sanded it smooth...to make it look nicer, even though its on the inside of the cowl.
 
 
A little hard to see in the pic (click on it for a larger view), but it worked perfectly. I now have my clearance and the mixture arm works as its supposed to. I flexed the engine with quite a bit of body weight and could not get it to touch so I think its good to go. On to the next challenge...

Wheel Pants Access HOBBS 2260.0 hrs

More work was done on the wheel pants this past week. After getting them initially fit, I noticed that the lower portion of the brake pad housing was rubbing on the side of the pants just slightly. Most likely because of my larger tires. I figured in the high vibration environment of flight, that rubbing would not be good. I decided to add a "bulge" to the wheel pants to contour around this interference. I figured I could pull it off without it being very noticeable. I call it my "guppy belly"...if you've ever seen a pregnant guppy you'll know what I mean.


Disclaimer...I am very comfortable doing fiberglass at this stage of the project. But, by no means am I a sage old expert. This way of doing it may not be the best, but its what I did and it turned out just fine. Somebody who has years of experience and expertise may think this is a silly way to do it? So...you decide if this is the path for you. I am actually enjoying experimenting with different techniques rather than just doing a Google search.
 
Ok, again, break out your modeling clay that you bought from the local hobby shop. I bought a large "brick" of it and use it quite a bit these days. Notice the grid lines I drew to try and keep the two pants similar. Form and shape your "guppy belly" right over the wheel pants. Do your best to make it pretty, but realize final shaping can be done with micro later.

 
Do your fiberglass layup. Remember to fairly aggressively scuff (sand) the wheel pants surface for good adhesion of your layups. I used to be lackadaisical about surface prep...my advice, don't be, its important.

 
This is what it looks like from the inside. The small cutout you see is some carving I did to get clearance for fitting.

 
Again, looking from the inside. I now take my cutting wheel in my die grinder and cut out the wall of the wheel pants that I no longer want. Pretty easy to see the edge with the olive drab colored modeling clay. Although not shown, use a tongue depressor or similar to scrape out the modeling clay...its now done its job and can be discarded.

 
Here is what the bulge looks like at this stage. Not too bad...but it will need some finishing work done to make it look nice. That will come later when I glass in my fairing transition pieces.

 
Doing a fit check, it looks like the faring will not only clear it nicely...but kind of hide it also. Once I am done, I feel confident you wont even notice this "guppy belly" without looking closely. Doing stuff like this is part of the game if you are going to do non-standard modifications. Be prepared.


 Someone on VAF posted about a nice Camlock access door that builders use to access their valve stem for airing up the tires. I thought, its really not that difficult to remove the front half of the wheel pant to air up a tire. But, the counter argument is, the harder it is to access, the less likely I will be to add air when needed. In the end, I decided to add these little access doors. These buggers are over-priced (duh), but really are a nice solution.


I'm thinking I will just paint these so they blend right in with the paint scheme. All in all, I like how they turned out and were easy to install.

Monday, October 14, 2013

World Record Formation Flight! HOBBS 2260.0 hrs


If you've been under a rock (or just too busy building) and haven't heard, this past weekend, 49 RV's flew in formation over Arrowhead Stadium for the Kansas City Chiefs vs. Oakland Raiders football game for breast cancer awareness. Of course, because of the cause, with pink wingtip smoke! 
 
It was a world record for the largest civilian formation flight, easily besting the 37 that flew over Oshkosh several years back. I had a handful of personal friends who flew in this, including at least a couple Rocky Mountain Renegades. Here is a great behind the scenes look at getting the formation "dressed" (or in position) right before going over the stadium.
 
Who would've ever thought, in this litigious age we live in, we would ever see 49 homebuilt planes flying over a packed football stadium?! The horror of airplanes built by amateurs in a garage flying over women and children! I'm only half joking...I never thought I would see something like this. Only the RV line of aircraft could even be considered for such a thing, because of the well proven design and numbers flying...nice work Van, your creation has officially arrived. Hats off to all the pilots, men and women alike, that did such a safe, professional job. You made us all proud. This was cool to witness.
 
Disclaimer: I take absolutely zero credit for any of these fine photos. I picked them off the VAF forum site and do not have proper references to cite, although some are watermarked.


Thursday, October 10, 2013

Big Winner! HOBBS 2260.0 hrs

 
Well, I attended my first LOE fly-in over the weekend. Although the turnout, especially people flying in, was low (about 100 people) because of the weather, it was a good time nonetheless. We did a brewery tour on Saturday which was fun, looked over some fine RV's...talked flying and airplanes. What's not to love? Saturday night was the banquet and charity raffle. The generosity from the group was nice to be part of. Even with the low turnout, we raised $6100 cash...pretty cool. I ended up buying five raffle tickets and sure enough, came away a winner! I won two RV8 leather stick boots from CAD valued at $267.
 
What really made my night was, I wanted to win the $500 off a paint job coupon from GLO Customs in Dallas, which I didn't. This is the premier RV paint shop in the U.S. and was already leaning toward using them for my paint job. I wandered over and asked the winner if he wanted to part with his coupon and he graciously said, "$50 and its yours". I was impressed with his generosity...he could've easily said $250 and I would've still walked away happy! I tried to get him to up the price but he wouldn't....very cool.
 
Obviously the stick boots aren't useful to me, but I did find an interested party and sold them for the same whopping $50...you know, to cover my costs. ;) I figured, anyone who was at the banquet also made their donation to charity so I didn't try to make any money off the transaction. Of course, I also wanted to 'pay it forward.' I realize I wasn't as generous as my guy was, but hey, it was nice to break even...sorta.

 
High fiving Sean Blair, with Caroline Zilik and the gang cheering me on. Our table did quite well, as we had multiple winning tickets in our small section.

 
Renegades flying a missing man formation for Russ and Carol Kamtz, who tragically lost their lives in their RV7A last month in Wyoming. Russ was co-chair of this event and the event was in honor of them. (Disclaimer: All photos were taken by the LOE photographer...not myself)

Thursday, October 3, 2013

LOE Fly-in HOBBS 2252.0 hrs


The LOE RV fly-in is back in Colorado, after quite a few years away. The story goes that it started here in Colorado, moved to New Mexico for several years, then to Oklahoma for a couple. Now its back in the good ol' Rocky Mountains! LOE, depending on who you ask, stands for "Land of Enchantment" (for New Mexico) or "Lots of Experimentals". Not sure it really matters what it really means, what you need to know is its a very good size gathering of RV's. Rumor is that Van's is planning to fly an RV12 or 14 out for this...but we'll see since the weather isn't cooperating as we have a system moving in Friday.
 
I've never been to one of these, but the girlfriend and I will be attending this one obviously since its in our backyard. It'll be nice to see some flying RV's and meet some new people.
 
Here is the weekend schedule. If you are in the area...come on by, we'll be there all day Saturday, going to the banquet and grabbing a hotel and departing Sunday morning. So, no building this weekend for me.

Wednesday, October 2, 2013

Wheel Pants Dance! HOBBS 2252.0 hrs


I'll start off this post showing off my new RV Nation t-shirt and N-number embroidered hat. I really like both of them and the hat has some nice colors don't ya think? If you are unaware of the RV Nation site, check it out...its still in its infancy, but it has promise and Scott seems like a real good guy.
 
 
I was planning on focusing on the wheels and wheel pants next. Not sure why, just because its on the list and kind of sounded like fun.

 
First order of business is drill the axle holes for the cotter pins. I didn't much like the instructions Van's offers for this. It says to use a spring loaded center punch to mark the hole. Good luck with that! Tighten up the nut snug, but not too tight to bind the wheel rotation. I used my long drill bit and just kind of angled it in the best I could to get a mark started. I then pulled the wheel off to drill it through...one side at a time. Worked out ok, you cant get the drill perfectly straight--but it got the job done which is all that matters.

 
Cotter pin in place...not secured yet though...just in case I have to take this puppy back off for some reason. Definitely be part of my pre-flight checklist to make sure I take care of this later.
 
 
Safety wiring the brake pad bolts in place.

 
Wheel pants dance. Since I have the bigger 380X150-5 tires, I knew some surgery would be required of the wheel pants. First, cutting the openings to fit the bigger tires. You know the drill by now...sneak up on it, small cuts followed by fit checks. Its a pain, but necessary. I have already had these wheel pants on and off almost as many time as I did the cowl.


I love trying to find nice objects in the hangar to use as patterns to trace. For this task, it was a 6" diameter coffee top.

 
Van's calls out a 1" clearance above the tire...follow this advice. I used a 1" piece of foam. I know a friend with a Giles 202 that had his wheels rub a hole through the top of his pants...he figured it was elongation of the wheel at 100mph landing speeds. Dunno?...but make sure you figure in the dynamic condition of the tire, rather than just static.


Trim work...cut for the tire...and for the axle.


Here is a good shot of how my wheel pant was hitting the brake housing...more on this later as I had to add a "bump" in this area. Other than that...the pants fit alright, I wasn't sure how much modification would be needed for the bigger tires?

 
Doing test fitting...


And more...test fitting...

 
I just had to take this photo...putting the wheel pants on sure makes it looks even more like an airplane ready to take flight!

 
The plans call for you to get the pants marked front to back with a straight line. How in the hell you do that is beyond me. What, besides your eyeball can you use for reference? In the end, I just used my eyeball...the Duren's have a good eye for such things, as my Dad was a skilled carpenter and machinist as various times in his life. :) Looks straight to me...what do you think?


I forgot to mention, the instructions say to raise the plane off its gear to do the pants fitting. The thought process is you want the wheel pants straight while in the flight configuration. Makes sense at first read. After some thought, and research, not sure I agree with this. The gear will camber inward, but shouldn't toe inward. You will line your pants up with the tread centerline...so what difference does it make if the weight is off the gear? Your call on this one...not sure I would jack it up again.
 
Since I didn't have my wings attached...it was a question of how to lift this puppy. I borrowed my hangar mate's jack and put a nice wide 2x8 under the spar carry through to distribute the pressure. I then started jacking...until my longeron showed a level attitude (this part actually is important). The problem with this method is, the CG is forward of the spar. So as I jacked the tail just kept rising...the wheels never did get fully off the ground...although they were darn close. I could've just added weight to the tail...but I really wasn't feeling comfortable with all of this. Once I got to 0.0 degrees...I stopped jacking and did my fitting.
 
 
Here you can see the camber I mentioned...notice the angle of the tire.

 
Wheel pant centerline (eyeballed mark) lined up with tire centerline.

 
Drilling holes to brackets...use a bright light inside the pant to see the holes and drill from the outside...carefully. This bracket gets permanently riveted to the pant.


Axle clearance hole...

 
Getting the pants straight...I used the 8 5/8" measurement from the plans for the tail. I didn't pull a measurement from fuse centerline..but I did use a plum bob to measure from the fuse side. I did this so I could match the other side. The straightness of the pant, was again, eyeballed. Nothing fancy. Some guys build real nice jigs for this, which isn't a bad idea, but one I skipped. We'll see, later, if I regret this. They look pretty darn good to me.

 
Here is a good shot at how high the tail rose when I jacked it up...the HS is at eye level. Looked cool...tail high, standing proud like a nice wheel landing.


For some reason...the axle penetration varied from one side to the next?? I couldn't for the life of me figure out why? I knew my measure points were consistent...so I just chalked it up to different variations in the pants themselves, as some have reported. Again...we'll see if this causes me a headache later?

 
This is what it looks like with the tailwheel back on the ground...I think the angle looks good.

 
Clearance from the bottom of the pants to the ground is a little bigger than the guys with stock tires. I used the 2x4 to give you some perspective. I like the added clearance for the same reason I put the bigger tires on...flying in and out of unimproved strips like Johnson Creek. The added drag and decrease in cruise speed from this is almost non-existent from PIREP's from other pilots who have gone this route.


Getting the final trimming done and cleaning up the edges. Also worked on getting my reveal nice and consistent. Remember, leave some room for paint...it doesn't have to be tight, just consistent, to look good.

 
I did my screw hole layout almost according to plans. The plans say to take these two 3 3/4" apart centered on the tire. I added a little and went to 4" as shown. I don't like how close they are to the tire and ended up moving them out to 6" (not shown)...and could have went further. My tip to you is, consider this before drilling. You want that tire to have a clear path above it.