Ron's RV7 Aircraft Factory


Welcome to my personal blog. This site was created as an informal description of my build progress in the construction of a Van's RV7 aircraft. A place where family/friends/builders/curiosity seekers can follow along. It is not intended to be a detailed description of every step in the building process as that would be much too time consuming. There are plenty of sites that do a great job in that arena, that is not my intention with this site. My intention is for this to be a philisophical/motivational/inspirational account of the emotional ups and downs of the life changing journey...and it will change your life. I hope this will give you an idea, through my eyes, of what its like to make this transformation. A note to other builders, I am not an expert so do not put your safety at risk by attempting anything you see on this site until you have done your own research, or send me an email so we can discuss it. Any deviations from the plans are not approved, nor endorsed by Van's Aircraft or myself. Thanks for visiting.


Tuesday, March 29, 2011

Top Wing Skins HOBBS 610.0 hrs

Well this is a first, I have never created a blog post where I could add 57 hrs to the project HOBBS meter!! It was a busy week to say the least. I am way behind in posts so this one is going to have a lot of pictures and I am going to try and keep it short (fat chance!).

The two weeks with Dad helping out were amazing, we logged 82 man-hours in that time. I was able to get about 6-8 weeks of work done in two weeks with his help. That is a huge step forward in helping me get this thing flying sooner rather than later. 

We got all of the fuel tank problems solved, all tanks passed their pressure tests. That was the green light to attach the tanks in place, install the Duckworks LE lights and rivet the top skins. Here are the pics and descriptions of our work...


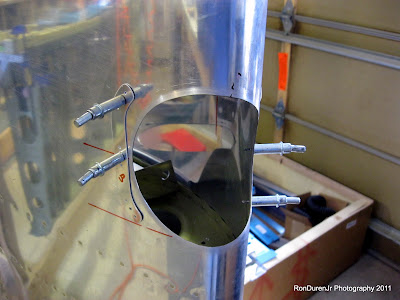
As you all probably know by now, I like doing little things on my plane to make it my own. Little touches that make it unique. The idea of having a plane exactly like everyone else's is mind numbing to me. So, here is another of my touches, unique to my plane. I changed the landing light cutout from the standard rectangular pattern to a circle. My thinking is, the lamp is round, why should the cutout be rectangle? I came up with this idea on my own but I'm sure I'm not the first to do it. Here is what I used for my cutout pattern...good ol' Shiner Bock from Texas! :)


Pattern layout and ready for the delicate cutout work with a dremel tool. Cutting into a perfectly good leading edge assembly certainly gives a guy pause. Cant make a mistake here or I'd lose my mind!


Dad having a go at his wing, he bravely went first as I drug my feet before starting  mine. We both chose one wing to do from start to finish...it was a friendly little competition to see who's would turn out better. ;) In the end I would have to call it a draw...they both looked really nice.


Marking the holes and match drilling for the lens attach brackets.


Fitting the lens in place for match drilling. I think this is where we made a mistake in our process. Both of our lenses didn't come out with a nice tight fit with the skin even though they looked perfect at this stage. I think it was because we had this layer of masking tape on the lens for protection when we did our match drilling. The thickness of the tape may have caused our problem. 

I plan to redo these lenses later and will forgo the masking tape for hopefully a better fit. Although the lenses didn't come out as we had hoped, everything else turned out great and it was a fun project. It took us both, working in parallel, a few hours to accomplish--its certainly not a 45 min task that's for sure.


Dad prepping the lens for the brackets and trimming it to size so it will fit in the hole. This took some doing to get it to fit in my round holes, but it is possible if you decide to go this route.


Here is what it looks like when its all finished. I was really happy with my choice to go with the round holes...looks pretty slick!


We mounted the light ballast on the end rib, outboard. I figured this was a good location so I could easily get to it if needed when the wingtip is removed. It also makes the wire routing a breeze as I can just enter the main conduit (just below in this pic) running down the length of the wing.


Man is that puuuuuuurdy! wooooo-wee!


We got all our prep work done that we needed to on Friday, setting the stage for riveting the top skins in place. We got up bright and early Saturday morning and attacked, and I mean attacked the top skins like we were possessed. We riveted all four top skins in place in roughly 5 1/2 hrs...the first wing (two skins) took about 3. We had to drill out exactly two rivets during the entire process (and one of the screwups I did was with the squeezer! doh!) and I also had one slip with the gun producing a small 'smiley' in the skin (no worries, this will be fixed during the painting process). Other than that, I was ecstatic about how they turned out! Even better than I expected to be honest. They really look great as you can see from the pics.

Although I had planned to use the back rivet method, Dad and I decided we liked the traditional method better...its quicker in my opinion. I was on the gun, Dad manned the bucking bar and we worked very well as a team burning through those skins. Its quite amazing how fast you can go with a good riveting partner. We got in a nice rhythm and cranked through them in no time. As Chris Ledoux used to sing during my rodeo days, "it was like child's play on Grandma's rocking chair."

I gotta tell ya, we were both pretty tired by the end, it was an intense 5 1/2 hrs to say the least. But probably the most rewarding part of the project so far.


Plumbing work for my ER tank vent line that I will run back to the fuse. This is different than how Mr. Tuckey did it...his vent exited through the bottom of the wing.


Installing the Dynon autopilot servo mounting bracket in the right wing. I ordered this mounting kit from Aircraft Spruce for $75. Yes, in case you were wondering, I am now about 99% sure I am going with the Dynon SkyView system/Autopilot and AOA heated pitot. Its a lot to invest in one company, but I'm certainly hoping it will be a good choice.


Wow, this was quite a sight and milestone. Moving the wings out of the wing stand (amazing how light they were to carry!) so that we could disassemble the stand. It was kind of surreal...I had looked at that stand as a fixture in my garage for about 9 months and now I was taking it down and getting ready to store the wings and move on to the fuse. Surreal...but very cool.


Dad tackled the task of building a wing cradle to store the wings and did a fine job. I also learned the cradle will be real handy for doing the finishing touches (wiring/plumbing) on the wing before closing it up. He just reused the end pieces from my fuel tank cradle to fit the contour of the wing. I also reused the same wheels I had on my wing stand and voila...a sturdy rolling wing cradle. This is where the wings will reside until they are mounted to the fuse later in the project.


A couple photos of us celebrating a very rewarding work session. After we finished the top skins, it was time for a shot of celebratory Canadian whiskey (Crown Royal...my drink of choice) and a Costa Rican cigar! What a great feeling to see the cleco's all removed and a nice shiny wing staring back at us for the first time. In my mind, I could already see the wind flowing over it, creating lift.


In summary, we didnt get the wings done as I had hoped while Dad was here but we came pretty darn close. If I hadnt had fuel tank problems, I think we would've got there. The good news is the wings are in a state that I can either work on them now and finish them up or wait til later. I've been reading other blogs and I think I can rivet those bottom skins on solo...sounds like others have done it without too much trouble. So nothing is holding up my continued progress for the forseeable future. Many thanks to my Dad for working so tirelessly while he was here...I had a hard time keeping up with him! :) I have had no less than three offers from other builders wanting to fly my Dad to their project to do the same for them!! haha! Once again, a perfect example of Aviation creating lifelong memories that I will always cherish. KPR my friends!

Monday, March 28, 2011

Unloading the Fuselage Crate HOBBS 553.0 hrs

I have lots of news and information to catch up on from the last week. Very busy, very exciting week in the factory! Before I do, I wanted to do a quick informational post about unloading the fuse crate. A reader left a comment asking this and I figured it would be good information for everyone to have. So here ya go...

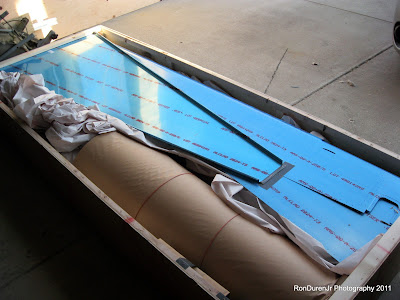
The crate, as I stated in an earlier post is about 7' x 2' x 3.5'...I didnt measure it so these are ballpark guesses...plenty of pics to see what it looks like and I think Van's posts these numbers for you. It weighed 303 lbs. It was delivered by FedEx freight and this truck had a liftgate. Using the liftgate, we easily lowered it to the ground and slid two (four wheel) furniture dollies (cheap at Harbor Freight) under each end as we did. From there it was a simple matter to navigate the curb and push it right up the driveway and into the garage.

I had three people available, one of which was a very helpful driver. With the liftgate and dollies, its an easy two person job and probably possible to do by yourself. Without those two items to assist you, it would take two guys with strong backs to carry it...3 or 4 people would be better.

Wednesday, March 23, 2011

Fuselage Arrives! HOBBS 553.0 hrs


Yesterday the Fuselage crate arrived. As you might know or guess, this is always pretty exciting when one of these buggers arrives! A shiny new pile of aluminum inviting me, almost begging me to turn it into an airplane. Dad and I tore into the crate like two kids on Christmas morning. Unwrapping parts...with plenty of "oooh's" and "aaaah's" and "wonder what this is?" or "I know what that is!" ;) It really doesnt get any better than this.

It seems each one of the sub-kits gets more exciting...empennage, wings...and now this one has been the the best so far...lots of cool stuff. Lets just say, I am dying to get started on this...I jokingly told my Dad, "screw finishing up the wings, lets start on the fuselage!" haha!

The good thing is, barring any setbacks we will have those wings done shortly and I can proceed with my inventory and start cranking along on the fuse. I can already hear those airplane noises that I will be making while I sit in the fuse for the first time, stick in hand, pretending I am flying my bird across the beautiful Colorado countryside....the stuff of childhood dreams. :)


The crate and parts were undamaged and longer than I expected. I believe I was thinking of the size of the finishing kit which is shorter (more like 6') and taller. This one was about 8 feet long by my estimation.


As usual, Van's did a nice job packing it all in there. My Duckworks landing lights were also included.


I dont know who was more excited, Dad or I, to unwrap everything and take a look-see!??

More Wing Prep HOBBS 553.0 hrs

Here are a few shots from some misc wing prep we have been doing while the ProSeal sets up on my fuel tank fixes.


I forgot to add some 7/16" dia holes in the ribs for the snap-in grommets for the pitot line and the AOA. Other builders, you might want to plan for this before riveting your skeleton together. All of the ribs were easy to get to with my right angle drill except the the two center ones where the wingwalk doubler resides. After some discussion, we figured we could get this solved with a long drill bit. Well, shoot, Harbor Freight to the rescue once again. We found a set of 3 of these huge 24" long drill bits for $8. Problem solved, worked great. If anyone needs to borrow them, give me a call.


A shot of Dad building a bracket for the right ER tank fuel pump. He's giving the pneumatic rivet squeezer with my new longeron yoke a go. The squeezer takes a little getting used to when you first get started with it. But he did say he is a big fan of it, it is a nice tool.


Cutting my access holes for the ER tank...just mirrored what I did on the left wing.

Monday, March 21, 2011

Fuselage Delivery Date HOBBS 551.0 hrs

I called Van's on Friday to check on my fuse shipment status. Low and behold Van's held to schedule, they quoted a ship date the week of 3/14, and sure enough Friday was still within that week. I got a tracking number from them, its coming FedEx freight just like my wings did. It is scheduled to arrive tomorrow...3/22. Certainly doesn't take long--shipped friday and scheduled to arrive tuesday. Heeee haw!! That should be fun....more airplane parts!

I am probably going to take a couple vacation days later this week in hopes of finishing up the wings before my Dad departs for home in Ephrata, Washington. So, if all goes well, my wings will be done by sunday and I can get cranking on the fuse...that will be huge. Stay tuned...

Fuel Tank Purgatory! HOBBS 551.0 hrs

Well, some good news/bad news on the last week's activities. The good news is, there has been quite a bit of activity between Dad and I. Its been fun working with Dad. The bad news is we've had a few rather frustrating setbacks with the fuel tanks. I had three...yeah three, fuel tanks leak during the pressure test!! What the...!!!??

The left main tank leaked right down the center of the BNC connector...I didnt read about this particular problem on VAF until after I did this tank. To other builders, this is certainly a potential 'gotcha'...make sure you really goop up the wire if you are using the capacitance sender system. It will leak out the center if you dont! So I commenced to removing the access plate and attempting to fix this (results forthcoming). Good news is it wasnt too difficult to remove even though it was ProSealed in place vs. the cork gasket.

Both ER tanks leaked at the nose in almost identical locations. I am still scratching my head over how this could be?? I not only did the same procedure as the main tanks, which had no problems in this area, but I was even more dilligent with the ER tanks. I cant for the life of me understand how they both leaked?

I have two theories however. One, we are using the cutoff finger of a glove as our makeshift 'balloon'. It certainly takes more pressure to inflate one of those than a regular balloon. For the next round of tests, I will purchase some actual balloons. Two, I have a suspicion that the ProSeal hadnt fully set up yet when we attempted the leak test. The reason I say this is, the second ER tank initially held pressure and then all of a sudden I heard a faint, but audible, pop like a balloon popping, followed by the gut wrenching, hisssing sound of leaking air.

So, we set about doing some more ProSeal work this weekend and plan to let that set up good and long this time before we try again later this week. The problem is, the leading edge ER tanks are the first sequence in riveting the wings so that is holding up progress. There isnt much left to do until we can get past that.

Thursday, March 17, 2011

Inspection Covers HOBBS 529.0 hrs

Yesterday while I was working Dad installed all of the nutplates for the inspection covers on the bottom skins and did a fine job. He also finished up dimpling all of the skins so we're ready for riveting. And as I was afraid of, he is now waiting on a new task. Ideally I wanted to wait for my Ducworks leading edge lights to arrive so we could install those before riveting the ER tank to the spar.

But...I still havent heard from Van's yet on a confirmed delivery date for my fuse (and LE lights). So, I made an executive decision as 'RV7Factory CEO'....last night Dad and I discussed it and decided to forge ahead and we'll install the LE lights later. No time to wait...."burning daylight!"

So, first order of business is to do a pressure test on the left wing ER tank to ensure we have a valid pressure vessel. After that passes (and I know it will!), he is going to tackle riveting the ER tank in place today. Its mostly a rivet "squeezer" operation so it will be an easy one person job.

Although I will have to admit...it hurts a little...deep down inside. It would be like missing out on your first born taking his/her first steps while you were working. Up 'til now, nobody has built anything on my airplane but me, and certainly nothing as significant as riveting my first major structure to the wing!! ;)

But alas, if it's not me...who better than my Dad! Like I told him last night, the #1 priority is to get this baby flying sooner rather than later and  I welcome his help. Of course it makes it much easier considering I completely trust his workmanship, which is of higher quality than mine. So, my baby is in good hands.

On a seperate note, yesterday I ordered a new batch of Akzo Nobel Primer (finally ran out) and some fuelube from Aircraft Spruce. I also ordered a double offset back riveter (many thanks to Sean Blair for offering for me to use his...I have a sickness, I just like to buy tools! I will take him up on his offer to use his longeron dies however) and a longeron yoke (also offered up by Bryan Raley, thanks) from ATS. All needed supplies/tools to finish up the wings and start on the fuse.

Wednesday, March 16, 2011

Gonna Fly Now! HOBBS 527.0 hrs


Well, my Dad arrived yesterday and I got him settled in for his extended stay. After I got off work we were able to get out in the shop and do some work together on the plane. I have to say, I can already tell this is going to be very nice having two people attacking this project in a concerted effort. It was a welcome injection of enthusiasm watching my Dad get so excited about the project. He jokingly said, he may not leave! :) My Mom might have an issue with that.

I get a sense, progress is gonna fly now. I'm already worried about running out of work if the fuse doesn't arrive soon. I haven't heard from Van's yet on a ship confirmation...this is my scheduled ship week. We should make short work of the wings working together.


Sunday, March 13, 2011

No More Fuel Tanks!! HOBBS 521.0 hrs


Four fuel tanks....check! After a very productive 14 hr weekend, I'm all done with fuel tanks and ProSeal! woohoo! As I cleaned the ProSeal off the cleco's, tools and the work table for the last time I was giddy. What a great feeling to be done with that crap. I still need to do some leak tests, add some access holes, plumbing, etc...but the ProSeal portion is done. (Note: one of the ER tanks in the pic is not completely done yet, it still needs a few ribs...although the tank itself is done.)

They say the most satisfying things in life are the ones that are the hardest to achieve. Well, needless to say, I am pretty satisfied with these tanks. They were a fair amount of grinding work, but they're all mine and I will smile every time I look at them because I intimately know what went into them. My fingerprints are all over 'em...literally. Dad arrives tomorrow so hopefully we will burn through the remainder of these wings in short order.


Friday, March 11, 2011

Leading Edge Lights HOBBS 507.0 hrs

As I mentioned, last night I went over and helped Brian Beatty with his RV7 project. We were riveting his top wing skins in place. We ended up using the 'back rivet' approach that many builder employ for the wing skins. It was my first time doing this so there was a small learning curve.

I have to admit the first few werent the best (sorry Brian), but after a few minutes we had a good rythm going and the quality improved. I was working the gun and it took me awhile to get the proper trigger burst down. It takes a little more force (a longer burst) to get a good shop head with this method.

Brian's project is looking good, he has most of his wing skins done. Dynon heated pitot, wiring, fuel tanks, leading edges are all complete. We had a few beers afterward and talked tools, Oshkosh, Sun 'n Fun and Reno, good stuff! He also showed me his SteinAir master wiring kit, which was pretty cool.


Smile Brian!!
 So, I have debated the leading edge light solution for some time. I like the Duckworks kits that Van's sells but quite honestly think they are too highly priced ($250/ea) for what they do. I wanted to find a good LED version that was cheaper, had the same performance, would run on less power (be cooler) and last longer. I also thought about doing a custom fiberglass mounting setup.

The ER tanks taught me something that many veterans have already told me. The more you deviate from the plans, the longer it will be until it flies. Right now I am kind of tired of deviation so I decided to just buy the Duckworks kits and be done with it.

I'm still not convinced they are the best solution, but they are easy to install, have a proven track record and quite frankly they wont be used very often during the life of the plane. I sometimes spend too much time worrying about things that dont warrant it...this is one of those times. There are more important things to worry about...pitot tubes, servo mounting brackets, nav/position lights, strobes, etc.

So, I called up Van's this morning and ordered two and had them put in my fuse kit which is getting ready to be shipped.

Thursday, March 10, 2011

Help is on the Way! HOBBS 507.0 hrs

On monday, my retired father is flying into the ol' Mile High City to give his son a helping hand on the project. I have been trying to get him out here since the project started, but the logistics hadnt worked out until now. It will be nice having him around as he's had prior experience with RV kits and spent most of his working life as a machinist, mechanic and skilled craftsman.  I'm definitely looking forward to it.

Tonight I am heading over to fellow RV builder Brian Beatty's project to help him rivet his top wing skins. Brian has visited my project previously, but this will be my first visit to his. This will be great experience for me as I am literally knocking on the door of doing my own wing skins.

This weekend, I will be finishing up my last fuel tank. From there, it should be smooth sailing to finish up these wings and get started on the fuse.

Saturday, March 5, 2011

Tank Stiffeners HOBBS 503.0 hrs

The project is a little bit of a grind right now, I feel like I am laboring to get over this last hump on the wings... the last fuel tank. Sometimes, even though its not much fun, you just gotta roll up your sleeves and get after it. This morning I did just that.

I can now check the following off the 'to do' list: Stiffeners, fuel filler, fuel drain, extra holes in the skin plugged, nose reinforcement plates riveted onto the end ribs and some last misc ProSeal work on the 3rd tank. This was a good chunk of ProSeal work right here, I pretty much went non-stop for about 4 hrs...several batches of ProSeal. It was a productive day.

Let me add, as I was doing each of these steps...it certainly crossed my mind, barring any unusual circumstances, this is the LAST time I have to do this! I can't tell you how good it feels to close in on being done with ProSealing fuel tanks! I know, I know...its my own fault for wanting four fuel tanks. ;)

Oh...and I crossed the 500 hr thresh hold! Its cranking along...

Friday, March 4, 2011

Johnson Creek Video HOBBS 499.0 hrs

I saw this video on Doug Reeves' VAF homepage this morning. It was submitted by Scott Schmidt, who has an exquisite RV10 and seems to be a very active aviator. He always seems to have great travel pics and writeups from places he goes with his -10. The video is a little long, but has some good flying footage and scenery. Enjoy.

I have never been to Johnson Creek, Idaho but have seen enough pics and video footage that I feel like I have. It looks like 'disneyland' to a guy like me! Mountains, camping, campfires, airplanes, pilots, grass strip, not accessible by road...whats not to love?

I cant wait to take the -7 there when she's done. I think I will have plenty of friends that want to accompany me, both Bryan Raley and Sean Blair have expressed their desire to also visit Johnson Creek. One day...until then, KPR! :)

Thursday, March 3, 2011

VP and Dynon Team Up! HOBBS 499.0 hrs


http://www.verticalpower.com/

I am on Vertical Power's mailing list and got a nice email from them recently. I really like the Vertical Power system, along with the Dynon SkyView. But up 'til recently, they hadnt joined forces yet. Dynon had no software to integrate with the VP systems. Well, they do now! Thats great news! Although I havent decided if I am going with the SkyView or AFS, I now at least have the option.

On a side note, I had emailed Dynon about 3 months ago asking when (or if) they would support Vertical Power. I was told at the time, it wasnt a priority and not on their short-term roadmap.

Well, kudo's to the customer service at Dynon's because that same gentleman (Dan Howe) personally followed up with an email to notify me of this development. That kind of customer service certainly makes a difference to me and where I spend my hard earned money...thats a smart business play.

Fuselage Balance Check Mailed HOBBS 499.0 hrs

Sent off my check to Van's for the balance of the Fuse kit yesterday. I know, a check is a little old fashioned, but when I paid the balance for my wings I had a daily limit imposed by the bank on my debit card. So I had to process two payments...not a big deal but kind of a pain. Thats why this time, I opted to just mail a check and be done with it.

They claimed to still be on schedule for a 3/14 week delivery...so it wont be long now. hee haw!

I'm going with a Bell tailwheel fork (on order) instead of the the stock Van's version. This fork will offer much better clearance and just appears to be more robustly built. My friend, Sean Blair, purchased one and has already recieved his...he tells me I will be happy with it. :) Consequently I had Van's delete the stock fork (WD-102) and steering arm (VA-154S) from my fuse kit (about a $50 savings).


In place of the steering arm and chains that Van's offers in the stock kit, I am leaning towards the steering control arm assembly offered by JDAir. There wont be any unsightly chains hanging off my baby! And, from what I've been told the rudder control response is much more precise with a control arm vs. chains. Looks like a pretty nice setup, a little pricy, but hey...this is aviation.

http://www.jdair.com/