Ron's RV7 Aircraft Factory


Welcome to my personal blog. This site was created as an informal description of my build progress in the construction of a Van's RV7 aircraft. A place where family/friends/builders/curiosity seekers can follow along. It is not intended to be a detailed description of every step in the building process as that would be much too time consuming. There are plenty of sites that do a great job in that arena, that is not my intention with this site. My intention is for this to be a philisophical/motivational/inspirational account of the emotional ups and downs of the life changing journey...and it will change your life. I hope this will give you an idea, through my eyes, of what its like to make this transformation. A note to other builders, I am not an expert so do not put your safety at risk by attempting anything you see on this site until you have done your own research, or send me an email so we can discuss it. Any deviations from the plans are not approved, nor endorsed by Van's Aircraft or myself. Thanks for visiting.


Monday, December 31, 2012

Goodbye 2012!! HOBBS 1664.0 hrs


Well, amazingly, its that time of the year...AGAIN...time to flip that calendar to 2013. Where did the year go? Funny how they just keep clicking by faster and faster?! Its been a great year and I am very excited to see what's in store for me next year...it should be epic!

Lastly...a couple of personal announcements. Happy birthday to my dear ol' pop, Ron Sr....yep, he is a New Years Eve baby! His birthday is included in my reserved N-number for Wablosa...N531R. Also, I became an uncle for the fifth time on Dec. 21st...welcome to the family Ethan and congrats to my sister Denise...only sixteen more years until your solo little guy!

KPR my friends, be safe, hug your family and friends, celebrate your good fortune and I'll see ya all next year!


Center Console Construction Starts HOBBS 1664.0 hrs


I started on my center console construction finally...been putting this off long enough. I plan to make it in two parts...this one you see here, and then a forward section. I want it to be as easy as possible to remove for maintenance. Pretty straightforward so far.

I used some cardboard and made a template...transferred it some 0.040" alum sheet and started cutting. I actually used my Mitsubishi Eclipse console as a guide for height and angle. This center console will also look much like what you'd see in a Diamond-20 (which I used to fly a lot).


Once I got the pilot side just the way I liked it...easy enough to make a duplicate for the other side.

..

Adding some angle alum to secure it to the floor pans. I will add more later, this is just the first one.


And to the end the day, I had to throw my seats back in to see how it was looking and of course sit in the cockpit to see how it feels. The height feels good...as does the overall comfort of it all. It will be cozy...but comfortable I think. Stay tuned...much more work to be done on this project. I really was enjoying this...building from scratch is pretty fun to me.

Aveo Nav/Strobes HOBBS 1664.0 hrs


Again, I couldn't find any instructions in the Van's manual about how to install my tip covers, nor did I research any blogs, so I just winged it...pun intended. This is what the cover looks like from the factory...a quick glance will tell you that this is used for both wing tips. First task is splitting it into two pieces. I just sketched a line down the center and used a cutoff wheel in the dremel.
 
At first, I wasn't sure the dremel was the best tool for cutting this stuff. My guess is this is polycarbonate (PC). The main difference between PC and Plexiglass (which the canopy is) is PC is softer and not a brittle...i.e., it wont crack as easy but it will also scratch easier (which is why we don't use it on the canopy). So, working with it is a little more forgiving.
 
Anyhow, cutting it with the dremel caused some melting and even a little smoke. The melted PC was easily removed however and so I used it throughout the process...mainly because I couldn't think of a better way to cut it. Just take your time, it will work fine.

 
Once you have it cut in half...do some fitting, try your best to line up the curvature...this is about where I thought it looked best. I temporarily taped it in place and started laying out my finish cuts.

 
I suppose you could just a sharpie to do this...but I thought this electrical tape would work better as I didn't want to try and clean sharpie marks later. Of course, I laid out this tape while is was in place on the tip.

 
After several iterations of cutting, trimming and sanding...this is what I got. Not too shabby, I like it.


Not sure if its the Mechanical Engineer in me, but I am paranoid about wires rubbing in the vibration prone environment of an aircraft. Here you can see I added some protective flex guard to the wire harness. Probably overkill...but it is what it is.

 
Here she is mounted in place...I just centered it top and bottom and tried to bias it toward the front of the wing for better visibility...no rocket science here. I tell ya, Aveo makes a nice looking product...I really think this puppies look sexy!


Nut plate installed...inside view.


Most everyone these days only puts two screws in these covers...right in the corners. Doesn't seem like much to me, but plenty of planes flying like this so I am following suit.

 
Let me add...I match drilled the holes with a #40 bit (little chance for cracking) and then opened up the holes with this little grinding tool in my dremel. Worked just fine...cleaned up the hole and...no cracks. The PC is more forgiving, but still be careful so you don't have to redo it. 

 
Hooked it up to my power supply to see some pretty lights....cool eh?

 
And a little video to show the Nav and strobe in action...love these babies. If you were wondering, these are LED lights...low power and will last forever.

Air Inlet Rings HOBBS 1664.0 hrs

 
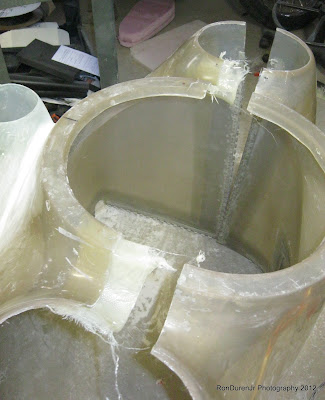
There's been a flurry of activity in the factory to end 2012...let's see if I can get you caught up on this last day before we flip the calendar to 2013. First order of business was continuing my cowling work, I tackled the aluminum air inlet inserts. The top two are formed in place with "flox". I suppose you could permanently attach the lower halves, but you must...for obvious reasons, make the top cowl removable. I made these two inlets removable...both top and bottom.
 
The idea is to put them in place, pour a fairly wet mix of flox into the cavity and let it form around the groove in the alum inlet. Sound simple enough...right? I had to make two attempts to get it right...it turns out to be a little trickier than first imagined.
 
This first pic just shows my initial fitting of the rings...I just wanted to do a sanity check that everything looked good before removing the cowling and starting to bond things in place.

 
My Ram Air unit is lining up nicely now...I emailed Rod and he set me straight, one of the spacers had a 3 deg offset machined into it...and I had it backwards. After flipping it around...all looks good. But for now, I'm not messing with this inlet ring.

 
A shot of how the bottom cowling surgery turned out...although, I've already shown this previously.

 
I added a "lip" to the bottom cowling...and here you can see one of the two screws that will fasten the two halves together right next to the spinner.

 
I wanted to be able to split the two halves once I poured my flox into the grooves. The question is how? Well, use that modeling clay you bought...you did buy some modeling clay right? This really worked well (the second time...when I did a better job with it...the first time resulted in me not getting it all the way across and having to break apart the two halves and start over!!)
 
By the way, at this point in the build I am pretty much doing my own thing... I have really not looked at any other blogs for awhile. I kind of enjoy figuring this stuff out on my own at this point...so, these tricks/tips are just what I've come up with...they may have been done by others, but I wouldn't know. So, that is just a disclaimer...these tactics may or may not be the best way to do this so make your own judgements.


I wanted the rings to be in line with the face of the spinner surface...so I came up with the idea of just putting the cowling face down on a flat surface and then using gravity to let the flox fill in the slots. Here you can see my flox on one half and also the modeling clay being used as a "dam" or break point. Later I filled in the other side.
 
And I forgot to mention, don't forget to use some kind of mold release on the alum ring if you don't want it permanently molded in place. I used my hair spray again...but car wax supposedly works well too.

 
The next day, with some coaxing, I popped the two halves together. Worked out pretty well. Those rings are not going anywhere...its a tight fit. The next task was to mix up some micro balloons (white stuff) and do some finish work. This will take a couple iterations, but this is the the start of the process.


Thursday, December 20, 2012

Ram Air Transition HOBBS 1645.0 hrs

http://www.holidaycardcenter.org/aopa/product/2199/as_top_selling_cards
Let me start by saying, this will be my last post before Christmas. Thanks for reading and I hope you and yours have a wonderful holiday season!! Its funny, when I pause to reflect, I realize this will be my last Christmas as an active builder...at least for THIS airplane. We're getting there... :)
 

The other night, I am wandering through my local "Aviation Hardware Store" (aka Home Depot), looking for something totally unrelated to my Ram Air unit and I see this little baby in the plumbing section. Immediately, my little light bulb goes off...and I think, hmm.
 
Almost every time I am in Home Depot I get bombarded (multiple times in the course of five minutes...which really annoys me by the way) with the help asking me..."can I help you find something?" I usually say "no thank you." Why you ask? Because I really don't know what I am looking for until I see it!! :) This was another one of those moments...I had no idea this is what I was looking for. 
 
I had been trying to come up with a clever way to bridge the gap from my Ram Air unit and the alum intake insert. Most guys just use an alum tube...and that was fine, but I wasn't crazy about it. The problem is, whatever you go with can't be permanent...it needs to be easy for the bottom cowling to come on and off. If you do a removable scoop (screwed in place) this task is much easier.
 
So anyhow, this puppy is a 4" to 3" transition, its an $8 part, is rubber so its flexible, designed for fluid flow and comes with two hose clamps. Sounds perfect for an airplane. The first problem is, its too big for my Ram Air unit. The 3" specification is for pipe size...which is inside diameter, not outside.

 
I then come up with the idea of buying a section of 3" black PVC ($7). The rubber transition piece with fit perfectly over the top of this pipe since that's what its designed for. But...the challenge continues, the ID (inside diameter) of the pipe is too small to fit over the insert on the Ram Air unit, which measures about 3.2" So, I take my 1" rotary file chucked in my drill and get the ID whittled up to 3.2". Bam...it now fits, progress! Here you can see it in place for fit checking.


I then cut the PVC pipe down to about 1" in length, it really is just acting as a spacer...not an extension. I then installed the rubber transition over the top...I like the way this is looking--professional. Still not there yet however...

 
I was pretty proud of coming up with this idea, then I was poking around on Rod Bower's website and see that many RV10 guys do something just like this with the bigger Ram Air unit that Rod sells. D'oh! And here I thought I had an original idea...nope, somebody beat me to it. But that's ok, I'm fine with that. I still don't know for sure this is going to work for me...haven't played around with the bottom cowling yet so stay tuned, it shows promise however.


When you are doing fiberglass work, you always need to have other stuff to do. You do a layup and then set it aside and work on something else while it dries, and then come back to it later. I was still working on my cowling while I was messing around with other stuff. Here are my "lips" right after I popped the two cowling halves apart (I used box tape and hair spray on the parts I didnt want to bond to...my usual mold release method). These lips will close up the seam between the cowling halves and also be a place to secure the halves with some screws. I will do some trim work next to clean these edges up. Watch as this evolves...if you cant picture it now, you will see what I mean soon and it will make sense.

 
I am almost done with my plenum/baffle work...been doing that as a filler project while I worked on the cowling. These pics show my strategy for closing up this gap above the oil cooler. Some guys just extend the fiberglass...I decided to just fabricate a piece of alum to do the same thing.

Monday, December 17, 2012

RV Websites HOBBS 1638.0 hrs

http://rvairspace.com/

Most of my readers know about Van's Air Force (VAF), its a great site and one that I have frequented many, many times since even before I started building. In the RV world, VAF is king, and its a well earned status. Doug Reeves has done a real nice job developing and maintaining it.

Lately a few more RV specific sites that show promise, have cropped up. I have talked with both owners and found them to be real good guys. I just wanted to give my readers a heads up of their existence, if you want to try something different or just want to supplement your VAF reading, try these out.

  • RV Airspace was formed by Glenn Brasch. Glenn and I have exchanged several emails and I am a member of his site. You'll find some distinct differences on the RV Airspace forums vs. VAF, like openly discussing accidents to learn from them. I am in favor of this and get very frustrated that VAF doesn't allow this kind of discussion in any form.
  • RV Nation was formed by Scott Brown, whom I've also corresponded with several times as well. He has put together a real professional looking site and has some really nice looking apparel (t-shirts and polo shirts) with the RV Nation (see below) logo...which is pretty cool looking. I plan to order one for a Christmas present for myself. :)
Anyway, I have no horse in the race with either of these sites...neither owner lobbied for me to advertise their site, just thought they were both worth sharing. Enjoy and KPR!

http://www.rv-nation.com

Cowling Surgery HOBBS 1638.0 hrs

I'm going to walk you through my cowling surgery. If you're wondering why I am going through this process, read my previous posts on this topic. This is mating my Sam James cowling with the intake scoop that Rod Bower sells for his ram air unit. This may seem difficult, if you don't have experience with fiberglass, but its really not a big deal with some basic skills. Except for the sanding, I enjoyed this...it was pretty fun and I like the way it came out.
 
Since pictures are worth a thousand words...here are a whole bunch of them for your viewing pleasure.
 

From my previous post, you can see in this pic...I originally planned to do my own 'custom' scoop instead of buying one. That's why you see this pink foam. This strategy is old news at this point, but this gives you an idea where I started from. Of course, this is the Rod Bower scoop that I bought in its untrimmed state.
 

Initially placing the scoop to see how it looks/fits...


Remove the pink foam...you can see my initial cutout...it pained me to cut my cowling up like this, but you'll see it gets worse before it gets better.


Scoop cleco-ed in place for initial fitting...off the airplane.


Next, I move it to the airplane to see how it all lined up with the ram air unit. I had to do some trim work to get it the way I wanted it.


Removed from the airplane, getting it ready for bonding. You can choose to make this removable also by attaching it with screws. You can probably guess my thoughts on this...my entire cowling has no visible screws, so placing screws here was not an option for the look I wanted for my airplane.


You can see that the width of the exhaust outlet on the Sam James cowl is narrower than the Rod Bower version...and I would guess the Van's stock cowling as well. So, this was my first dilemma...how to make this work? Create it from scratch? Or....work smarter, not harder.


The surgery continues...more cutting to fit the scoop.


A view from the inside...


Here was my strategy for the wider exhaust outlet...use the existing one, cut in down the center and then reattach.


Scoop in place, trim work done on the cowling...


Reattaching my two halves...spliced together with temporary pieces of aluminum just to hold it nice and straight. Don't worry at all about drilling holes in the cowling for cleco's...we'll fill them easily later.


Voila...she's now almost ready to bond everything in place...just need to do some additional prep on the surfaces.

 
Here is the final cutout...gosh, that was a lot of fiberglass that I paid for and then discarded...painful, but I think it is not uncommon. Surgery of this kind is pretty common for most builders I believe. Notice the bonding surfaces have been sanded and cleaned with acetone.

 
I cleco-ed a scrap piece of alum to bridge the gap between the two halves. This will give me a nice smooth transition...use some kind of mold release on this piece.

 
After fiberglassing...notice how I laid the fiberglass layups a little long, we'll trim this to size later. The seams you see will be easily filled with micro later.

 
The start of the finish work...adding micro (the white material), forming nice transitions and fillets (I'm all out of my West Systems filler-the rust colored stuff-that I used everywhere else on the plane...standard micro works fine too and is cheaper). This is just the first application by the way...it will need more later to get it ready for paint, but it gives you an idea about the process.

 
Fitting my aluminum inserts. This one on the scoop will be permanently floxed/bonded in place. But first, you will need to do some trim work to get it to fit. Don't trim any more than you need to since you will just be adding it back.

 
This is about where I expect the insert to reside...I will use flox to make a nice transition from the insert to the fiberglass. Right now I am just getting an idea of where it will sit in its final state...which will come later.

 
I used a piece of manila envelope from Van's to fashion an extension on my ram air unit so I can check alignment. File folders work good too if you have one handy...paper/cardboard mockups are always helpful when prototyping.


Since I was feeling pretty good about my scoop at this point, I now wanted to work on the rest of the cowling...which I will post more pics later. Here I am temporarily fastening the two halves together for more fit checking...again using scraps of alum as fastening devices.

 
Removed from the plane and then attached together with the side hinges. I need to make fiberglass 'lips' to bridge the seam between the two halves. First task is get it all lined up nicely. Although not shown here, make sure you leave a small gap (1/16" min) for paint allowance.


A parting shot showing the inside of the cowling...just to give you an idea of how it looks. My next posts will continue this fiberglass work on the cowling...adding the aforementioned lips, and also the cowl pin covers. Stay tuned...