 Finally getting around to posting this, I finished the left elevator a few weeks ago and have already moved onto the empennage tips. Its safe to say all of the metal work is done for the empennage, from here on out it will just be 'glass work. The trim tab is not 100% done yet, but it just needs a little fine tuning and shaping, which I will do later. The left elevator is a little more involved because of the trim tab and the servo motor. Beyond that though, it is identical construction as the right elevator. So, rolling the leading edge needed to be done again. I felt a little more comfortable with this because I have now done it three times...with that being said, I'm still not going to miss this task, its kind of a pain. For aerodynamic reasons, the shape is not critical because this is never exposed to the airflow. But I do worry about induced stress at the rivet line in my leading edge and cracks forming because of this. We'll see as the airplane ages how well I did. It is something, that as the builder, I can be sure to keep an eye on as the plane ages. Another one of the cool things about being the builder, I will be completely intimate with every detail of the construction. That, in of itself, will make my flying safer.
My leading edge rolled and riveted, it'll fly!
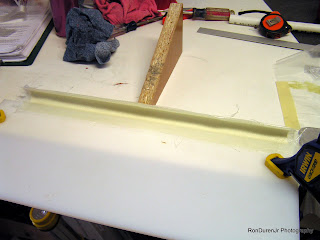
I needed to find something to create a 'mold' for a custom semi-circular fairing for the leading edge of the trim tab. So I found a piece of PVC that was about the right diameter for the job. Cut it in half and 'voila' I had a suitable mold. I used some clear box tape and hair spray for cheap mold release and the part popped right out when the resin had set up...nothing to it.
Here is a shot of the part after removing it from the mold. This is my first attempt at making a custom fiberglass part, came out alright. I wanted a way to close the gap on the bottom side of the trim tab to cut down on drag. I have not permanently attached this yet...still mulling this over whether to actually incorporate this into my design or not, but I probably will. Just trying to think about all scenarios that may cause me problems before installing it.
Here is a shot of the part after removing it from the mold. This is my first attempt at making a custom fiberglass part, came out alright. I wanted a way to close the gap on the bottom side of the trim tab to cut down on drag. I have not permanently attached this yet...still mulling this over whether to actually incorporate this into my design or not, but I probably will. Just trying to think about all scenarios that may cause me problems before installing it.
Here is another shot of the trim tab as I shape it. You can see I have sanded the trim tab skin in preperation for a coat of filler primer later.
And of course, the other side is also closed off...once again for aerodynamic purposes.
With this design I am able to really close up this gap nicely. I am not quite done yet, but its getting closer to being where I want it. I really like the look of this design deviation. I have to admit, moisture retention in the foam and added weight are concerns. I will address these topics again later.
Here is where my servo motor will reside for the electric trim. You can see I painted the inside of the skin in this area for added corrosion protection and for a more finished look if this area is ever accessed. It sure made me glad I wasnt doing all of the skin interiors.
I added some double stick tape to add a little height when the servo motor was mounted because there was an interference with the mounting screws. You can see it in the following pictures if you look closely.


Thanks for the post, its always nice to see someone making progress on his project.
ReplyDelete