Ron's RV7 Aircraft Factory


Welcome to my personal blog. This site was created as an informal description of my build progress in the construction of a Van's RV7 aircraft. A place where family/friends/builders/curiosity seekers can follow along. It is not intended to be a detailed description of every step in the building process as that would be much too time consuming. There are plenty of sites that do a great job in that arena, that is not my intention with this site. My intention is for this to be a philisophical/motivational/inspirational account of the emotional ups and downs of the life changing journey...and it will change your life. I hope this will give you an idea, through my eyes, of what its like to make this transformation. A note to other builders, I am not an expert so do not put your safety at risk by attempting anything you see on this site until you have done your own research, or send me an email so we can discuss it. Any deviations from the plans are not approved, nor endorsed by Van's Aircraft or myself. Thanks for visiting.


Thursday, February 21, 2013

Tail Strobe HOBBS 1748.0 hrs

Let me start by saying that my blog posts are typically about a week behind the actual Factory progress, so what I am showing here is already old news to some degree. With that caveat, this rudder strobe issue is not nearly as hard to do as I was trying to make it out to be. More on this in next week's post, but it is essentially done at this point.
 
 
First, I soldered on some longer leads to the strobe. In hindsight, some blade connectors would've been a little more elegant solution so the strobe could be more easily removed. 
 
I am running shielded wire from the VP-X to the DB9 connector for the rudder...but you can see, from the strobe to the DB9 is unshielded. I'm hoping this distance (~24") is going to be ok for EMI? I can change it later if it is.

 
I plan to permanently attach my rudder cap via pop rivets and micro to blend it in...plans say to screw it on, I don't see a good reason to have to remove it outside of damaging it and I'll take that risk. Many pilots say they haven't removed theirs in 20 yrs of flying. I don't like visible screws, so its an aesthetic issue for me. With that said, you will need to carefully consider how to remove/replace the strobe if needed. I put a piece of conduit down the center...I fiberglassed a bulkhead into the rudder cap which I will show you later.


Because the rudder is permanently attached, I decided to make a removable front cap...just in case I needed to see or access the inside of the rudder cap at some point. This is what I came up with. This is still being developed, but this is the start of it.


I fiberglassed in a recessed surface for attaching nutplates, same concept as the oil filler door.


Once that is done, cut my access hole...it wont give me much access...but it is something, and it didn't cost me much to do it...just some time. The screws that hold this cap in place will be hidden behind the fuse.

 
One quick shot of my 'final' solution for the elevator trim wire. I think...? I may reevaluate later, that red zip tie may want to cut through that shrink tube with wear and tear. Otherwise this works well. You can see I put a piece of polyurethane tubing around the wire for abrasion protection. I am finding all kinds of uses for this stuff.
 
Also, make sure you add these bolts/washers on the elevator horns BEFORE attaching the Vertical stab! I had the VS all finalized and happy, went to mount my elevators and realized I couldnt access them worth a damn. Off came the VS...these are the things that novice builders don't always catch, and take time to navigate.

 
Moving to the tailwheel assembly as it I get the tail ready for flight. I somehow misplaced my locking pin and spring...maybe I will find it later? I needed to order an internal rudder stop (pics later) and I knew Flyboy Accessories had one...so I ordered a couple other items while I was at it. The aforementioned locking pin...and a couple other goodies.
 
You can see how this installs in the Bell fork....


Depress the spring and slide the fork on...followed by the control arm.

 
And voila, there you have it...nothing to it but to do it.

 
As I was doing fiberglass work on the rudder I needed other jobs to keep me busy. I have the last bottom skin on each wing to rivet in place...may as well use that as a filler job to stay busy. First task was riveting the pitot mast in place. As you can see, I also siliconed it for a good seal. I would've used ProSeal but I am out. This is paintable silicone that I used to attach the antenna's and is recommended on the hints for homebuilders video for antenna's so why not my pitot mast I figured?


One other thing I purchased from Flyboys was this canopy breaker. Its bigger and heavier than I anticipated...but it does look like it would do the job of breaking the canopy. I don't have any idea where I am going to put it in the cockpit yet...but at least I have it.


Lastly, I seen this product from Buller Enterprises, Inc. on VAF and was also mentioned by Sean Blair to me. Although fundamentally, you only need one, they are sold in a set of two. No worries, it looks better to have them on each side and they were only $40 for the pair. Not something a builder couldn't do himself...but a nice out of the box solution to save time. The machining on them is a little rough, but otherwise I was happy with them and its one less thing to worry about.

Thursday, February 14, 2013

Back in Action! HOBBS 1730.5 hrs


Well boys and girls, the Factory is officially back in action! I finished off last weekend with a good run of work and this week has been real good so far. I expect some high hour weeks upcoming now that the move is behind me.
 
My first day working at the hangar went like this. I worked the first half of the day Saturday, walked down to Sean's hangar and we had lunch at the airport diner...came back after lunch and worked the rest of the afternoon. I then showered at the hangar (did I mention we have a shower and two bathrooms?), had quick a beer with my plane to cap off the day. I then drive to dinner followed by the movie theatre to see Top Gun in IMAX 3D with eight others of the RV crowd...(Sean & Diana, Gary & Caroline, Chuck & Brenda, Scott & Deb).  The movie was cool...the flying scenes were quite amazing, made you feel like you were in the cockpit. A wonderful aviation day!


The pics I promised of the brake lines on the gear legs. Again, this is 1" 'monster' tape with some polyurethane tubing for added protection. It came out good, I liked this solution.

 
My strategy now that I am in the hangar was to mount the tailfeathers for flight...and then work my way forward, crossing things off the punchlist. I was somehow thinking...this will only take me an hour or two since I've had the tail on countless times already. Well, I forgot all the little things I still had to do...I see a theme starting already...the "little things".
 
I needed to add nutplates and tapped holes in the longeron for the empennage fairing. And the biggie...I hadn't addressed the wire routing for the elevator trim tab and the rudder strobe. Both of which are not trivial...not particularly difficult, but it does take some time to think about and then implement. So...I am still working on this as I write this. I have the elevator trim tab wiring done...now moving to the rudder. I have a cool idea for the rudder...


Here I am trying to decided where to punch a hole in the aft bulkhead of the fuse to run the wire into the rudder cap. Sound simple...but its a little tricky if you want a nice setup to easily removed the rudder if needed. Like I said, after expending quite a few brain cells...I think I have a pretty clever idea...wait and see.

 
Oh, also...I needed to mount my ELT antenna. Although intended to mount on the top of the fuse...most RV builders mount them under the empennage fairing. I plan to go this route as well...hopefully my DAR doesn't give me grief over this as I have heard some do.
 
As you can see, I took advantage of the swept mounting angle to just enlarge the center tooling hole  on the bulkhead. I still need to crawl in there and finalize the nut since I can't reach it from the outside...but that's where it's gonna sit.

 
This is nice...a five conductor bundled wire for the elevator trim motor. I think this came with my Vertical Power harness? Very handy since it comes from Ray Allen and all the wire colors are exactly the same as on the motor. I thought this was shielded wire from the appearance...but its not, must not be needed?

 
This is a pretty standard wire routing path for the elevator trim for RV's...the path Van's recommends is problematic because of the jackscrew on the trim motor. It occupies the same space as the wire and would probably rub or even get caught up. I didn't get a picture, but you'll understand what I mean when you get to this part. So you can see, this provides a very nice way to remove the left elevator when needed...just unplug the DB9 connector and an adel clamp.

 
And a quick fit check to see how it all fits under the empennage fairing...looking good! Next up is the rudder strobe wiring path.


Lastly...moving to the hangar meant I needed more hose. I didn't like my cheap harbor freight air hose...heavy and stiff. Sean showed me his polyurethane hose from Home Depot and I thought...wow, this is much nicer than my old hose. I certainly don't need 100'..but it was only $40 so this was a no brainer. Very lightweight and flexible.

New Work Area HOBBS 1730.5


With the "move" now in the rearview mirror, I've been busy getting my new work area at the hangar setup for the resumption of construction activities. The inertia of stopping and starting a project like this cannot be underestimated. I lost probably about a week and half of construction progress because of the move.
 
The good news is...the shop looks great and I am thrilled to be in my new home! I've turned into a real nice work area. I feel like a little kid every time I walk into "my" hangar. My aviation dreams are prioritized something like this....
  1. Own an airplane
  2. Own a new airplane
  3. Own an airplane that I built
  4. Own (or rent) a hangar 
As you can see, the hangar part is pretty cool to a guy like me, second only to owning an airplane...and now checked off the list. :) You will also notice...all of those should soon be a reality. It is amazing to have the opportunity to live your dreams.

 
Here are a few shots of how my corner of the hangar is shaping up. Bob really did a wonderful job providing a first class work area. The bench and pegboard you see was provided by Bob. I did get some razzing that the pegboard is for hanging tools...not pictures. But...hey, I am a visual guy, I make no excuses for that...I like my pictures and a nice aesthetic appeal. On the flip side...a couple of my move crew said they wanted me to set up their hangar too! haha


Wednesday, February 6, 2013

Formation Flying HOBBS 1719.0 hrs

 
Jim "Gringo" Gray and Bob "Wizard" Markert, along with the rest of the Renegades flight team have started a formation flying site dedicated to teaching formation flying and eventually getting your FFI card if you desire. Check out the site, there are some great training documents available for study/review. I will definitely be participating in this at some point down the road with my plane. I've also added this link to my website for quick reference.

Transition Training Scheduled HOBBS 1719.0 hrs


I officially reserved a spot with Mr. Alex De Dominicis for my transition training. My training slot is April 20th-22nd near Dallas, TX. I wanted to do this training as close to first flight as possible so I'm not sure how this timing will work out? But...Alex is so popular that his available training slots were filling up fast. I would rather get it done early than have to postpone my first flight.

Some thoughts, if you read my blog regularly you know my thoughts on transition training. Its a requirement for me personally and should be for you too. Most insurance companies are now requiring it, but even if they don't...get some transition time with a good instructor. Van's has several listed on their website along with a recommended training syllabus. It can only help the cause...you remember what that is, keeping your arse and airplane in one piece.

Typically Alex's training program averages 4.5 to 5.0 hrs for most pilots (I think I need 5 for insurance?). He usually does flights on the weekends, with Monday as a weather day. So I will probably fly via the 'aluminum tube' on Saturday morning, get a hotel...do one introductory flight Saturday afternoon and then, weather permitting, finish up on Sunday.

Lastly, I chose Alex for several reasons....
  1. I don't know of anyone locally that provides RV transition training (and is insurance approved)...you need a special waiver from the FAA to do flight instruction in an E-AB aircraft.
  2. Alex has a sterling reputation for running a very good program.
  3. I would rather go to Dallas than the Pacific Northwest to do springtime flying...much more chance of getting flying weather in Dallas.
  4. Airline tickets from Denver to Dallas are pretty reasonable...and I've always liked the Dallas area so it will be a fun weekend getaway.
  5. Alex has an RV7....not a 7A (or RV6), I want and need TW time.
  6. Alex has on board air conditioners in all of his planes...might not need this in April, but a nice option when doing pattern work on a hot day. 
There ya go, leading up to my time with Alex I will be ramping up my flying activity/frequency...Citabria time and a few more aerobatic flights with Dagmar in the Pitts to do more spin training and refresh some of my unusual attitude stuff.

Monday, February 4, 2013

Move Day!!! HOBBS 1719.0 hrs

Well, its over and done with...the move that is! Saturday morning, Feb. 2nd, 2013 my baby girl left home to go out into the world and spread her wings. I've been trying to come up with an analogy to give you an idea what it feels like to move your bird to the airport. The best I could do was its somewhat like having your daughter go off to college. Maybe not exactly the same, but as I said in a prior post, exciting and bittersweet all at the same time.
 
Mostly I am very excited for this new chapter, but I would be lying if I said I wasn't just a little sad to see this chapter ending. My airplane is no longer right outside my door just feet away from where I live...that's surreal to say the least. It was also a time for reflection about how far I have come since starting on the horizontal stabilizer over 3 1/2 yrs ago....to drink it all in. I still, even after all this time, I sometimes wonder to myself, "am I really doing this?...am I really building an airplane?" Its cool.
 

My Dad arrived in Denver Friday about noon. I picked him up from the airport and sure enough, he was raring to go. I wanted to play it by ear to see how much we were going to do Friday afternoon, considering he just flew in...I thought he might be tired and want to relax a little. But no dice, I think he was just as excited as I was to dig right in and get started. Consequently, we threw some stuff in the back of my pickup and headed out to the airport. I also was anxious to show him my new hangar since he hadn't seen it yet.
 
When we arrived, unbeknownest to me, Stephanie (from the Renegades) and her partner Carl had their "new to them" RV7 parked exactly in my spot in the hangar. Bob had let them use the hangar for some maintenance issues they were having with the flaps. They assured me, they would be vacated by the time we arrived on Saturday with Wablosa. I wasn't worried...


It was great to see a finished RV7 parked exactly where my plane will be...and it was a nice looking RV7 to boot. What great motivation to get mine flying.


Moving day arrives...the plan was to meet at my house at 9am. Gary Zilik was the first to arrive at 8am. I had been up since 5am getting things organized. Like a five year old, I felt like it was Christmas morning and couldnt sleep! First things first, we loaded up my pickup again with the air compressor, toolboxes, etc.

 
I pulled my loaded pickup out of the driveway and then we wheeled Wablosa into the daylight for only the second time in her young life. Always cool to see...now we awaited Bill Shook to arrive with the trailer.


Brian Beatty and Sean Thomas discuss securing the wings in the wing cradle.


Gary Zilik helps out with the wings...


Scott and his grandson Dakota look on...I think 'Kota was still waking up...but that didn't last long as he was buzzing around "helping" out with moving activities in no time.


Bill Shook and the enclosed trailer arrive...sweet, game on! Lets move this puppy!


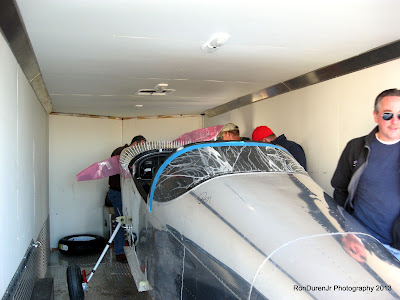
The gear legs fit the trailer width, no problem, but we couldn't get past the wheel wells on the trailer. Gary mentioned that we could lift one side over the wheel well and get it in that way. I said sure, lets give it a shot...Gary and I both were straining to lift that one side...she was a little heavy but we managed and she fit real nice.


You can see, there wasn't a lot of room to spare. At this point I thought we would just get the wings on a second trip as I didn't think we had room for both the fuse and the wings??


After some discussion with the moving team, we figured we could swing the tail to one side and get the wings in as well. After some convincing I agreed...lets give it a try! You gotta love airplane builders...we are a resourceful group, always a 'can do' attitude. I can't say enough about how grateful I was for the moving crew I had helping me.


We decided to move the wings in the cradle...

 
Brian and Bill position the wings for loading...

 
Sean helps out...

 
In they go...slowly, carefully...easy does it

 
And sure enough, although it was tight...they did, in fact, fit....way cool!

 
Bob Markert had sent me a text saying that he and Jim Gray were flying that morning. Doing a formation checkout flight in a five ship group. He asked if we could keep the taxiway clear for their return at approximately 10:45am. I said, "sure, no problem." So we arrived at the airport at about 10:30am...I told the crew, lets expedite this unload, we have inbound 'bogies'. We were able to do just that...within minutes we had everything unloaded and Bill pulled the trailer out of the way just in time to watch the guys taxi on by. How cool is this?...my new home away from home??! pinch me.


Wablosa gets settled into her new home...and a fine home it will be! What a day! I was, as you might expect, pretty nervous about getting everything moved without damage. Even though I had insurance in place to cover everything...it was still a big deal to come out of this unscathed.
 
Mission accomplished...the move went flawlessly...all because of the crew I had. They really went out of their way to treat my bird with the same care and attention they would their own. I was quite impressed how everyone had great ideas, things I didn't even consider, to keep everything undamaged during transit. I owe them all a great debt! Thanks guys!
 
My moving crew was: Ron Duren Sr, Gary Zilik, Scott and Dakota Mills, Sean Thomas, Brian Beatty and Bill Shook.

 
After the move, I took everyone that could make it to breakfast to say thanks...the absolute least I could do. Its a restaurant right there on the field. Here you can see, 'Kota takes a call from his Mom while Brian studies the sectional on the table top and my Pop listens to Scott and Gary.
 
 
Mr. Zilik and Scott Mills converse...

 
Dad and I finally arrived back at the house after dark. Wow, what a day...and emotionally exhausting for me...I was tired, but oh so happy....a 'good' tired. I was thrilled it was over and went better than I could have ever imagined. It was quite honestly, a "perfect" day. There really was not one element of it that could've went better in my mind.

 
So, if you know me, as I always say...don't forget to celebrate the moments along the way. First flight is only one of many milestones to cherish during your build. I started this tradition way back when I finished the first sub-assembly, the horizontal stabilizer. Having an adult beverage and smoking a cigar! I bought a couple Nicaraguan cigars and a bottle of Scotch for Pop and I. It was time to take a deep breath and celebrate our good fortune! I never take for granted the life I get to live...nor should you.


We went out to the near empty garage/aircraft factory, lit up our cigars and had some Scotch. We talked about the day, reflected on life in general and discussed a lot of things...aviation and non-aviation alike. The topics we covered were private, between Dad and I...and it was a moment I will always cherish...thanks Dad. 
 
What an amazing day! Thanks to all who were part of it...good people, one and all. Now, lets get this baby flying!!