Over the weekend, I had my first visitors to see my project. Bob Markert and his wife Mary (RV8 builders, currently working on their wings) and John Loretz and his wife April. Although John isnt a builder, he currently flies a 200 hp RV8 and seems to have an underlying interest in building. John introduced me to aerobatics in his '8' a few months back, boy, what a ride that was! My first loop and several aileron rolls, a few of which I did myself. Samira and I spent the day preparing for the visit, cleaning and organizing the shop along with the house. I made up a batch of homemade potato salad and we marinated steak and chicken for 'kabobs'. I went out and bought a slew of beer and Samira whipped up some tasty Red Sangria.
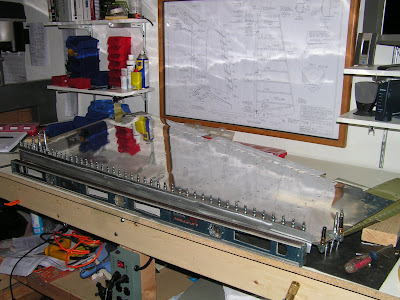
It was very cool to bring out all of my finished parts (HS, VS and rudder) from storage and simulate putting them together on the bench to form an aircraft tail! Everyone seemed to like the sight of 'airplane parts' under construction as well.
I was pleased to see the interest from the women to join us once we ventured into the shop for the tour. As I told the ladies, I dont believe building an airplane or aviation-related activities are strictly a man's domain nor should they be, so they are always welcome if the interest is there. Of course, Mary and Bob are building as a team and Samira is just about to delve into helping me as well, so I shouldnt be too surprised. And April seemed to be just as interested as the others, maybe there is a project in John and April's future...John did mention something about an RV10...hmm :)
It was a nice evening: good food, good people, good conversation (mostly about airplanes!), good beer and Sangria. A scene hopefully to be repeated again!
Ron's RV7 Aircraft Factory
Welcome to my personal blog. This site was created as an informal description of my build progress in the construction of a Van's RV7 aircraft. A place where family/friends/builders/curiosity seekers can follow along. It is not intended to be a detailed description of every step in the building process as that would be much too time consuming. There are plenty of sites that do a great job in that arena, that is not my intention with this site. My intention is for this to be a philisophical/motivational/inspirational account of the emotional ups and downs of the life changing journey...and it will change your life. I hope this will give you an idea, through my eyes, of what its like to make this transformation. A note to other builders, I am not an expert so do not put your safety at risk by attempting anything you see on this site until you have done your own research, or send me an email so we can discuss it. Any deviations from the plans are not approved, nor endorsed by Van's Aircraft or myself. Thanks for visiting.
Monday, July 20, 2009
Tuesday, July 14, 2009
Rudder Completed! Hobbs: 88.0 hrs
Finally finished my Rudder. Actually I finished it a little while ago at the 82.0 hr mark on the HOBBS but I am a little late getting this posted. It came out pretty well. As I mentioned in a previous post, Van's recommends that you dont deviate by more than 0.100" from a straight line on your Rudder trailing edge. For a couple of reasons this is undesirable, first...it doesnt look good if you have a crooked rudder and second, in extreme cases it could affect the flight characteristics of the plane. So, this was important to do a good job on it. I would say, from my measurements with my calipers and a straight edge, I am within about 0.025-0.030" from straight. Not too bad...of course I would've like it to be perfect but gosh, that would be hard to do. My process was pretty much exactly how Van's recommended it: to glue the trailing edge with ProSeal...cleco it and let it sit for three days to cure. Then finished up by riveting the trailing edge with the 'double flush' riveting technique. I also alternated shop heads every other one to provide more structural integrity. I picked up this tip on the VAF forums and I liked it.
These are the holes after enlarging. I, of course, deburred them and painted the edges for corrosion protection.
Rolling the leading edge wasnt too difficult either. I bought myself a piece of 1/2" pipe and duct taped it to the edge as Van's suggests and then took some vice grips and rolled it into shape. Finished up with my hands to tweak it. I also added a step of 'gluing' this overlap joint with RTV 'ultra blue' before riveting. I read that this is safe on aluminum. Probably not necessary, but it only took a minute and wont hurt anything.
So, all in all, I am pretty happy with the way my rudder turned out. I was a little concerned about this step and frankly it turned out to be a non-event if you are careful and follow the instructions. I am now fully engaged on the elevators....about to prime my skin stiffeners prior to riveting. Samira is going to do her first back riveting of the project on these!! :)
Here is a little added 'tweak' to the shop before I riveted the trailing edge. I routed out a pocket for my back rivet plate so it would sit flush with the table surface.
The leading edge after rolling it into shape and cleco-ed.
And this is a view of it after I glued it with RTV and used blind rivets to finish it up.
This was a slight oversight on my part. Inside this enclosure hidden from view is my rudder counterweight (essentially a chunk of lead held in place by two screws and nylok nuts). I forgot to tighten these screws before sealing it up, I swear the plans didnt mention it, I guess that was left up to me to remember. So, instead of drilling out rivets I used my unibit and opened up these small holes so I could get a socket in there. It shouldnt affect the structural integrity of the part and now I have access holes if needed in the future. This view shows one hole enlarged and one yet to be.
These are the holes after enlarging. I, of course, deburred them and painted the edges for corrosion protection.
Tuesday, July 7, 2009
RV8 Cutaway Poster HOBBS: 84.0 hrs
A gentleman named Tom Johnson from Portland, OR is producing a cutaway poster of the RV8 to sell to RV builders. I came across this on VAF. Here is a shot of it pretty much done, totally awesome! He is going to offer poster prints as well as more expensive ($200-ish) glicee numbered prints. Now that he is done with the RV8, I believe he is going to do some other models as well. Hopefully an RV7 will be in the mix, and if so, I will be ordering one of the expensive ones. That would be very cool to hang on the office wall.
Monday, July 6, 2009
Inspiration: Cool Pic! HOBBS: 83.0 hrs
I recently came across this picture online and really liked it. I dont know who the aircraft belongs to or who took the photo, but it sure is a beauty with a stunning backdrop! From the looks of the smaller tail, it appears to be an RV6. Obviously this picture was taken before final paint, hence the gray primer and bare aluminum. It is very common for builders to test fly their airplanes before doing final paint...just in case. Photos like these are great inspiration to keep pluggin' along!
Finishing up the rudder right now...trailing edge is done, rolling the leading edge next.
Friday, July 3, 2009
Rudder Trailing Edge HOBBS: 80.0 hrs
I just tackled the first 'tricky' task in my project. The Rudder trailing edge. The trailing edge used to be a continuous formed piece of sheet metal. Now, the design has two seperate skins with an AEX aluminum wedge sandwiched between them as I mentioned in my previous post. Van's recommends using 'proseal' to glue the pieces together before riveting. Proseal is a two part epoxy that is also used to seal the wing tanks. I had heard it was sticky, nasty stuff...and I have to sort of agree. It is definitely that, but it wasnt as bad as expected. Of course, I just did a small job. I used one of the 30 min tubes that Van's sells, along with the application gun also sold by Van's. Worked well, except I only used about half the tube of proseal...so there was some waste involved. But, I think the tube was about $17...so not a big monetary loss. Well, it is now glued and will sit for a couple days to set up and cure before I rivet. The good news is, it is straight as an arrow! I see no noticable deviation from a straight line. If nothing changes while riveting, I will be a happy camper!!
As shown before, this is my setup...I've been happy with this strategy...everything came out nice and straight.
Subscribe to:
Posts (Atom)